DOCX Templates
Introduction
This section will go through all the tags that are available for docx template, together with the appropriate data selection query. In this documentation, curly braces {...}are used as delimiters for the tags. Please check check general template for how to change the delimiters . The templates can be made using various softwares like Microsoft Word, Libreoffice Writer, APEX Office Edit, or Google Docs. The files should be in .docx or .docm format.


Tag Overview
The following tables shows the available tags in docx template. The three dot in the format column shows what is variable, they should be either replaced by cursor name or column name. Please note that the column names are case sensitive, you can use double quotes to force the casing.
| Tag | Format | Example | Short Description |
|---|---|---|---|
| Normal Substitution | {...} | {normal} | Normal Substitution, the data from the given column will be replaced. |
| Image Tag | {%...} | {%imageKey} | Tag to be used when the content is an image. (can point to url, file, base64encoded string) Options |
| Loop Tag | {#...} {/...} | {#data_loop} … {/data_loop} | Tag that loops over the given cursor name and repeats everything in between the tags for each record. |
| Uncertain Loop Tag | {#...} {/...} | {#data_loop?} … {/data_loop?} | Special tag, similar to the Loop tag, functions in the same way but avoids leaving an empty paragraph in cases where the record is null, undefined, or empty. |
| Horizontal Tabular Looping | {:...} {/...} | {:data_loop_horizontal} … {/data_loop_horizontal} | Tag to be used when inside a table column. Will repeated horizontally in the given column(s) for the given cursor. |
| Conditions | {#...} {/...} | {#condition} … {/condition} | Tag that checked whether or not the given condition is truthy and falsy,if falsy the content between the tags is removed. |
| Table Cell Style Tag | {...$} | {normal_with_style$} | Special tag to be used inside the table of word. Will be replaced like normal tag but extra styling can be provided. |
| Style Tag | {style ...} | {style name} | Tag to be used when the replacing content must have different style than the tag style. |
| HTML Content Tag | {_...} | {_htmlcontent} | Tag to be used when the content of a column is HTML content. |
| Barcodes and Qr codes | {|...} | {|barcode} | Tag to use when a barcode/qrcode needs to be generated in it's place. |
| QR Code Image Replacing | QR code of Tag | QR code of Tag | Replacing QR code with an image,barcode or qr code when custom styling is needed. |
| Chart | {$...} | {$chart} | Tag to be used when a native word chart should be generated, see details for specific format of what this cursor should contain. |
| Chart Templating | {aopchart ...} | {aopchart chartData} | Tag to be used near a chart that is defined and style in the template, see details for passing the data for this dummy chart. |
| D3 Images | {$d3 ...} | {$d3 image_data} | Tag to be used to insert d3 images. |
| Page Breaks | {?...} | {?pageBreak} | Tag that will insert a pagebreak when the provided condition evaluates to true. |
| Column Break Tag | {?"columnbreak"} | {?"columnbreak"} | Tag that will insert a column break. If the tag is provided with condition and it evaluates to true then only column break is inserted. |
| Watermark Tag | {watermark ...} | {watermark watermark_string} | Tag that will put the watermark in the document. |
| Markdown Tag | {_..._} | {_markdownContent_} | Tag to be used when the provided data is markdown. |
| Raw Tag | {@...} | {@raw} | Tag that replaces the given tag with the xml provided. For Advanced users only. |
| Hyperlink Tag | {*...} | {*hyperlink} | Substitution like normal tag, but will contain a hyperlink so that a user can be directed. |
| Auto Hyperlink Tag | {*...} | {*auto text} | Tag that automatically detect URLs and mail addresses and convert them to hyperlinks from one single value. |
| Internal link Tag | {*link ...} {*target...} | {*link /*target} | Tags that should be used in pair, will generate a link from link to the given target pair. |
| Table of Content Tag | {~...} | {~toc} | Tag to be used for generating table of content. Options availabe see details. |
| Footnote tag | {+...} | {+footnote} | Tag to be used when a dynamic footnote should be created. |
| Labels | {-...} | {-labels} | Special tags to be used for labels mail merging. |
| Form Tag | {?form ...} | {?form name} | Tag to be used in order to generate PDF forms. Output must be PDF. |
| Attach Tag | {?insert ...} | {?insert insertDocument} | Tag that will attach the given document inside the template/output. |
| Embed Tag | {?embed ...} | {?embed fileToEmbed} | Tag that will take the content of the document provided and merge it with the template. Tags inside the embedded document won't be rendered. |
| Subtemplate Tag | {?include ...} | {?include subtemplate} | Tag that will insert the subtemplate into the main template after rendering. |
| Classic Report Tag | {&...&} | {&classic_report&} | Tag to be used the data source is a classic report. |
| Interactive Report Tag | {&interactive} | {&interactive} or {&interactive_1} | Tag to be used when the data source is an interactive report. This will recreate the given interactive report in Word. |
| Interactive Grid Tag | {&...&} | {&interactive_grid&} | Tag to be used the data source is an interative grid. |
| Calendar Tag | {?CALENDAR ...} | {?CALENDAR cal} | Calendar region export from APEX |
Tags can't start with a number and should start with an alphabetical character (a-z,A-Z)
Other special tags can be used. Please refer to the general template section: Special Tags
Normal Substitution
Available From: v1.0These kind of tags are the simplest tag to use. These tags are enclosed in curly braces and can include variables (name of column) that will be replaced with actual data when the output is generated. The replaced value will have the same style of the tag itself.
To be more specific on the style of the replaced content, the style of the starting curly brace is taken. When the tag becomes long, you can style the starting curly braces and change the font of remaining tag to a smaller size. eg: {cust_first_name}
Example
Date Source
Hereby example data source for different options.
- SQL
- PL/SQL returning SQL
- PL/SQL returning JSON
- JSON
select 'file1' as "filename",
       cursor (
         select c.cust_first_name as "cust_first_name",
                c.cust_last_name  as "cust_last_name",
                c.cust_city       as "cust_city"
         from aop_sample_customers c
         where c.customer_id = 1
       )       as "data"
from dual;
declare
    l_return clob;
begin
    l_return := q'[
      select 'file1' as "filename",
             cursor (
               select c.cust_first_name as "cust_first_name",
                      c.cust_last_name  as "cust_last_name",
                      c.cust_city       as "cust_city"
               from aop_sample_customers c
               where c.customer_id = 1
             )       as "data"
      from dual;
        ]';
    return l_return;
end;
declare
  l_cursor sys_refcursor;
  l_return clob; -- can also be varchar2, make sure it corresponds to the structure in the JSON
begin
  apex_json.initialize_clob_output(dbms_lob.call, true, 2);
  open l_cursor for
    select 'file1' as "filename",
           cursor (
             select c.cust_first_name as "cust_first_name",
                    c.cust_last_name  as "cust_last_name",
                    c.cust_city       as "cust_city"
             from aop_sample_customers c
             where c.customer_id = 1
           )       as "data"
    from dual;

  apex_json.write(l_cursor);
  l_return := apex_json.get_clob_output;
  return l_return;
end;
[
  {
    "filename": "file1",
    "data": [
      {
        "cust_first_name": "John",
        "cust_last_name": "Dulles",
        "cust_city": "Sterling"
      }
    ]
  }
]
Template
The template should contain the name of the columns that were provided in the query above. For example we have the template normal_substitution.docx with following content:
Dear {cust_first_name} {cust_last_name},

Thank you for your recent purchase. We hope you're enjoying your new product.

If you have any questions, please don't hesitate to contact us.

Best regards,
AOP Team
Output
When the above data source (which results in one row with John as cust_first_name and Dulles as cust_last_name) together with the given template is passed to AOP, the output will be as follows.
Dear John Dulles,

Thank you for your recent purchase. We hope you're enjoying your new product.

If you have any questions, please don't hesitate to contact us.

Best regards,
AOP Team
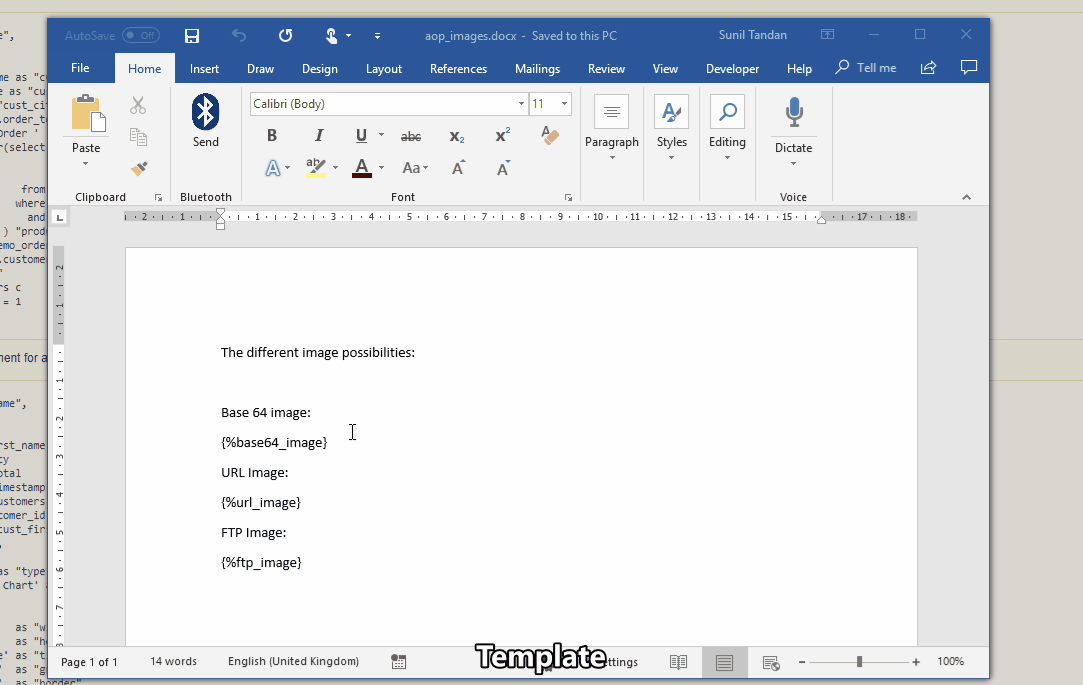
Image Tag
Available From: v1.0Image tags are a useful way to insert images into your reports. These tags are denoted by a percent sign (%) and allow you to include images from a file path, URL (http, https, ftp, sftp), or base64 encoded data. In order to use a file path, you will need to enable local resource in AOP server configuration. See here //TODO:
Given the following simple example SQL Query:
select 'file1' as "filename",
       cursor (
         select 'https://picsum.photos/seed/picsum/200/300.jpg' as "random_image"
         from dual
       )       as "data"
from dual
The url is named random_image , the tag to be used will be {%random_image}.
Image Tag Options
The following options should be prepended with the column name being used followed by an "_". For example, if the column name is "image", then the options would be "image_width", "image_height", "image_alt"_text, etc. See example below.
The options are case sensitive. For example, "_width" is valid, but "_Width" is not. You will need to wrap the column name with double quotes in order to force the casing.
AOP 20.3 introduced other units than px (default), in, cm, pt, and em.
width: Specifies the fixed width of the given image. Units: px (default), in, cm, pt, and em. If not specified, the inserted image's width will be actual image width or available width of the paragraph, whichever is smaller. eg: "_width" : "80px"
height: Specifies the fixed height of the given image. Units: px (default), in, cm, pt, and em. If not specified, the inserted image's height will be actual image height or available height of the paragraph, whichever is smaller. eg: "_height" : "80px"
alt_text: Specifies the alternative text of the inserted image. Blank if not specified. eg: "_alt_text" : "This is an image"
max_height: Maximum height for scaling image proportionally. Units: (default) px, in, cm, pt, and em.
max_width: Maximum width for scaling image proportionally. Units: (default) px, in, cm, pt, and em.
transparency: For specifying transparency of image. Values are in percentage like "90%". default: 0%
rotation: For specifying rotation to image, in degrees for example (90, 180)
ignore_error: true, if default image should be inserted if image cannot be fetched, if false, throws error. default: true
url : For specifying hyperlink url for this image, the user will be redirected to this url when clicked on image.
maintain_aspect_ratio: whether or not to maintain aspect ration of images, width option or height option should be specified for this option to work.
wrap_text : Wrap text option, can be: front, behind, top-bottom, square or default (default meaning in line with text).
Example usages in the SQL query:
select 'file1' as "filename",
       cursor (
         select 'https://picsum.photos/seed/picsum/200/300.jpg' as "image",
                '60px'                                          as "image_width",
                'Random picture on the internet'                as "image_alt_text",
                'square'                                        as "image_wrap_text",
                '90%'                                           as "image_transparency",
                '90'                                            as "image_rotation",
                1                                               as "image_ignore_error"
         from dual
       )       as "data"
from dual
When manual height and width is not provided and the dimensions of image are greater than the page width or page height, then image size is reduced, such that it fits in page without changing the aspect ratio of image.
If the image is stored as blob in your table, you can use apex_web_service.blob2clobbase64 function to convert blob to base64 encoded image, example:
select p.product_name                                    as "product_name",
       apex_web_service.blob2clobbase64(p.product_image) "product_img",
       500                                               "product_img_max_width",
       500                                               "product_img_max_height"
from aop_sample_product_info p
Supported Image Format Types
| Format | Extension | MimeType |
|---|---|---|
| JPEG | .jpg, .jpeg, .jfif, .pjpeg, .pjp | image/jpeg |
| PNG | .png | image/png |
| GIF | .gif | image/gif |
| BMP | .bmp | image/bmp |
| TIFF | .tiff , .tif | image/tiff |
| SVG | .svg | image/svg+xml |
| WEBP | .webp | image/webp |
| HEIC | .heic | image/heic |
Example
- SQL
- PL/SQL returning SQL
- PL/SQL returning JSON
- JSON
select 'file1' as "filename",
       cursor (
         select product_name                                    as "product_name",
                apex_web_service.blob2clobbase64(product_image) as "pic",
                500                                             as "price",
                100                                             as "pic_max_height",
                'alternative text'                              as "pic_alt_text"
         from aop_sample_product_info
         where product_name = 'Wallet'
       )       as "data"
from dual;
declare
  l_return clob;
begin
  l_return := q'[
    select 'file1' as "filename",
           cursor (
             select product_name                                    as "product_name",
                    apex_web_service.blob2clobbase64(product_image) as "pic",
                    500                                             as "price",
                    100                                             as "pic_max_height",
                    'alternative text'                              as "pic_alt_text"
             from aop_sample_product_info
             where product_name = 'Wallet'
           )       as "data"
    from dual;
    ]';
  return l_return;
end;
declare
  l_cursor sys_refcursor;
  l_return clob; -- can also be varchar2, make sure it corresponds to the structure in the JSON
begin
  apex_json.initialize_clob_output(dbms_lob.call, true, 2);
  open l_cursor for
    select 'file1' as "filename",
           cursor (
             select product_name                                    as "product_name",
                    apex_web_service.blob2clobbase64(product_image) as "pic",
                    500                                             as "price",
                    100                                             as "pic_max_height",
                    'alternative text'                              as "pic_alt_text"
             from aop_sample_product_info
             where product_name = 'Wallet'
           )       as "data"
    from dual;

  apex_json.write(l_cursor);
  l_return := apex_json.get_clob_output;
  return l_return;
end;
[
    {
        "filename": "file1",
        "data": [
            {
                "product_name": "Wallet",
                "pic": "**Bas64 Encoded Image**",
                "price": 500,
                "pic_max_height": 100,
                "pic_alt_text": "alternative text"
            }
        ]
    }
]
with template:
| Product | Image | Price |
|---|---|---|
| {product_name} | {%pic} | {price} |
will result in:

Extra example GIF for different source:
Frequent Errors:
- You might sometimes get the following error (might occur when the tag is inside loop):
The tag "image" is not inside a paragraphIn this case, just change the style of the tag (the whole {%image}), for example change the text color to red, and the error should be resolved.
Loop Tag
Available From: v1.0AOP enables the iteration through a set of records using the loop tag. The loop tag consists of an opening and closing tag, denoted by # and / respectively, followed by the record or column name enclosed within delimiters, such as {#record1}{name}... {/record1}.
By using the opening tag {#data_loop} and closing tag {/data_loop}, we can iterate through the elements of the column "data_loop". This means that the content within the tags will be repeated for each element in the array. "data_loop" is a column/record.
Example
Data Source
Hearby the example of data source for different options.
- SQL
- PL/SQL returning SQL
- PL/SQL returning JSON
- JSON
select 'file1' as "filename",
       cursor (
         select c.cust_first_name as "cust_first_name",
                c.cust_last_name  as "cust_last_name",
                c.cust_city       as "cust_city",
                cursor (
                  select o.order_total      as "order_total",
                         'Order ' || rownum as "order_name",
                         cursor (
                           select p.product_name                                    as "product_name",
                                  i.quantity                                        as "quantity",
                                  i.unit_price                                      as "unit_price",
                                  apex_web_service.blob2clobbase64(p.product_image) as "image"
                           from aop_sample_order_items  i,
                                aop_sample_product_info p
                           where o.order_id = i.order_id
                                 and i.product_id = p.product_id
                         )                  "product"
                  from aop_sample_orders o
                  where c.customer_id = o.customer_id
                )                 "orders"
         from aop_sample_customers c
         where customer_id = 1
       )       as "data"
from dual
declare
  l_return clob;
begin
  l_return := q'[
    select 'file1' as "filename",
           cursor (
             select c.cust_first_name as "cust_first_name",
                    c.cust_last_name  as "cust_last_name",
                    c.cust_city       as "cust_city",
                    cursor (
                      select o.order_total      as "order_total",
                             'Order ' || rownum as "order_name",
                             cursor (
                               select p.product_name                                    as "product_name",
                                      i.quantity                                        as "quantity",
                                      i.unit_price                                      as "unit_price",
                                      apex_web_service.blob2clobbase64(p.product_image) as "image"
                               from aop_sample_order_items  i,
                                    aop_sample_product_info p
                               where o.order_id = i.order_id
                                     and i.product_id = p.product_id
                             )                  "product"
                      from aop_sample_orders o
                      where c.customer_id = o.customer_id
                    )                 "orders"
             from aop_sample_customers c
             where customer_id = 1
           )       as "data"
    from dual
    ]';
  return l_return;
end;
declare
  l_cursor sys_refcursor;
  l_return clob; -- can also be varchar2, make sure it corresponds to the structure in the JSON
begin
  apex_json.initialize_clob_output(dbms_lob.call, true, 2);
  open l_cursor for
    select 'file1' as "filename",
           cursor (
             select c.cust_first_name as "cust_first_name",
                    c.cust_last_name  as "cust_last_name",
                    c.cust_city       as "cust_city",
                    cursor (
                      select o.order_total      as "order_total",
                             'Order ' || rownum as "order_name",
                             cursor (
                               select p.product_name                                    as "product_name",
                                      i.quantity                                        as "quantity",
                                      i.unit_price                                      as "unit_price",
                                      apex_web_service.blob2clobbase64(p.product_image) as "image"
                               from aop_sample_order_items  i,
                                    aop_sample_product_info p
                               where o.order_id = i.order_id
                                     and i.product_id = p.product_id
                             )                  "product"
                      from aop_sample_orders o
                      where c.customer_id = o.customer_id
                    )                 "orders"
             from aop_sample_customers c
             where customer_id = 1
           )       as "data"
    from dual

  apex_json.write(l_cursor);
  l_return := apex_json.get_clob_output;
  return l_return;
end;
[
  {
    "filename": "file1",
    "data": [
      {
        "cust_first_name": "William",
        "cust_last_name": "Hartsfield",
        "cust_city": "Atlanta",
        "orders": [
          {
            "order_total": 1640,
            "order_name": "Order 1",
            "product": [
              {
                "product_name": "Blouse",
                "quantity": 4,
                "unit_price": 60,
                "image": "/9j/4AAQSkZJRgABAQAAAQABAAD/2wCEAAkGBhAQEBUSExIVFBMWFRIUFxYUGBoU\r\nFxcXGRYYFRgcGhIXICYfFyUlGRcTIS8gJCgpLC0sFx4xNTAqNSk3LCkBCQoKDgwO\r\nGQ8PGiwkHiItKi0vLDU1NSw1Li0vKTQpKSk1KyorNTU1KiwpKSwqNC0sKTQsLSws\r\nLCwpLCw0LCw1LP/AABEIAGgAaAMBIgACEQEDEQH/xAAcAAEAAgMAAwAAAAAAAAAA\r\nAAAABgcDBAUBAgj/xAA3EAABAwIDBAYIBgMAAAAAAAABAAIRAwQSITEHQVFxBQYT\r\nYaHBIiMyQnKBkbEUkqKjstFSYoL/xAAaAQEAAgMBAAAAAAAAAAAAAAAAAwYCBAUB\r\n/8QAJxEAAgICAgADCQAAAAAAAAAAAAECAwQRBRIhMUETIkJRYYGR4fD/2gAMAwEA\r\nAhEDEQA/ALxREQBERAERQfrBtVtrW5Nu2m6qW+05rgGh0xhGRxEQZ+i83okrqna9\r\nQWycIq6qbZKAE/h3/mE+IiVMugOsFC9oitRdLTqDk5piYc3cUTTM7ca2pbnHR00R\r\nF6QBERAEREAREQBcPp3rjaWZw1HkvicDGl7oOkxk2YOpC7ZXz90t0qatzUrH2qlS\r\no6ODQS1on4WtHyWMno3sHGWRNqT8ESTrRtZuHMcKNPsaZBGN3pVSNJEZM1AnPuKg\r\nVhQrvaXPA0kDeAc447966Bql0mZacu8c1lt3mdAMomdY7lC5MtNGHVS/cOUORPcN\r\nSs3QPWS8sKwcPVlwAAgFhbOTXt7tx1GfGVv2tENfU4YgByifPwWK8oYm4d5B+u5F\r\nImuojbHUiyui9rVLJtzRdTOXp0/WMO45e03P4uandrdMqsbUY4OY4BzXDQgqhLam\r\nKjG8PR7yJEnzVnbNrr1T6MmGODmzuDtR9RP/AEs4z29M4HIcdCqDtr/BM0RFKcEI\r\niIAiIgMF/dClSfUIkMY98ccILvJfM76xMnSc48T4r6M6zWtWrZ16VEA1H0nsbJgS\r\n4YdeRKo7pfqRf29Nzn21RxDdaY7UftzGvDcsJHX42UY9tvTPSgC5gIwhrmg9/f4r\r\n3DIGU8Z3fRcSxu8LWNIOMyIPuy4g5HTUqUXVcNafRncAtdrRaKrFKO0ak8DMxnos\r\nj6GIaHLQx5Lxd0iMIYcJg6GM8oWwK7xSLj7QgnzXhNs51gx1OsRIwmXjuI1y5OKn\r\nuzy9BuyGmQ6m8ZcWlpj5earptW4ubgNo0X1HsqEEUmkns51JHs6DM8VY3V3qXfUL\r\nujXAbTptPrGPfLnBwIMNaCARPEZhSxi9pnKzr6/Yzg2t/IspERTlPCIiAIiIAiIg\r\nKN2n2Rb01iOj6VF4+Us+7VhqNmmeRUx2uWDJtq8+mHVKUcWkB+vcW/rKgd3cODIB\r\njcVr2eZb+LlvHTN6mAcPL+l7VWTTqD/U/wBrBQPsmZkDktymBiI4gjwUR1vQ6exy\r\nzP4y8qbuztx83y4/xVtBQfZRbsbb1T75qw7k1oDfu5TlbcfIo+e95EwiIsjSCIiA\r\nIiIAiLwUBVO1XpXHd06IOVJmI/E+D4Na38yheEuDnboWz1ju+2vLipxq1I+Friwf\r\npAWvSE0ncIK15PxLnhV9KYx+htPYYycdMuII71lsb3FhJ13rVovh4aSYOUb93HRK\r\ntDsn65EyFGb+/Un+zi9wXFagffhw5ifIn6Kxgqj6v1sN1RqjeWA8icP2JVuBbFb2\r\niq8vV0v7L4l+giIpDjhERAEREAXgleV4IlAfODvSJJOrnE/MyvWtUJaWN4H7K5bn\r\nZh0e90hj6fcx5Dfk10gchksJ2T9HnXtSOHaQDzgKHoyyQ5SlR1plQ21US0ndnJ1P\r\nMruXlDGIyxaiVYzNlvRw9x8f44zH2nxWw3Z1YAAYKkD2fWP9HkZleOtsmjzFEfBp\r\n/wB9yu+hqhBYM5a9v8grqC41n1Os6RBFKSDIL3OfnxgmPBdoLOEepyORzIZUouCa\r\n0ERFIcwIiIAiIgCIiAIiIAiIgCIiAIiIAiIgP//Z"
              },
              {
                "product_name": "Skirt",
                "quantity": 4,
                "unit_price": 80,
                "image": "/9j/4AAQSkZJRgABAQAAAQABAAD/2wBDAAkGBwgHBgkIBwgKCgkLDRYPDQwMDRsU\r\nFRAWIB0iIiAdHx8kKDQsJCYxJx8fLT0tMTU3Ojo6Iys/RD84QzQ5Ojf/2wBDAQoK\r\nCg0MDRoPDxo3JR8lNzc3Nzc3Nzc3Nzc3Nzc3Nzc3Nzc3Nzc3Nzc3Nzc3Nzc3Nzc3\r\nNzc3Nzc3Nzc3Nzc3Nzf/wAARCABoAGgDASIAAhEBAxEB/8QAHAAAAQQDAQAAAAAA\r\nAAAAAAAAAAIDBwgBBAUG/8QAPBAAAQMCAwIKCAMJAAAAAAAAAQACAwQRBQYhBzES\r\nExRhcYKhscHCIjJBUXKBkdIzUpJCRVRzg5SistH/xAAUAQEAAAAAAAAAAAAAAAAA\r\nAAAA/8QAFBEBAAAAAAAAAAAAAAAAAAAAAP/aAAwDAQACEQMRAD8AnFCEIBebxjO2\r\nDYNib8Pr5JmSsa1xc2IuaLi43a9i9Iq77Qq11Xm7FJGuBDZjGOhgDfBBMUefssSf\r\nvVjPjje3vatuPN2XJPVxug607R3qtjpX+3vSDO/n+qCzJzVl4b8cw7+5Z/1NPzjl\r\ntgu7HKA/DMD3KtPKHD3/AFWOPfaw70Fi5toWVohrirX/AMuJ7u5qXg+esDxnEosP\r\noJZnzShxbwoS0aAk6nmCroyRxbqQPmu5k6uNDmfC6kv4LWVLA4j8pPBPYSgsqhCE\r\nAhCEAhCEDdRK2CCSZ/qxtLj0AXVXa6Z09RJM83dI4vcecm5VjM6VPJMqYrKDY8me\r\n0dLhwR3qt0x9IoNd6QUtybKBJb7kDRK9iwgy06rZhJBu02PsPOtUJ+LegtLg9YMQ\r\nwmirAb8fAyT6tBW4vJ7LavlWSqEE3dCXwnquNuwhesQCEIQCEIQeO2r1HEZOnYDb\r\njpY2dvC8qgKU6qadtVRwMGoIL/iVBf8ApaR5lCsm9A2d6bcllJcgwNywd6yNyQ46\r\noFBPRGyZTjCgm7YnU8ZgVdTE6xVXCHQ5o8WlSMoh2G1Nq7FKUn14Y5APhJHmCl5A\r\nIQhAIQhBEm22ovW4bTfkhe89YgeVRTIVIO2Go43NRjv+FTxt73eZR7KgRdYWAUOK\r\nBJNk2TcrL0m6BwFONOqZultcgkHY7VGDOMcd9J6eSPsDvKp4VbNn9VyXOGEy3sDU\r\nNYTzO9HzKyaAQhCAQhCCve0qo5RnDE3X0bIGDqtA8F5CUrtZqqeVZgxKYG4fVSuH\r\nRwiuHJuQNgocdEkb0E6IEuKQCLrLtyQN6BwmwCUwptx0ASo9EHRw2c01ZBUNNjFI\r\n2QfIg+CtWxwexr2m4cLjoVTIvWA96tDleo5XlvC6i9zJSRE9PBF0HUQhCATVVKIK\r\naWZ26NhefkLp1cfN8/J8rYtLexFJIAectI8UFbKhxkkc929xuVqyLekjIJ00Wq6M\r\n2Qa1tVgjRPGMrHFm2iDXcNEkNWwYiVjiigYOruZLYNU7xJShERuQEfrBWM2YVHKM\r\nkYab3MbXxnqvcO6yruyIg3sVO+xt5dlJ7CdGVcgHQQ0+KD3aEIQCTJGyVjmSsa9j\r\nhYtcLg/JCEHCxDJeXcQuZ8Kga4/tQgxH/Gy402yzLkjrtFZGPc2e47QUIQMu2TZe\r\nO6fEB/VZ9qbOyPAv4zEP1x/YhCBJ2Q4JfSvxD6x/alDZHgI31mIHrx/YhCB1uyfL\r\no3y17umZvg1blPszyvCPTo5pj75Kh/gQhCDpUuS8t0rg6LBqThDUF7OH/tdd1jGx\r\nsDI2hrRoGtFgEIQKQhCD/9k="
              },
              {
                "product_name": "Ladies Shoes",
                "quantity": 4,
                "unit_price": 120,
                "image": "/9j/4AAQSkZJRgABAQAAAQABAAD/2wCEAAkGBhQQEBIUEhIWFRUWFBYUGBcTFBoY\r\nFhQcFBgVFRUWFRscHCYhIyAjHx4THy8sLycpLCwvFh8xNTA2NSgtLCoBCQoKBQUF\r\nDQUFDSkYEhgpKSkpKSkpKSkpKSkpKSkpKSkpKSkpKSkpKSkpKSkpKSkpKSkpKSkp\r\nKSkpKSkpKSkpKf/AABEIAGgAaAMBIgACEQEDEQH/xAAcAAEAAgIDAQAAAAAAAAAA\r\nAAAABgcFCAEDBAL/xAA9EAABAwICBwQGBwkBAAAAAAABAAIDBBEFIQYHEjFBUXEi\r\nYYGREyMyQqGxFFJiwdLh8CQzRFRygrLC0UP/xAAUAQEAAAAAAAAAAAAAAAAAAAAA\r\n/8QAFBEBAAAAAAAAAAAAAAAAAAAAAP/aAAwDAQACEQMRAD8AvFERAREQEREBERAR\r\nEQEREBERAUD1g6eOo/VwFvpANpxcLhvENtz4+SmOKV7YIZJHbmNJ68h4mw8Vr5i+\r\nIGokkc83Ly4k875lBaugWspmIWik2WT2vYezIBv2b7nDM2zyzB32nAK1Cpax0Et2\r\nuLXMdcEGxBabgjxsVsRq30/biMWzIQKiNvbaMtsbvSMHzHAnkQgmyIiAiIgIiICI\r\niAiIgr/W1ipZDHED7RL3dG5NHmSf7VTLpe0rM1uu9e3uibbzcqskdbNBjMXi7Qdz\r\nyPUfl8l1YXjUtJURzQvLXsIcCPiCOIIuCORXvkb6RpafDuPBYN8RubiyDa7QTTWP\r\nFKYSss17bNljvnG78J3g/eCpItStDtKJcNqWzxG43PZfsyN4tPzB4EBbR6P49FW0\r\n8c8Ltpjxx3tI9prhwIORQZJERAREQEREBERBDtYmjX0mEPaO0wG/e38lRWKUL4nE\r\nOGQP6utpHMuLFVbpng8YmLDYOObQfeB5HgeuXTegpKabZXsoiyb2hvyJ4g8CP1zX\r\nrx7AC0EtGWY6Ebx3FR/C6wwygOzG4jmONvn4IMpVYSYzzHAgb1IdXWm78KqLPuae\r\nQgSN+rwEjRzHxGXK3e6lyte7HWI5Z7nBR3FKMtJvZBtVSVTZWNexwc1wDmuabhwI\r\nuCCu5UNqk1i/RHikqX+pe71bnHKJx4E/VJ8jnuur4aUHKIiAiIgIiICrjWedmemd\r\n0HmS0/NWOq31uGxpT9r/AHagwcuij56eaeIbRZk+ID94213Fn225Ec8xxVYYvhI2\r\nmvbuycCNxBWx+gsf7KTzkcfINCgesvQ0QudNEPVSOJLQMo3kXcB9l+Z7iDzCCGaK\r\nVokYYXHNou2/Ll4X+IXXpHQm20Pd39OHko5C90cu03JzTcWU1hxFlVFfc5uTgeHM\r\nHqgr2U5/rJXBqo1rNsyjq3gEdmKVxy7mPPyPDd0rDSDD/RHs+yfh3FYG9kG6YK5W\r\nt2huuaqomiOUfSIhkA82e0cmu5dxurs0O09p8Tj2otpjr2LJAAcrX2SDYhBJUREB\r\nERAVaa4Af2cgXAN/Jzcr7uCstfL4wRYi/XNBHdAZdqjB2SO2620LX3G47s/gstjW\r\nGCpgkid77SAfqne1w6Gx8F7QFyg1a0hoDBUHaGycwRyc0kOHnfyWNL3xu243Frhx\r\nHHuPMK4damhpcXTsHZdm4j3HDLaPc4W8QeaqqeicBm2/e3MFB8nEhOO20NduOyMj\r\n1BXTUYLE/MEsP2c2+ROXHisPV1JY4ixHUL5jxxw4ZIM7S4HGy1wX/wBR7PkP+qWY\r\ndVloaWO2S32S3LZ6WUDi0mHvNKyNLpXEOY6hBeGjusTIMqh3ekHHqp1T1LZGhzHB\r\nwO4jctaKfS+G1i8eKkGj+sL6O+8UmR3tJu13ggvxFg9GNK4q9m1GbOHtMvm3vHMI\r\ngziIiAiIg4c26weIaDUU9zJTR3PFg2D5tsiIIxiOpKkkv6OSaI8tpsjfJ7Sfio9W\r\nahpB+6qond0kJb8WuPyREGJqNSFaPdpn9JHD/Ji8btSlb/LR+EzPyXKIOs6j6s/w\r\nw8J2fiXLNRVWf/Fo6zt+4lEQT/VrqwkwyZ0skjc2Fvo2Oc4Z2zcTYeQ8UREH/9k="
              }
            ]
          },
          {
            "order_total": 730,
            "order_name": "Order 2",
            "product": [
              {
                "product_name": "Blouse",
                "quantity": 4,
                "unit_price": 60,
                "image": "/9j/4AAQSkZJRgABAQAAAQABAAD/2wCEAAkGBhAQEBUSExIVFBMWFRIUFxYUGBoU\r\nFxcXGRYYFRgcGhIXICYfFyUlGRcTIS8gJCgpLC0sFx4xNTAqNSk3LCkBCQoKDgwO\r\nGQ8PGiwkHiItKi0vLDU1NSw1Li0vKTQpKSk1KyorNTU1KiwpKSwqNC0sKTQsLSws\r\nLCwpLCw0LCw1LP/AABEIAGgAaAMBIgACEQEDEQH/xAAcAAEAAgMAAwAAAAAAAAAA\r\nAAAABgcDBAUBAgj/xAA3EAABAwIDBAYIBgMAAAAAAAABAAIRAwQSITEHQVFxBQYT\r\nYaHBIiMyQnKBkbEUkqKjstFSYoL/xAAaAQEAAgMBAAAAAAAAAAAAAAAAAwYCBAUB\r\n/8QAJxEAAgICAgADCQAAAAAAAAAAAAECAwQRBRIhMUETIkJRYYGR4fD/2gAMAwEA\r\nAhEDEQA/ALxREQBERAERQfrBtVtrW5Nu2m6qW+05rgGh0xhGRxEQZ+i83okrqna9\r\nQWycIq6qbZKAE/h3/mE+IiVMugOsFC9oitRdLTqDk5piYc3cUTTM7ca2pbnHR00R\r\nF6QBERAEREAREQBcPp3rjaWZw1HkvicDGl7oOkxk2YOpC7ZXz90t0qatzUrH2qlS\r\no6ODQS1on4WtHyWMno3sHGWRNqT8ESTrRtZuHMcKNPsaZBGN3pVSNJEZM1AnPuKg\r\nVhQrvaXPA0kDeAc447966Bql0mZacu8c1lt3mdAMomdY7lC5MtNGHVS/cOUORPcN\r\nSs3QPWS8sKwcPVlwAAgFhbOTXt7tx1GfGVv2tENfU4YgByifPwWK8oYm4d5B+u5F\r\nImuojbHUiyui9rVLJtzRdTOXp0/WMO45e03P4uandrdMqsbUY4OY4BzXDQgqhLam\r\nKjG8PR7yJEnzVnbNrr1T6MmGODmzuDtR9RP/AEs4z29M4HIcdCqDtr/BM0RFKcEI\r\niIAiIgMF/dClSfUIkMY98ccILvJfM76xMnSc48T4r6M6zWtWrZ16VEA1H0nsbJgS\r\n4YdeRKo7pfqRf29Nzn21RxDdaY7UftzGvDcsJHX42UY9tvTPSgC5gIwhrmg9/f4r\r\n3DIGU8Z3fRcSxu8LWNIOMyIPuy4g5HTUqUXVcNafRncAtdrRaKrFKO0ak8DMxnos\r\nj6GIaHLQx5Lxd0iMIYcJg6GM8oWwK7xSLj7QgnzXhNs51gx1OsRIwmXjuI1y5OKn\r\nuzy9BuyGmQ6m8ZcWlpj5earptW4ubgNo0X1HsqEEUmkns51JHs6DM8VY3V3qXfUL\r\nujXAbTptPrGPfLnBwIMNaCARPEZhSxi9pnKzr6/Yzg2t/IspERTlPCIiAIiIAiIg\r\nKN2n2Rb01iOj6VF4+Us+7VhqNmmeRUx2uWDJtq8+mHVKUcWkB+vcW/rKgd3cODIB\r\njcVr2eZb+LlvHTN6mAcPL+l7VWTTqD/U/wBrBQPsmZkDktymBiI4gjwUR1vQ6exy\r\nzP4y8qbuztx83y4/xVtBQfZRbsbb1T75qw7k1oDfu5TlbcfIo+e95EwiIsjSCIiA\r\nIiIAiLwUBVO1XpXHd06IOVJmI/E+D4Na38yheEuDnboWz1ju+2vLipxq1I+Friwf\r\npAWvSE0ncIK15PxLnhV9KYx+htPYYycdMuII71lsb3FhJ13rVovh4aSYOUb93HRK\r\ntDsn65EyFGb+/Un+zi9wXFagffhw5ifIn6Kxgqj6v1sN1RqjeWA8icP2JVuBbFb2\r\niq8vV0v7L4l+giIpDjhERAEREAXgleV4IlAfODvSJJOrnE/MyvWtUJaWN4H7K5bn\r\nZh0e90hj6fcx5Dfk10gchksJ2T9HnXtSOHaQDzgKHoyyQ5SlR1plQ21US0ndnJ1P\r\nMruXlDGIyxaiVYzNlvRw9x8f44zH2nxWw3Z1YAAYKkD2fWP9HkZleOtsmjzFEfBp\r\n/wB9yu+hqhBYM5a9v8grqC41n1Os6RBFKSDIL3OfnxgmPBdoLOEepyORzIZUouCa\r\n0ERFIcwIiIAiIgCIiAIiIAiIgCIiAIiIAiIgP//Z"
              },
              {
                "product_name": "Skirt",
                "quantity": 3,
                "unit_price": 80,
                "image": "/9j/4AAQSkZJRgABAQAAAQABAAD/2wBDAAkGBwgHBgkIBwgKCgkLDRYPDQwMDRsU\r\nFRAWIB0iIiAdHx8kKDQsJCYxJx8fLT0tMTU3Ojo6Iys/RD84QzQ5Ojf/2wBDAQoK\r\nCg0MDRoPDxo3JR8lNzc3Nzc3Nzc3Nzc3Nzc3Nzc3Nzc3Nzc3Nzc3Nzc3Nzc3Nzc3\r\nNzc3Nzc3Nzc3Nzc3Nzf/wAARCABoAGgDASIAAhEBAxEB/8QAHAAAAQQDAQAAAAAA\r\nAAAAAAAAAAIDBwgBBAUG/8QAPBAAAQMCAwIKCAMJAAAAAAAAAQACAwQRBQYhBzES\r\nExRhcYKhscHCIjJBUXKBkdIzUpJCRVRzg5SistH/xAAUAQEAAAAAAAAAAAAAAAAA\r\nAAAA/8QAFBEBAAAAAAAAAAAAAAAAAAAAAP/aAAwDAQACEQMRAD8AnFCEIBebxjO2\r\nDYNib8Pr5JmSsa1xc2IuaLi43a9i9Iq77Qq11Xm7FJGuBDZjGOhgDfBBMUefssSf\r\nvVjPjje3vatuPN2XJPVxug607R3qtjpX+3vSDO/n+qCzJzVl4b8cw7+5Z/1NPzjl\r\ntgu7HKA/DMD3KtPKHD3/AFWOPfaw70Fi5toWVohrirX/AMuJ7u5qXg+esDxnEosP\r\noJZnzShxbwoS0aAk6nmCroyRxbqQPmu5k6uNDmfC6kv4LWVLA4j8pPBPYSgsqhCE\r\nAhCEAhCEDdRK2CCSZ/qxtLj0AXVXa6Z09RJM83dI4vcecm5VjM6VPJMqYrKDY8me\r\n0dLhwR3qt0x9IoNd6QUtybKBJb7kDRK9iwgy06rZhJBu02PsPOtUJ+LegtLg9YMQ\r\nwmirAb8fAyT6tBW4vJ7LavlWSqEE3dCXwnquNuwhesQCEIQCEIQeO2r1HEZOnYDb\r\njpY2dvC8qgKU6qadtVRwMGoIL/iVBf8ApaR5lCsm9A2d6bcllJcgwNywd6yNyQ46\r\noFBPRGyZTjCgm7YnU8ZgVdTE6xVXCHQ5o8WlSMoh2G1Nq7FKUn14Y5APhJHmCl5A\r\nIQhAIQhBEm22ovW4bTfkhe89YgeVRTIVIO2Go43NRjv+FTxt73eZR7KgRdYWAUOK\r\nBJNk2TcrL0m6BwFONOqZultcgkHY7VGDOMcd9J6eSPsDvKp4VbNn9VyXOGEy3sDU\r\nNYTzO9HzKyaAQhCAQhCCve0qo5RnDE3X0bIGDqtA8F5CUrtZqqeVZgxKYG4fVSuH\r\nRwiuHJuQNgocdEkb0E6IEuKQCLrLtyQN6BwmwCUwptx0ASo9EHRw2c01ZBUNNjFI\r\n2QfIg+CtWxwexr2m4cLjoVTIvWA96tDleo5XlvC6i9zJSRE9PBF0HUQhCATVVKIK\r\naWZ26NhefkLp1cfN8/J8rYtLexFJIAectI8UFbKhxkkc929xuVqyLekjIJ00Wq6M\r\n2Qa1tVgjRPGMrHFm2iDXcNEkNWwYiVjiigYOruZLYNU7xJShERuQEfrBWM2YVHKM\r\nkYab3MbXxnqvcO6yruyIg3sVO+xt5dlJ7CdGVcgHQQ0+KD3aEIQCTJGyVjmSsa9j\r\nhYtcLg/JCEHCxDJeXcQuZ8Kga4/tQgxH/Gy402yzLkjrtFZGPc2e47QUIQMu2TZe\r\nO6fEB/VZ9qbOyPAv4zEP1x/YhCBJ2Q4JfSvxD6x/alDZHgI31mIHrx/YhCB1uyfL\r\no3y17umZvg1blPszyvCPTo5pj75Kh/gQhCDpUuS8t0rg6LBqThDUF7OH/tdd1jGx\r\nsDI2hrRoGtFgEIQKQhCD/9k="
              },
              {
                "product_name": "Bag",
                "quantity": 2,
                "unit_price": 125,
                "image": "/9j/4AAQSkZJRgABAQAAAQABAAD/2wCEAAkGBhQSERUUExQVExMWFRsVFxYXGBQY\r\nFRIYGhgVFBscHhYaHCYeGBkkGRQWHy8gIyopLCwvFx4xNTAqNSYrLCkBCQoKDgwO\r\nFw8PFywcHBwsLDQsKSkpKSkpKSwsLCwsLCwpKSkpKSkpKSwsKSwpKSkpLCksKSks\r\nLCkpKSksNSksKf/AABEIAGgAaAMBIgACEQEDEQH/xAAcAAABBQEBAQAAAAAAAAAA\r\nAAAAAwQGBwgFAgH/xABGEAABAwIDBAUHBgsJAAAAAAABAAIDBBEFIUEGBxIxE1Fh\r\ncYEiQlKRobHRFCMyk6LBFRdDVGJjcpKy0/AWJFNkc4KjwtL/xAAWAQEBAQAAAAAA\r\nAAAAAAAAAAAAAQL/xAAZEQEBAQADAAAAAAAAAAAAAAAAAREhMUH/2gAMAwEAAhED\r\nEQA/ALxXiaYMaXHk0EnuAuV7TDHpuClnd6MMjvUxx+5BE6LfVhsht0j2DRzo3cJ8\r\nW3t42XUh3mYa7lWRD9olv8QCzZQ4HFKB9JuQvY394UgwvDaKIfPUbqoek2pljJHa\r\n0Cx8CFRfh29w/wDPab61nxX1m3NAeVZT/WM+Kp5uJ4c1pEOCMceuaYut4kPd7lCc\r\neglkdxR0kVMwaUxf7eJ5ufAKK02dsqL86g+sb8UozaujPKqg+tj+KyjFI4ZOnc09\r\nUkZPxX0ynSWE/wCyx/hVxGsRtFTXt8ogv/qx/wDpfH7S0oyNTACNOljv6rrMeGwU\r\n72fPS1jn6Np4YBGDn+UfJc6eaPFN3bKmSRxY6SOLzekcHvA7S0NHqHrQaWO39B0j\r\nIhUxukkeI2NaeIuc48IGQtzKkCzHslsy2HEKMl5e/wCVQ8hYfTaeZ9y04FFCEIRA\r\nuJttLw4dVn/LS+2Nw+9dtRjebPwYTVn9SR+8Q370Gd6cuiYBwfSBsSWgG1r65cx6\r\n0j+HyMiLW0ulBX8UY4uHyb9V/X1ZJGiq+Hmxp7wqpaPacjQL2dpMzYDPTPL2JQva\r\nc+Bl+4JR1Mx4uI2AjS2RQNf7QA8wD7feEpHjUQ8xvqGXsSbohwNIhjzHUc/bkkIJ\r\nGHLoGX68/ig6kW07dbBKO2mi53zXMNOGnOCNw73X96Rn4DYCEN8XfFMgluz0/SV9\r\nHbP+9RXNnjk4O1AGi0UFmfCdsRDUUpeD0MUrXHhF3+Tllfmc/atJUNY2WNkjDdj2\r\nh7TYi7XAOBscxkVDwuhCEQKsd8+0rm0stM2F7mu6PpZTYMYC7ja0Z3Lj0Z9RVnKj\r\n99eNAzup2Elp6LpfRa9vGR5uTrObzPnctVKsVg2MO4hzbe4CVuLpm2S3Jew8laDy\r\nxHlN106krHiVgeux9yaskIXySMEEgG4Co61FXMc1o1ASVVT6tGa5DIyLEFO24i8c\r\n1A5jqjqF4llac9U0mxAu0sU2fUGxQdjYmiZUYnSwytD43yEOaeThwuJHsV47GbQu\r\niqZKCUSPa2aRlPOW2bJwtEjmEjLjAJOWXYBZUzuo8rGaPsc4+qKUq3dlZDLjNa3M\r\nx00kjwbefOIY8s+QEEg7yViznWp1ysZCELTAWYN74LcZqwCQHdG4gE2PzMXMa8it\r\nPrOG+qkLcYe4jKSKNwPXZvB72FBCKYEpzFGko4yOSVY0rSlo4c807jkY0G/LhPgm\r\nDgT1+C8OpzbkUHZZLBkCRdenOhtbIrjfIT6J968OpraEetTA9qqaMjI2XHqI7ZJY\r\nwnQpN7DqqJVuWjvjNP3Sn/hkVpbnHdLLilVpNWkA9YbxuHslCqLd1VmCqlm5dDSV\r\nMgPUREWt+04DxV7botn30mGRMkbwSPLpXg8wXGwv28DWrKJmhCEAoNvV2C/CFOHx\r\nAfKYbmP9Y05ujJ7bAi+o7SpyhBmDCauiY4R1tHMC08L3xzSNe0jI3hdr1gEK18M3\r\nT4XURNlhfM+N4u1zZne4jIjkQcwnW87d62sjM8LR8qYL2H5do809bwPonw5EWge6\r\nna40tY2mcfmahwbY+ZIcmuA0ubNPeOpUTd+46hPJ9SO6Rp97CkvxFUf+NVfvRfy1\r\nZCE0Vx+Iyk0qKsdzof5aY1e4sfkq2UdkjGvH2S1WqhQUhUbi6sX4Z6d/eJWX+y5c\r\nqq3NYi3lHFJ+xK3/AL8K0IubtDtBFRU755nWY0cvOe7RrRq4n+rK6M6w7EVTKyKk\r\nmjMTqgtaRxMceh42l58hxsLMPP0StNtFlWG7CF9dUzYnOPKJLI+puViG9jWWbfUu\r\ncrQSgQhCgEIQgFRe9rZM0lYyshHDHK8ONuUcwPF4cVuIdod2K9EzxfCY6mF8MreJ\r\njxYjUagg6EHMFAngOLtqqeOZvJ7QSPRdycPB1x4LoKscMiqMEkc14dPQPdfpGi5i\r\n0u5o+ibWB802FiDkrHoq5kzGyRua9jhcOabg/wBdSBdCLqBbc72YKIOjhtUVPLha\r\nfIjP6bhr+iM+5BI9qdrafD4TLO+2jWDN8h6mt17+Q1VHtmrNpa4DOKmjNza5jp2H\r\n2PldbLr7AMnOD7vMQxmf5TXPfDCfOcLPc3nwxRH6Le05a2crvwDZ+GjhbDTsDI2+\r\ntx1c53Nzj1lFLYRhUdNCyGJvDHG3haNe8nUk3JPWU8QhECEIQCEIQCEIQfCFxJ9j\r\n4CS6LpKZ7sy6ne6LiPWWDyHHtLShCBnV7BNlHDLWV0jTzaZg1p7wxjbpfBtgKGlI\r\ndFTs4xye673DuLieHwshCCQoQhAIQhAIQhB//9k="
              }
            ]
          }
        ]
      }
    ]
  }
]
Template
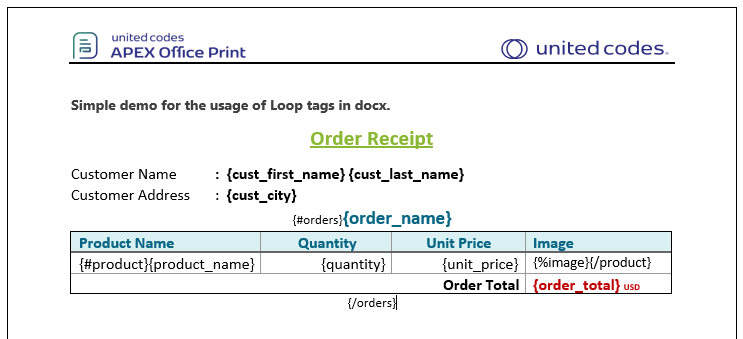
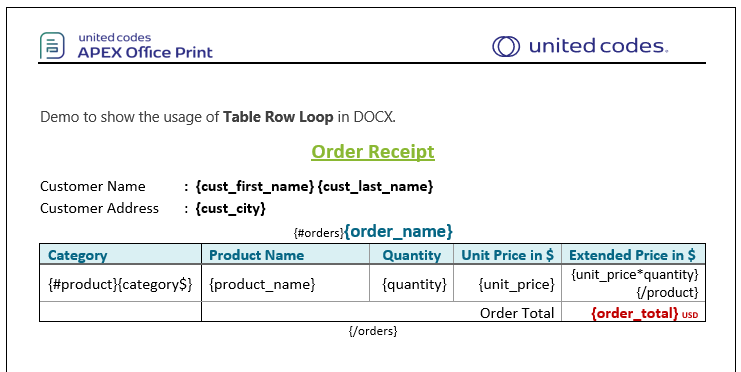
The following template shows the iteration of orders and product columns with the help of loop tag, where the orders and product are iterated outside and inside of table respectively. When loop tags are used inside the table, it will create a new row for each records.
Output
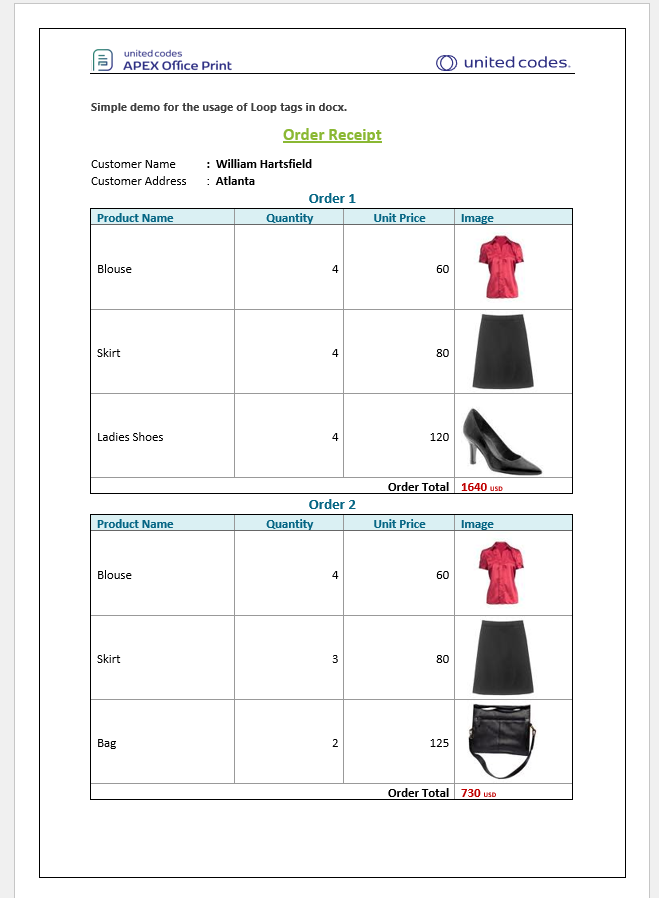
The given data source and template gives the following output when processed by AOP.
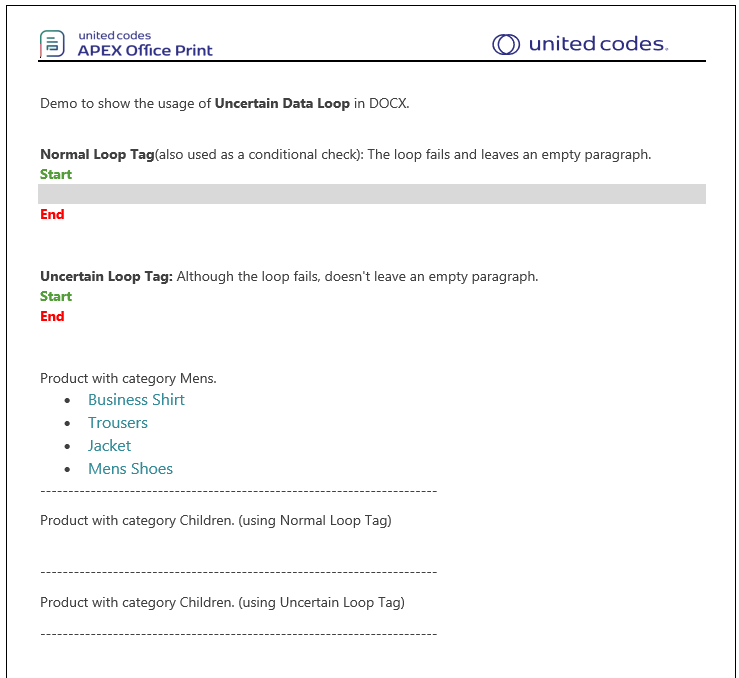
Uncertain Loop Tag
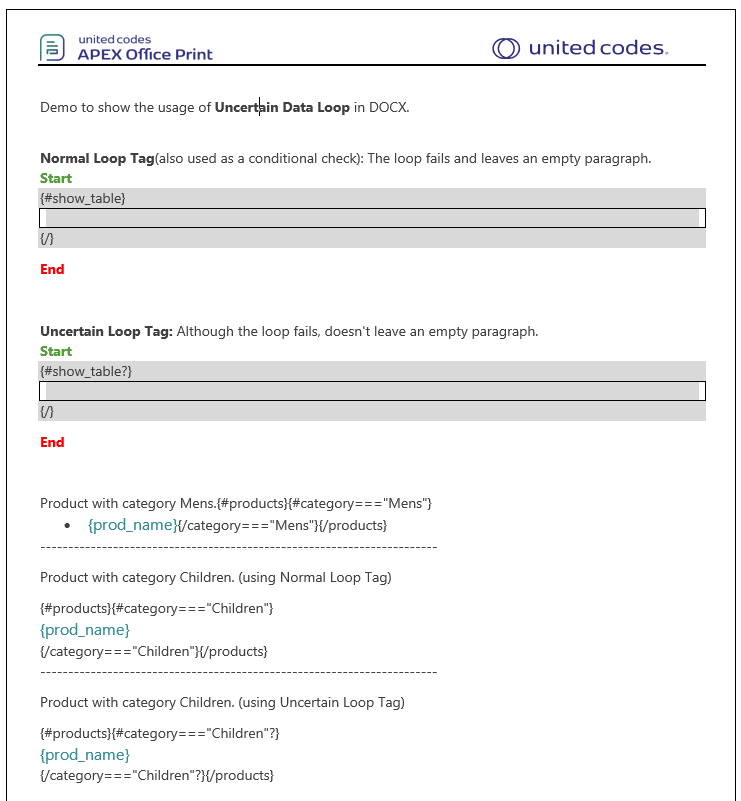
Available From: v22.2Uncertain Loop Tag is same as the normal loop tag available in AOP. However if the loop fails (i.e condition fails) and this results in an empty paragraph, this empty paragraph will be removed. This tag should start with (#) and end with question mark (?). Ex {#loop?} ... {/loop?}.
Example
Data Source
Hearby the example of data source for different options.
- SQL
- PL/SQL returning SQL
- PL/SQL returning JSON
- JSON
select 'file1' as "filename",
       cursor (
         select cursor (
           select product_name as "prod_name",
                  category     as "category"
           from aop_sample_product_info
         ) as "products"
       )       as "data"
from dual
declare
  l_return clob;
begin
  l_return := q'[
    select 'file1' as "filename",
           cursor (
             select cursor (
               select product_name as "prod_name",
                      category     as "category"
               from aop_sample_product_info
             ) as "products"
           )       as "data"
    from dual
    ]';
  return l_return;
end;
declare
  l_cursor sys_refcursor;
  l_return clob; -- can also be varchar2, make sure it corresponds to the structure in the JSON
begin
  apex_json.initialize_clob_output(dbms_lob.call, true, 2);
  open l_cursor for
    select 'file1' as "filename",
           cursor (
             select cursor (
               select product_name as "prod_name",
                      category     as "category"
               from aop_sample_product_info
             ) as "products"
           )       as "data"
    from dual

  apex_json.write(l_cursor);
  l_return := apex_json.get_clob_output;
  return l_return;
end;
[
  {
    "filename": "file1",
    "data": [
      {
        "products": [
          {
            "prod_name": "Business Shirt",
            "category": "Mens"
          },
          {
            "prod_name": "Trousers",
            "category": "Mens"
          },
          {
            "prod_name": "Jacket",
            "category": "Mens"
          },
          {
            "prod_name": "Blouse",
            "category": "Womens"
          },
          {
            "prod_name": "Skirt",
            "category": "Womens"
          },
          {
            "prod_name": "Ladies Shoes",
            "category": "Womens"
          },
          {
            "prod_name": "Belt",
            "category": "Accessories"
          },
          {
            "prod_name": "Bag",
            "category": "Accessories"
          },
          {
            "prod_name": "Mens Shoes",
            "category": "Mens"
          },
          {
            "prod_name": "Wallet",
            "category": "Accessories"
          }
        ]
      }
    ]
  }
]
Template
The template contains the normal loop tag and uncertain loop tag to demonstrate the difference between them.
 uncertain-data-loop-template.docx
Output
Upon processing the provided template and data using AOP, the resulting output is as follows.
uncertain-data-loop-output.docx
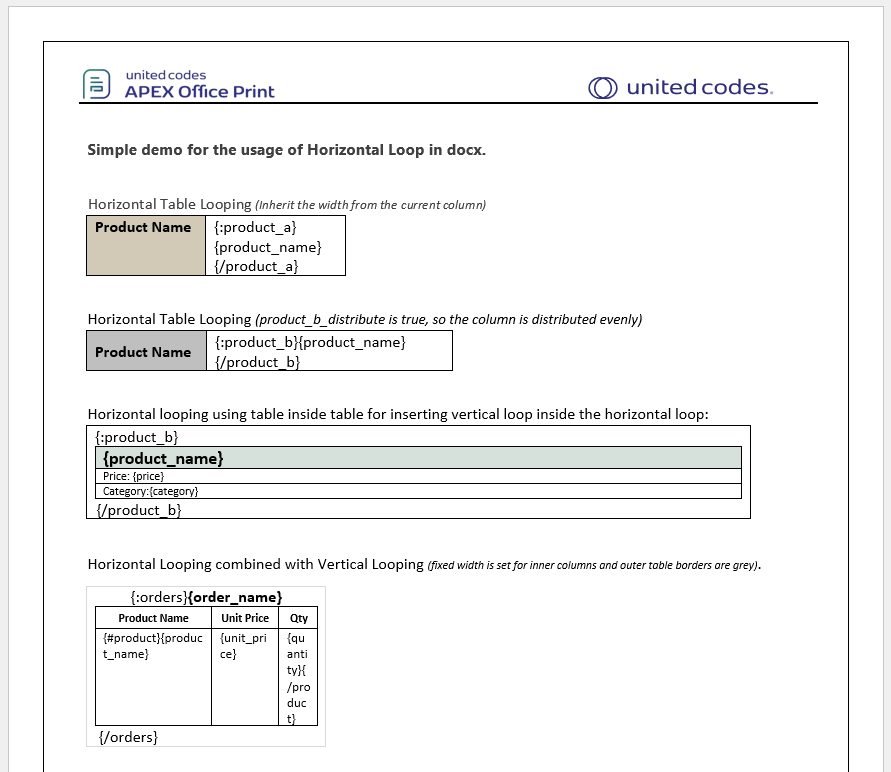
Horizontal Tabular Looping
Available From: v18.1Horizontal Tabular Looping interates over the records and creates the column for each records. It also consists opening and colosing tag, denoted by : and / followed by tagname enclosed inside delimiters respectively. For example: {:record1} ... {/record1} . However, this tag can be used to repeat only one row in Word(In Excel, this works like normal loop tag and repeats the cells defined by the rectangular boundary of starting and closing tag).
Since AOPv22.1.5, _distribute can be used with tag name to distribute the data evenly among the columns. For example, the following tag will distribute the data evenly among the columns:
'true' as "tagname_distribute"
It's value can be boolean true or false depending on the use case.
Example
Following is an example on how this could be used:
Data Source
Hearby the example of data source for different options.
- SQL
- PL/SQL returning SQL
- PL/SQL returning JSON
- JSON
select 'file1' as "filename",
       cursor (
         select cursor (
           select product_name as "product_name"
           from aop_sample_product_info p
           where rownum < 5
         )      as "product_a",
                cursor (
                  select p.product_name as "product_name",
                         p.list_price   as "price",
                         p.category     as "category"
                  from aop_sample_product_info p
                  where rownum < 5
                        and product_id > 5
                )      as "product_b",
                "true" as "product_b_distribute",
                cursor (
                  select o.order_total      as "order_total",
                         'Order ' || rownum as "order_name",
                         cursor (
                           select p.product_name as "product_name",
                                  i.quantity     as "quantity",
                                  i.unit_price   as "unit_price"
                           from aop_sample_order_items  i,
                                aop_sample_product_info p
                           where o.order_id = i.order_id
                                 and i.product_id = p.product_id
                                 and rownum < 5
                         )                  "product"
                  from aop_sample_orders o
                  where o.customer_id < 3
                )      "orders"
         from dual
       )       as "data"
from dual
declare
  l_return clob;
begin
  l_return := q'[
    select 'file1' as "filename",
           cursor (
             select cursor (
               select product_name as "product_name"
               from aop_sample_product_info p
               where rownum < 5
             )      as "product_a",
                    cursor (
                      select p.product_name as "product_name",
                             p.list_price   as "price",
                             p.category     as "category"
                      from aop_sample_product_info p
                      where rownum < 5
                            and product_id > 5
                    )      as "product_b",
                    "true" as "product_b_distribute",
                    cursor (
                      select o.order_total      as "order_total",
                             'Order ' || rownum as "order_name",
                             cursor (
                               select p.product_name as "product_name",
                                      i.quantity     as "quantity",
                                      i.unit_price   as "unit_price"
                               from aop_sample_order_items  i,
                                    aop_sample_product_info p
                               where o.order_id = i.order_id
                                     and i.product_id = p.product_id
                                     and rownum < 5
                             )                  "product"
                      from aop_sample_orders o
                      where o.customer_id < 3
                    )      "orders"
             from dual
           )       as "data"
    from dual
    ]';
  return l_return;
end;
declare
  l_cursor sys_refcursor;
  l_return clob; -- can also be varchar2, make sure it corresponds to the structure in the JSON
begin
  apex_json.initialize_clob_output(dbms_lob.call, true, 2);
  open l_cursor for
    select 'file1' as "filename",
           cursor (
             select cursor (
               select product_name as "product_name"
               from aop_sample_product_info p
               where rownum < 5
             )      as "product_a",
                    cursor (
                      select p.product_name as "product_name",
                             p.list_price   as "price",
                             p.category     as "category"
                      from aop_sample_product_info p
                      where rownum < 5
                            and product_id > 5
                    )      as "product_b",
                    "true" as "product_b_distribute",
                    cursor (
                      select o.order_total      as "order_total",
                             'Order ' || rownum as "order_name",
                             cursor (
                               select p.product_name as "product_name",
                                      i.quantity     as "quantity",
                                      i.unit_price   as "unit_price"
                               from aop_sample_order_items  i,
                                    aop_sample_product_info p
                               where o.order_id = i.order_id
                                     and i.product_id = p.product_id
                                     and rownum < 5
                             )                  "product"
                      from aop_sample_orders o
                      where o.customer_id < 3
                    )      "orders"
             from dual
           )       as "data"
    from dual

  apex_json.write(l_cursor);
  l_return := apex_json.get_clob_output;
  return l_return;
end;
[
  {
    "filename": "file1",
    "data": [
      {
        "product_a": [
          {
            "product_name": "Business Shirt"
          },
          {
            "product_name": "Trousers"
          },
          {
            "product_name": "Jacket"
          },
          {
            "product_name": "Blouse"
          }
        ],
        "product_b": [
          {
            "product_name": "Ladies Shoes",
            "price": 120,
            "category": "Womens"
          },
          {
            "product_name": "Belt",
            "price": 30,
            "category": "Accessories"
          },
          {
            "product_name": "Bag",
            "price": 125,
            "category": "Accessories"
          },
          {
            "product_name": "Mens Shoes",
            "price": 110,
            "category": "Mens"
          }
        ],
        "product_b_distribute": true,
        "orders": [
          {
            "order_total": 2380,
            "order_name": "Order 1",
            "product": [
              {
                "product_name": "Business Shirt",
                "quantity": 3,
                "unit_price": 50
              },
              {
                "product_name": "Trousers",
                "quantity": 3,
                "unit_price": 80
              },
              {
                "product_name": "Jacket",
                "quantity": 3,
                "unit_price": 150
              },
              {
                "product_name": "Blouse",
                "quantity": 3,
                "unit_price": 60
              }
            ]
          },
          {
            "order_total": 1640,
            "order_name": "Order 2",
            "product": [
              {
                "product_name": "Blouse",
                "quantity": 4,
                "unit_price": 60
              },
              {
                "product_name": "Skirt",
                "quantity": 4,
                "unit_price": 80
              },
              {
                "product_name": "Ladies Shoes",
                "quantity": 4,
                "unit_price": 120
              },
              {
                "product_name": "Bag",
                "quantity": 4,
                "unit_price": 125
              }
            ]
          },
          {
            "order_total": 730,
            "order_name": "Order 3",
            "product": [
              {
                "product_name": "Blouse",
                "quantity": 4,
                "unit_price": 60
              },
              {
                "product_name": "Skirt",
                "quantity": 3,
                "unit_price": 80
              },
              {
                "product_name": "Bag",
                "quantity": 2,
                "unit_price": 125
              }
            ]
          }
        ]
      }
    ]
  }
]
Template
The template consists usage of horizontal looping with and without _distribute, and combination of vertical and horizontal loops as shown below.
horizontal-tabular-looping.docx
Output
With the provided data source and the template, following output is generated by AOP.

horizontal-tabular-looping-output.docx
Conditions
The Loop tag can also serve as a conditional tag by utilizing comparison operators, as demonstrated in the example below. It supports iteration of data in bullets and numbering as well. For more detailed explanation on conditions, You can visit Simple Angular like Expressions section of General Tags.
Example
Data Source
Hearby the example of data source for different options.
- SQL
- PL/SQL returning SQL
- PL/SQL returning JSON
- JSON
select 'file1' as "filename",
       cursor (
         select cursor (
           select product_name as "prod_name",
                  list_price   as "price",
                  category     as "category",
                  case
                    when mod(rownum, 2) = 0 then
                      'true'
                    else
                      'false'
                  end          as "in_stock"
           from aop_sample_product_info
         ) as "products"
       )       as "data"
from dual
declare
  l_return clob;
begin
  l_return := q'[
    select 'file1' as "filename",
           cursor (
             select cursor (
               select product_name as "prod_name",
                      list_price   as "price",
                      category     as "category",
                      case
                        when mod(rownum, 2) = 0 then
                          'true'
                        else
                          'false'
                      end          as "in_stock"
               from aop_sample_product_info
             ) as "products"
           )       as "data"
    from dual
    ]';
  return l_return;
end;
declare
  l_cursor sys_refcursor;
  l_return clob; -- can also be varchar2, make sure it corresponds to the structure in the JSON
begin
  apex_json.initialize_clob_output(dbms_lob.call, true, 2);
  open l_cursor for
    select 'file1' as "filename",
           cursor (
             select cursor (
               select product_name as "prod_name",
                      list_price   as "price",
                      category     as "category",
                      case
                        when mod(rownum, 2) = 0 then
                          'true'
                        else
                          'false'
                      end          as "in_stock"
               from aop_sample_product_info
             ) as "products"
           )       as "data"
    from dual

  apex_json.write(l_cursor);
  l_return := apex_json.get_clob_output;
  return l_return;
end;
[
  {
    "filename": "file1",
    "data": [
      {
        "products": [
          {
            "prod_name": "Business Shirt",
            "price": 50,
            "category": "Mens",
            "in_stock": false
          },
          {
            "prod_name": "Trousers",
            "price": 80,
            "category": "Mens",
            "in_stock": true
          },
          {
            "prod_name": "Jacket",
            "price": 150,
            "category": "Mens",
            "in_stock": false
          },
          {
            "prod_name": "Blouse",
            "price": 60,
            "category": "Womens",
            "in_stock": true
          },
          {
            "prod_name": "Skirt",
            "price": 80,
            "category": "Womens",
            "in_stock": false
          },
          {
            "prod_name": "Ladies Shoes",
            "price": 120,
            "category": "Womens",
            "in_stock": true
          },
          {
            "prod_name": "Belt",
            "price": 30,
            "category": "Accessories",
            "in_stock": false
          },
          {
            "prod_name": "Bag",
            "price": 125,
            "category": "Accessories",
            "in_stock": true
          },
          {
            "prod_name": "Mens Shoes",
            "price": 110,
            "category": "Mens",
            "in_stock": false
          },
          {
            "prod_name": "Wallet",
            "price": 50,
            "category": "Accessories",
            "in_stock": true
          }
        ]
      }
    ]
  }
]
Templates
The following template shows the utilization of loop tags in various conditions, such as boolean, string, and numeric value checks, to retrieve the desired data within a table. It showcases examples of using bullets and numbering as well.

Outputs
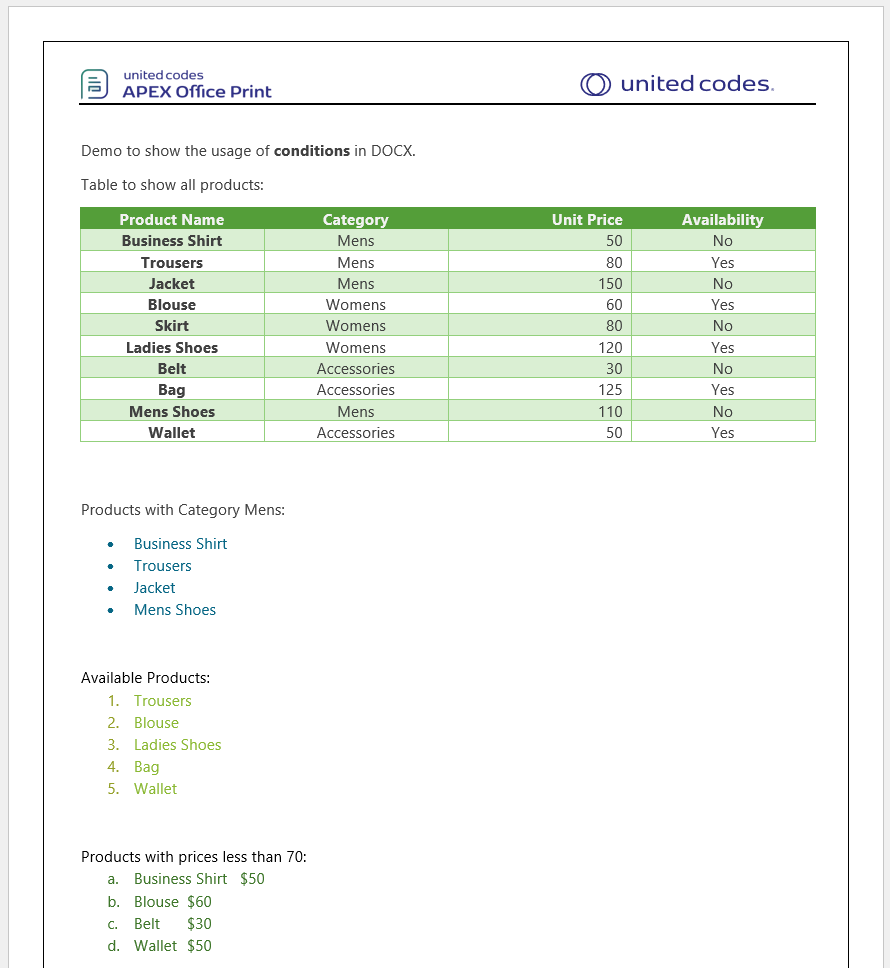
Table Cell Style Tag
Available From: v21.1.1Table cell style tag can be used to specify the table cell markup/style on top of replacing the tag with text. Background color, cell width and row merging are supported.
The tag will end with a $ sign at the end. This dollar sign should be prepended with the column name that holds the value of the replacing text.
This tag in Word is to be used inside a table cell. The options for cell markup are limited in Word. The background color and width for the given column can be set. Width manipulation is available since AOPv20.2. Giving a width of 0 will remove the whole column. The background information should be specified by appending "_cell_background_color" and the width info by appending "_width". The data for the background color should be in hex format. The cell-width can be specified in "in", "cm", "px", "pt", "em" and "%" (in respect to the initial width of the table).
Table Cell Style Options
The options should be appended with the column name that holds the value. The options are case sensitive.
- _cell_background_color : provides the backgound color of current cell. hex value.
- _width: provides the width of the cell. The values can be in cm, in, px, pt, em, and "%" (in respect to the initial width of the table). Setting it to 0 will remove the whole column.
- _preserve_total_width_of_table: If the column is to be removed(setting the width of column to 0) but the total width of table should not be decreased, then set it to
true(falseby default.) The width of column to be removed is evenly distributed among the columns of the table.
(Ex.true as "columnName_preserve_total_width_of_table").
Example Cell Styling
Here is an example showcasing the usage of the Table Cell Style Tag to demonstrate cell styling within a table.
Data Source
Hearby the example data sources for different options.
- SQL
- PL/SQL returning SQL
- PL/SQL returning JSON
- JSON
select 'file1' as "filename",
       cursor (
         select 'Country'          as "c1_title",
                'Nepal'            as "c1_data",
                '#eb9b34'          as "c1_title_cell_background_color",
                '6cm'              as "c1_title_width",
                'Continent'        as "c2_title",
                'Asia'             as "c2_data",
                '5cm'              as "c2_title_width",
                '#5c803b'          as "c2_title_cell_background_color",
                'Highest Altitude' as "c3_title",
                '8848m'            as "c3_data",
                '5cm'              as "c3_title_width",
                '#803b3b'          as "c3_title_cell_background_color",
                'Will be removed'  as "c4_title",
                ''                 as "c4_data",
                '0%'               as "c4_title_width"
         from dual
       )       as "data"
from dual;
declare
  l_return clob;
begin
  l_return := q'[
    select 'file1' as "filename",
           cursor (
             select 'Country'          as "c1_title",
                    'Nepal'            as "c1_data",
                    '#eb9b34'          as "c1_title_cell_background_color",
                    '6cm'              as "c1_title_width",
                    'Continent'        as "c2_title",
                    'Asia'             as "c2_data",
                    '5cm'              as "c2_title_width",
                    '#5c803b'          as "c2_title_cell_background_color",
                    'Highest Altitude' as "c3_title",
                    '8848m'            as "c3_data",
                    '5cm'              as "c3_title_width",
                    '#803b3b'          as "c3_title_cell_background_color",
                    'Will be removed'  as "c4_title",
                    ''                 as "c4_data",
                    '0%'               as "c4_title_width"
             from dual
           )       as "data"
    from dual;
    ]';
  return l_return;
end;
declare
  l_cursor sys_refcursor;
  l_return clob; -- can also be varchar2, make sure it corresponds to the structure in the JSON
begin
  apex_json.initialize_clob_output(dbms_lob.call, true, 2);
  open l_cursor for
    select 'file1' as "filename",
           cursor (
             select 'Country'          as "c1_title",
                    'Nepal'            as "c1_data",
                    '#eb9b34'          as "c1_title_cell_background_color",
                    '6cm'              as "c1_title_width",
                    'Continent'        as "c2_title",
                    'Asia'             as "c2_data",
                    '5cm'              as "c2_title_width",
                    '#5c803b'          as "c2_title_cell_background_color",
                    'Highest Altitude' as "c3_title",
                    '8848m'            as "c3_data",
                    '5cm'              as "c3_title_width",
                    '#803b3b'          as "c3_title_cell_background_color",
                    'Will be removed'  as "c4_title",
                    ''                 as "c4_data",
                    '0%'               as "c4_title_width"
             from dual
           )       as "data"
    from dual;

  apex_json.write(l_cursor);
  l_return := apex_json.get_clob_output;
  return l_return;
end;
[
  {
    "name": "file1",
    "data": {
      "c1_title": "Country",
      "c1_data": "Nepal",
      "c1_title_cell_background_color": "#eb9b34",
      "c1_title_width": "6cm",
      "c2_title": "Continent",
      "c2_data": "Asia",
      "c2_title_width": "5cm",
      "c2_title_cell_background_color": "5c803b",
      "c3_title": "Highest Altitude",
      "c3_data": "8848m",
      "c3_title_width": "5cm",
      "c3_title_cell_background_color": "803b3b",
      "c4_title": "Will be removed",
      "c4_data": "",
      "c4_title_width": "0%"
    }
  }
]
Template
In the above source, we have four columns. We will be giving 4 columns different colors and width. The last column will be removed, as the width provided from data source is 0%. The template looks as follows:

Output
Upon processing the provided template and data using AOP, the resulting output is as follows.

Example Row Merging
Available From: v21.1Table Cell Style can be also be used to merge rows.
_group should be appended with the column name to merge two or more cells, if the values in those cells are same. As for example
Example
Data Source
Hearby the example data sources for different options.
- SQL
- PL/SQL returning SQL
- PL/SQL returning JSON
- JSON
select 'file1' as "filename",
       cursor (
         select c.cust_first_name as "cust_first_name",
                c.cust_last_name  as "cust_last_name",
                c.cust_city       as "cust_city",
                cursor (
                  select o.order_total      as "order_total",
                         'Order ' || rownum as "order_name",
                         cursor (
                           select p.product_name as "product_name",
                                  i.quantity     as "quantity",
                                  i.unit_price   as "unit_price",
                                  p.category     as "category",
                                  'true'         as "category_group"
                           from aop_sample_order_items  i,
                                aop_sample_product_info p
                           where o.order_id = i.order_id
                                 and i.product_id = p.product_id
                           order by p.category asc
                         )                  "product"
                  from aop_sample_orders o
                  where c.customer_id = o.customer_id
                )                 "orders"
         from aop_sample_customers c
         where customer_id = 1
       )       as "data"
from dual
declare
  l_return clob;
begin
  l_return := q'[
    select 'file1' as "filename",
           cursor (
             select c.cust_first_name as "cust_first_name",
                    c.cust_last_name  as "cust_last_name",
                    c.cust_city       as "cust_city",
                    cursor (
                      select o.order_total      as "order_total",
                             'Order ' || rownum as "order_name",
                             cursor (
                               select p.product_name as "product_name",
                                      i.quantity     as "quantity",
                                      i.unit_price   as "unit_price",
                                      p.category     as "category",
                                      'true'         as "category_group"
                               from aop_sample_order_items  i,
                                    aop_sample_product_info p
                               where o.order_id = i.order_id
                                     and i.product_id = p.product_id
                               order by p.category asc
                             )                  "product"
                      from aop_sample_orders o
                      where c.customer_id = o.customer_id
                    )                 "orders"
             from aop_sample_customers c
             where customer_id = 1
           )       as "data"
    from dual
    ]';
  return l_return;
end;
declare
  l_cursor sys_refcursor;
  l_return clob; -- can also be varchar2, make sure it corresponds to the structure in the JSON
begin
  apex_json.initialize_clob_output(dbms_lob.call, true, 2);
  open l_cursor for
    select 'file1' as "filename",
           cursor (
             select c.cust_first_name as "cust_first_name",
                    c.cust_last_name  as "cust_last_name",
                    c.cust_city       as "cust_city",
                    cursor (
                      select o.order_total      as "order_total",
                             'Order ' || rownum as "order_name",
                             cursor (
                               select p.product_name as "product_name",
                                      i.quantity     as "quantity",
                                      i.unit_price   as "unit_price",
                                      p.category     as "category",
                                      'true'         as "category_group"
                               from aop_sample_order_items  i,
                                    aop_sample_product_info p
                               where o.order_id = i.order_id
                                     and i.product_id = p.product_id
                               order by p.category asc
                             )                  "product"
                      from aop_sample_orders o
                      where c.customer_id = o.customer_id
                    )                 "orders"
             from aop_sample_customers c
             where customer_id = 1
           )       as "data"
    from dual

  apex_json.write(l_cursor);
  l_return := apex_json.get_clob_output;
  return l_return;
end;
[
  {
    "filename": "file1",
    "data": [
      {
        "cust_first_name": "John",
        "cust_last_name": "Dulles",
        "cust_city": "Sterling",
        "orders": [
          {
            "order_total": 2380,
            "order_name": "Order 1",
            "product": [
              {
                "product_name": "Bag",
                "quantity": 4,
                "unit_price": 125,
                "category": "Accessories",
                "category_group": true
              },
              {
                "product_name": "Wallet",
                "quantity": 2,
                "unit_price": 50,
                "category": "Accessories",
                "category_group": true
              },
              {
                "product_name": "Belt",
                "quantity": 2,
                "unit_price": 30,
                "category": "Accessories",
                "category_group": true
              },
              {
                "product_name": "Mens Shoes",
                "quantity": 2,
                "unit_price": 110,
                "category": "Mens",
                "category_group": true
              },
              {
                "product_name": "Jacket",
                "quantity": 3,
                "unit_price": 150,
                "category": "Mens",
                "category_group": true
              },
              {
                "product_name": "Business Shirt",
                "quantity": 3,
                "unit_price": 50,
                "category": "Mens",
                "category_group": true
              },
              {
                "product_name": "Trousers",
                "quantity": 3,
                "unit_price": 80,
                "category": "Mens",
                "category_group": true
              },
              {
                "product_name": "Ladies Shoes",
                "quantity": 2,
                "unit_price": 120,
                "category": "Womens",
                "category_group": true
              },
              {
                "product_name": "Blouse",
                "quantity": 3,
                "unit_price": 60,
                "category": "Womens",
                "category_group": true
              },
              {
                "product_name": "Skirt",
                "quantity": 3,
                "unit_price": 80,
                "category": "Womens",
                "category_group": true
              }
            ]
          }
        ]
      }
    ]
  }
]
Template
The template shows the merging of category {category$} column that have same value.
Output
Upon processing the provided template and data using AOP, the resulting output is as follows.

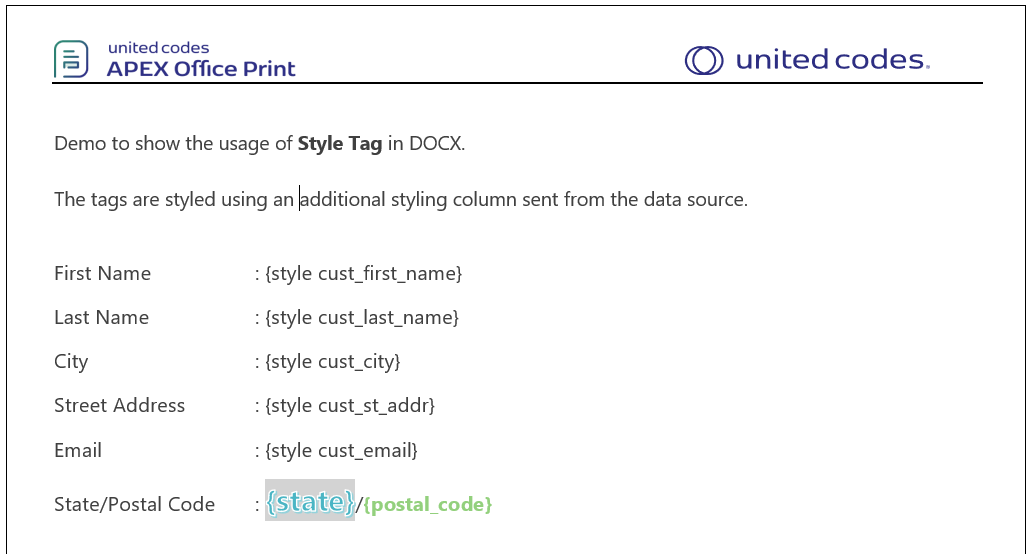
Style Tag
Available From: v20.3The {style ...} tag enables users to style their text in Word. It functions similar to a regular substitution, while also allowing users to provide the desired style from their side using SQL. It currently supports 7 different styling options, users can choose from following options. These options should be included in the data by appending _ to the name of the column that holds the replacing text value. If the value is in column progress column, The font family option would be progress_font_family. The options are case sensitive.
- _font_family: Determines the font family. Valid font names like: AnjaliOldLipi, Z003, Liberation Sans
- _font_size: Determines the font size of the replacing text. Values should be numbers or Points like 20pt , 100. Note: If the number is used like (50,100,200) then the actual text size in output reduces by 25% whereas using “pt” results in the same size as given input.
- _font_color: Determines the font color of the replacing text. Hex Color Codes like #ff00ff #002060
- _bold : Determines whether or not the replacing text should be bold. Can be: true,false,”true”,”false”,0,1
- _italic : Determines whether or not the replacing text should be italic. Values can be true,false,”true”,”false”,0,1
- _underline : Determines whether or not the replacing text should be underlined. Values can be: true,false,”true”,”false”,0,1
- _strikethrough : Determines whether or not the replacing text should be strikethrough. Values can be true,false,”true”,”false”,0,1
- _highlight : Determines the color for highlighting the color of replacing text. Values should be thename of colors which are available for highlighting in Word. Currently 15 colors are supported: yellow, green, cyan, magenta, blue, red, darkBlue, darkCyan, darkGreen, darkMagenta, darkRed, darkYellow, darkGray, lightGray, black.
Users can omit including above tags for styling which results in the same styling as defined in the template for these features.
Example
Data Source
Hearby the example data sources for different options.
- SQL
- PL/SQL returning SQL
- PL/SQL returning JSON
- JSON
select 'file1' as " filename",
       cursor (
         select c.cust_first_name      as "cust_first_name",
                c.cust_last_name       as "cust_last_name",
                c.cust_city            as "cust_city",
                c.cust_street_address1 as "cust_st_addr",
                c.cust_email           as "cust_email",
                c.cust_state           as "state",
                c.cust_postal_code     as "postal_code",
                'NanumMyeongjo'        as "cust_first_name_font_family",
                '25pt'                 as "cust_first_name_font_size",
                '#ff00ff'              as "cust_first_name_font_color",
                1                      as "cust_last_name_bold",
                1                      as "cust_city_italic",
                1                      as "cust_st_addr_underline",
                1                      as "cust_email_strikethrough",
                'black'                as "cust_st_addr_highlight",
                'white'                as "cust_st_addr_font_color",
                ''                     as
         from aop_sample_customers c
         where c.customer_id = 1
       )       as "data"
from dual
declare
  l_return clob;
begin
  l_return := q'[
    select 'file1' as " filename",
           cursor (
             select c.cust_first_name      as "cust_first_name",
                    c.cust_last_name       as "cust_last_name",
                    c.cust_city            as "cust_city",
                    c.cust_street_address1 as "cust_st_addr",
                    c.cust_email           as "cust_email",
                    c.cust_state           as "state",
                    c.cust_postal_code     as "postal_code",
                    'NanumMyeongjo'        as "cust_first_name_font_family",
                    '25pt'                 as "cust_first_name_font_size",
                    '#ff00ff'              as "cust_first_name_font_color",
                    1                      as "cust_last_name_bold",
                    1                      as "cust_city_italic",
                    1                      as "cust_st_addr_underline",
                    1                      as "cust_email_strikethrough",
                    'black'                as "cust_st_addr_highlight",
                    'white'                as "cust_st_addr_font_color",
                    ''                     as
             from aop_sample_customers c
             where c.customer_id = 1
           )       as "data"
    from dual
    ]';
  return l_return;
end;
declare
  l_cursor sys_refcursor;
  l_return clob; -- can also be varchar2, make sure it corresponds to the structure in the JSON
begin
  apex_json.initialize_clob_output(dbms_lob.call, true, 2);
  open l_cursor for
    select 'file1' as " filename",
           cursor (
             select c.cust_first_name      as "cust_first_name",
                    c.cust_last_name       as "cust_last_name",
                    c.cust_city            as "cust_city",
                    c.cust_street_address1 as "cust_st_addr",
                    c.cust_email           as "cust_email",
                    c.cust_state           as "state",
                    c.cust_postal_code     as "postal_code",
                    'NanumMyeongjo'        as "cust_first_name_font_family",
                    '25pt'                 as "cust_first_name_font_size",
                    '#ff00ff'              as "cust_first_name_font_color",
                    1                      as "cust_last_name_bold",
                    1                      as "cust_city_italic",
                    1                      as "cust_st_addr_underline",
                    1                      as "cust_email_strikethrough",
                    'black'                as "cust_st_addr_highlight",
                    'white'                as "cust_st_addr_font_color",
                    ''                     as
             from aop_sample_customers c
             where c.customer_id = 1
           )       as "data"
    from dual

  apex_json.write(l_cursor);
  l_return := apex_json.get_clob_output;
  return l_return;
end;
[
  {
    " filename": "file1",
    "data": [
      {
        "cust_first_name": "John",
        "cust_last_name": "Dulles",
        "cust_city": "Sterling",
        "cust_st_addr": "45020 Aviation Drive",
        "cust_email": "john.dulles@email.com",
        "state": "VA",
        "postal_code": 20166,
        "cust_first_name_font_family": "NanumMyeongjo",
        "cust_first_name_font_size": "25pt",
        "cust_first_name_font_color": "#ff00ff",
        "cust_last_name_bold": 1,
        "cust_city_italic": 1,
        "cust_st_addr_underline": 1,
        "cust_email_strikethrough": 1,
        "cust_st_addr_highlight": "black",
        "cust_st_addr_font_color": "white"
      }
    ]
  }
]
Template
The template consist of multiple style tags used for the styling of different column values.
Output
The provided data and template will result in:

HTML Content Tag
Available From: v2.1AOP also provides option to insert the HTML contents in Word using HTML tag( _ followed by column name enclosed by the delimiters eg. {_htmlContent}). This enabled render of HTML contents within word. The tags that are currently supported are:
Supported HTML Tags
| Tag | Description |
|---|---|
| <br /> | in order to introduce breaks (newline) |
| <p> .. </p> | represents a paragraph |
| <strong> .. </strong> | bold text |
| <b> .. </b> | bold text |
| <s> .. </s> | strike through |
| <u> .. </u> | underline |
| <em> .. </em> | italics |
| <h1> .. </h1> | heading 1 |
| <h2> .. </h2> | heading 2 |
| <h3> .. </h3> | heading 3 |
| <h4> .. </h4> | heading 4 |
| <h5> .. </h5> | heading 5 |
| <h6> .. </h6> | heading 6 |
| <sub> .. </sub> | subscript |
| <sup> .. </sup> | superscript |
| <ol> .. </ol> | ordered list |
| <ul> .. </ul> | unordered list |
| <li> .. </li> | list item |
| <table> .. </table> | table (including th, tr, td) |
| <caption> .. </caption> | caption |
| <img> | image |
| <pre> .. </pre> | preformatted text |
| <blockquote>.</blockquote> | quoting for multiple lines |
| <q> .. </q> | quoting for single line |
| <dfn> .. </dfn> | definition element |
| <span style="..">..</span> | text between the span will have the style defined, background-color, color, font-size and font-family are supported. |
Table
The HTML table tag is supported by AOP. Here are the table elements that are supported:
<table> ... </table>
<tr> ... </tr>
<th> ... </th>
<td> ... </td>
<thead> ... </thead>
<tbody> ... </tbody>
<tfoot> ... </tfoot>
The <thead> tag defines the header row and the <tfoot> tag defines the "total row".
While creating a template for an HTML table we can specify a table style. We can do this either by creating a new design and naming it like "customTable" or by modifying an existing table style and giving an alias to that table.

Now, Customizing the table and providing Name for the table.
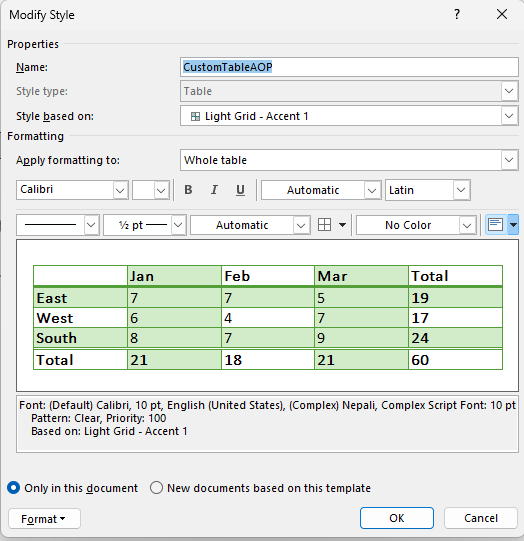
To use the custom table, you can add _custom_table_style in the prefix of the column name and table name to its value.
The sql to use custom table will be as follows :
        ...
        '/.... table content here ..../' as "tableContent",
        'CustomTableAOP' as  "tableContent_custom_table_style",
        ...
Ordered Lists and Unordered Lists
APEX Office Print supports HTML ordered <ol> and unordered <ul> tags. These two tags can also be nested. The example below shows the usage of these two tags.
Word is capable of changing the styling of the symbols for <ol> and <ul> tags. This can be achieved through adding an additional parameter to the json file provided. For the <ol> tag this is _ordered_list_style and for the <ul> tag this is _unordered_list_style. These properties take numeric values.

If the styling in the red box choosed that would correspond to styling number 1 which is indicated in the "Document Number Formats" with green box. If another style were to choosen that would have style number 2.
In short every added style is enumarated starting from 1. For example if the below JSON is provided with the above HTML code,
'......' as "listContent",
'1' as "listContent_ordered_list_style",
Ordered list starting value can be user defined with HTML start parameter. Given the example HTML code below:
<ol start="10">
    <li>Item 1</li>
    <li>Item 2</li>
    <li>Item 3</li>
</ol>
Furthermore the list hierarchary can be customize and style attribute of <ol> tag are supported. Style attributes which are supported are listed below:
    <ol style="list-style-type:decimal">...</ol>                : starting with 1.
    <ol style="list-style-type:decimal-leading-zero">...</ol>   : strrting with 01.
    <ol style="list-style-type:lower-alpha">...</ol>            : starting with a)
    <ol style="list-style-type:lower-latin">...</ol>            : starting with a.
    <ol style="list-style-type:lower-roman">...</ol>            : starting with i.
    <ol style="list-style-type:upper-alpha">...</ol>            : starting with A)
    <ol style="list-style-type:upper-latin">...</ol>            : starting with A.
    <ol style="list-style-type:upper-roman">...</ol>            : starting with I.
When manual image size is not provided and size of image is larger than the dimension of page, then size of image is reset to fit in page without changing the aspect ratio of the image.
Example
Data Source
Hereby example data source for different options.
- SQL
- PL/SQL returning SQL
- PL/SQL returning JSON
- JSON
select 'file1' as "filename",
       cursor (
         select nvl(:p172_htmlcontent, 'no <b>apex</b> session')                                                                                          as
         "overview",
                cursor (
                  select cust_first_name           as "first",
                         '<p><strong><span style="color:green">'
                         || cust_first_name
                         || '</span></strong></p>' as "name_st_green"
                  from aop_sample_customers
                )                       as "cust_names",
                '<ol> <li> Level 1.1 <ul> <li>Level 2.1</li> <li> Level 2.2 <ol> <li>Level 3.1</li> <li>Level 3.2</li> </ol> </li> </ul> </li> <li>Level 1.2</li> <li>Level 1.3</li> </ol>' as "nestedList",
                '<ol start="10"> <li>Item 1</li> <li>Item 2</li> <li>Item 3</li> </ol>'         as "list_start_10",
                '<ol> <li> Level 1.1 <ol type="A"> <li>Level 2.1</li> <li> Level 2.2 <ol style="list-style-type:lower-alpha"> <li>Level 3.1</li> <li>Level 3.2</li> </ol> </li> </ol> </li> <li>Level 1.2</li> <li>Level 1.3</li> </ol>' as "list_with_style",
                '<ol> <li>Cat</li> <li>Dog</li> </ol>'  as "list2",
                '1'                     as "list2_ordered_list_style",+
                '<table border="1" > <tr> <th>Name</th> <th>Age</th> <th>Country</th> </tr> <tr> <td>Harry Depp</td> <td>28</td> <td>Britain</td> </tr> <tr> <td>John Smith</td> <td>35</td> <td>USA</td> </tr> <tr> <td>Ram Krishna</td> <td>19</td> <td>Nepal</td> </tr> </table>' as "html_table_1",
                '<table border="1"> <thead> <tr> <th>Company</th> <th>Contact</th> <th>Country</th> </tr> </thead> <tbody> <tr> <td>Alfreds Futterkiste</td> <td>Maria Anders</td> <td>Germany</td> </tr> <tr> <td>Centro comercial Moctezuma</td> <td>Francisco Chang</td> <td>Mexico</td> </tr> <tr> <td>Ernst Handel</td> <td>Roland Mendel</td> <td>Austria</td> </tr> <tr> <td>Island Trading</td> <td>Helen Bennett</td> <td>UK</td> </tr> <tr> <td>Laughing Bacchus Winecellars</td> <td>Yoshi Tannamuri</td> <td>Canada</td> </tr> <tr> <td>Magazzini Alimentari Riuniti</td> <td>Giovanni Rovelli</td> <td>Italy</td> </tr> </tbody> <tfoot> <tr> <td>Company 2</td> <td>Contact 2</td> <td>Country 2</td> </tr> </tfoot> </table>' as "html_table_2",
                'CustomTableAOP'        as "html_table_2_custom_table_style",
                '<img src="https://picsum.photos/200/150">' as "image1",
                '<img src="https://picsum.photos/300/300" width="75px" height="75px">' as "image2"
         from dual
       )       as "data"
from dual
declare
  l_return clob;
begin
  l_return := q'[
    select 'file1' as "filename",
           cursor (
             select nvl(:p172_htmlcontent, 'no <b>apex</b> session')                                                                                          as
             "overview",
                    cursor (
                      select cust_first_name           as "first",
                             '<p><strong><span style="color:green">'
                             || cust_first_name
                             || '</span></strong></p>' as "name_st_green"
                      from aop_sample_customers
                    )                       as "cust_names",
                    '<ol> <li> Level 1.1 <ul> <li>Level 2.1</li> <li> Level 2.2 <ol> <li>Level 3.1</li> <li>Level 3.2</li> </ol> </li> </ul> </li> <li>Level 1.2</li> <li>Level 1.3</li> </ol>' as "nestedList",
                    '<ol start="10"> <li>Item 1</li> <li>Item 2</li> <li>Item 3</li> </ol>'         as "list_start_10",
                    '<ol> <li> Level 1.1 <ol type="A"> <li>Level 2.1</li> <li> Level 2.2 <ol style="list-style-type:lower-alpha"> <li>Level 3.1</li> <li>Level 3.2</li> </ol> </li> </ol> </li> <li>Level 1.2</li> <li>Level 1.3</li> </ol>' as "list_with_style",
                    '<ol> <li>Cat</li> <li>Dog</li> </ol>'  as "list2",
                    '1'                     as "list2_ordered_list_style",+
                    '<table border="1" > <tr> <th>Name</th> <th>Age</th> <th>Country</th> </tr> <tr> <td>Harry Depp</td> <td>28</td> <td>Britain</td> </tr> <tr> <td>John Smith</td> <td>35</td> <td>USA</td> </tr> <tr> <td>Ram Krishna</td> <td>19</td> <td>Nepal</td> </tr> </table>' as "html_table_1",
                    '<table border="1"> <thead> <tr> <th>Company</th> <th>Contact</th> <th>Country</th> </tr> </thead> <tbody> <tr> <td>Alfreds Futterkiste</td> <td>Maria Anders</td> <td>Germany</td> </tr> <tr> <td>Centro comercial Moctezuma</td> <td>Francisco Chang</td> <td>Mexico</td> </tr> <tr> <td>Ernst Handel</td> <td>Roland Mendel</td> <td>Austria</td> </tr> <tr> <td>Island Trading</td> <td>Helen Bennett</td> <td>UK</td> </tr> <tr> <td>Laughing Bacchus Winecellars</td> <td>Yoshi Tannamuri</td> <td>Canada</td> </tr> <tr> <td>Magazzini Alimentari Riuniti</td> <td>Giovanni Rovelli</td> <td>Italy</td> </tr> </tbody> <tfoot> <tr> <td>Company 2</td> <td>Contact 2</td> <td>Country 2</td> </tr> </tfoot> </table>' as "html_table_2",
                    'CustomTableAOP'        as "html_table_2_custom_table_style",
                    '<img src="https://picsum.photos/200/150">' as "image1",
                    '<img src="https://picsum.photos/300/300" width="75px" height="75px">' as "image2"
             from dual
           )       as "data"
    from dual
    ]';
  return l_return;
end;
declare
  l_cursor sys_refcursor;
  l_return clob; -- can also be varchar2, make sure it corresponds to the structure in the JSON
begin
  apex_json.initialize_clob_output(dbms_lob.call, true, 2);
  open l_cursor for
    select 'file1' as "filename",
           cursor (
             select nvl(:p172_htmlcontent, 'no <b>apex</b> session')                                                                                          as
             "overview",
                    cursor (
                      select cust_first_name           as "first",
                             '<p><strong><span style="color:green">'
                             || cust_first_name
                             || '</span></strong></p>' as "name_st_green"
                      from aop_sample_customers
                    )                       as "cust_names",
                    '<ol> <li> Level 1.1 <ul> <li>Level 2.1</li> <li> Level 2.2 <ol> <li>Level 3.1</li> <li>Level 3.2</li> </ol> </li> </ul> </li> <li>Level 1.2</li> <li>Level 1.3</li> </ol>' as "nestedList",
                    '<ol start="10"> <li>Item 1</li> <li>Item 2</li> <li>Item 3</li> </ol>'         as "list_start_10",
                    '<ol> <li> Level 1.1 <ol type="A"> <li>Level 2.1</li> <li> Level 2.2 <ol style="list-style-type:lower-alpha"> <li>Level 3.1</li> <li>Level 3.2</li> </ol> </li> </ol> </li> <li>Level 1.2</li> <li>Level 1.3</li> </ol>' as "list_with_style",
                    '<ol> <li>Cat</li> <li>Dog</li> </ol>'  as "list2",
                    '1'                     as "list2_ordered_list_style",+
                    '<table border="1" > <tr> <th>Name</th> <th>Age</th> <th>Country</th> </tr> <tr> <td>Harry Depp</td> <td>28</td> <td>Britain</td> </tr> <tr> <td>John Smith</td> <td>35</td> <td>USA</td> </tr> <tr> <td>Ram Krishna</td> <td>19</td> <td>Nepal</td> </tr> </table>' as "html_table_1",
                    '<table border="1"> <thead> <tr> <th>Company</th> <th>Contact</th> <th>Country</th> </tr> </thead> <tbody> <tr> <td>Alfreds Futterkiste</td> <td>Maria Anders</td> <td>Germany</td> </tr> <tr> <td>Centro comercial Moctezuma</td> <td>Francisco Chang</td> <td>Mexico</td> </tr> <tr> <td>Ernst Handel</td> <td>Roland Mendel</td> <td>Austria</td> </tr> <tr> <td>Island Trading</td> <td>Helen Bennett</td> <td>UK</td> </tr> <tr> <td>Laughing Bacchus Winecellars</td> <td>Yoshi Tannamuri</td> <td>Canada</td> </tr> <tr> <td>Magazzini Alimentari Riuniti</td> <td>Giovanni Rovelli</td> <td>Italy</td> </tr> </tbody> <tfoot> <tr> <td>Company 2</td> <td>Contact 2</td> <td>Country 2</td> </tr> </tfoot> </table>' as "html_table_2",
                    'CustomTableAOP'        as "html_table_2_custom_table_style",
                    '<img src="https://picsum.photos/200/150">' as "image1",
                    '<img src="https://picsum.photos/300/300" width="75px" height="75px">' as "image2"
             from dual
           )       as "data"
    from dual

  apex_json.write(l_cursor);
  l_return := apex_json.get_clob_output;
  return l_return;
end;
[
{
"filename": "file1",
"data": [
{
"overview": "<div class=\"ck-content\"><p>This is text coming from the database / session in HTML format.<br>It supports:</p><p>Lists with numbers:</p><ol><li><strong>Bold</strong></li><li><i>Italic</i></li><li><u>Underline</u></li><li><s>Strikethrough</s></li><li>Sub<sub>script</sub></li><li><sup>Super</sup>script</li><li><span style=\"color:#FF0000;\">Text Color</span></li><li><span style=\"background-color:#FFFF00;\">Background Text Color</span></li></ol><p>Lists without numbers:</p><ul><li>item 1</li><li>item 2</li></ul><h2>Heading 1</h2><h2>Heading 2</h2><h3>Heading 3</h3><h4>Heading 4</h4><p>Normalt text with Font Change</p><p>Code font</p><figure class=\"table\" style=\"width:500px;\"><table><thead><tr><th>THeader 1</th><th>THeader 2</th></tr></thead><tbody><tr><td>some text</td><td> </td></tr><tr><td> </td><td>some other text</td></tr></tbody></table></figure><p>Other table with style:</p><figure class=\"table\" style=\"width:700px;\"><table style=\"border:1px solid green;\"><thead><tr><th>THeader 1</th><th>THeader 2</th></tr></thead><tbody><tr><td>some text</td><td> </td></tr><tr><td> </td><td>some other text</td></tr></tbody></table></figure><p> </p></div>",
"cust_names": [
{
"first": "Albert",
"name_st_green": "<p><strong><span style=\"color:green\">Albert</span></strong></p>"
},
{
"first": "Edward",
"name_st_green": "<p><strong><span style=\"color:green\">Edward</span></strong></p>"
},
{
"first": "Eugene",
"name_st_green": "<p><strong><span style=\"color:green\">Eugene</span></strong></p>"
},
{
"first": "Fiorello",
"name_st_green": "<p><strong><span style=\"color:green\">Fiorello</span></strong></p>"
},
{
"first": "Frank",
"name_st_green": "<p><strong><span style=\"color:green\">Frank</span></strong></p>"
},
{
"first": "John",
"name_st_green": "<p><strong><span style=\"color:green\">John</span></strong></p>"
},
{
"first": "William",
"name_st_green": "<p><strong><span style=\"color:green\">William</span></strong></p>"
}
],
"nestedList": "<ol> <li> Level 1.1 <ul> <li>Level 2.1</li> <li> Level 2.2 <ol> <li>Level 3.1</li> <li>Level 3.2</li> </ol> </li> </ul> </li> <li>Level 1.2</li> <li>Level 1.3</li> </ol>",
"list_start_10": "<ol start=\"10\"> <li>Item 1</li> <li>Item 2</li> <li>Item 3</li> </ol>",
"list_with_style": "<ol> <li> Level 1.1 <ol type=\"A\"> <li>Level 2.1</li> <li> Level 2.2 <ol style=\"list-style-type:lower-alpha\"> <li>Level 3.1</li> <li>Level 3.2</li> </ol> </li> </ol> </li> <li>Level 1.2</li> <li>Level 1.3</li> </ol>",
"list2": "<ol> <li>Cat</li> <li>Dog</li> </ol>",
"list2_ordered_list_style": 1,
"html_table_1": "<table border=\"1\" > <tr> <th>Name</th> <th>Age</th> <th>Country</th> </tr> <tr> <td>Harry Depp</td> <td>28</td> <td>Britain</td> </tr> <tr> <td>John Smith</td> <td>35</td> <td>USA</td> </tr> <tr> <td>Ram Krishna</td> <td>19</td> <td>Nepal</td> </tr> </table>",
"html_table_2": "<table border=\"1\"> <thead> <tr> <th>Company</th> <th>Contact</th> <th>Country</th> </tr> </thead> <tbody> <tr> <td>Alfreds Futterkiste</td> <td>Maria Anders</td> <td>Germany</td> </tr> <tr> <td>Centro comercial Moctezuma</td> <td>Francisco Chang</td> <td>Mexico</td> </tr> <tr> <td>Ernst Handel</td> <td>Roland Mendel</td> <td>Austria</td> </tr> <tr> <td>Island Trading</td> <td>Helen Bennett</td> <td>UK</td> </tr> <tr> <td>Laughing Bacchus Winecellars</td> <td>Yoshi Tannamuri</td> <td>Canada</td> </tr> <tr> <td>Magazzini Alimentari Riuniti</td> <td>Giovanni Rovelli</td> <td>Italy</td> </tr> </tbody> <tfoot> <tr> <td>Company 2</td> <td>Contact 2</td> <td>Country 2</td> </tr> </tfoot> </table>",
"html_table_2_custom_table_style": "CustomTableAOP",
"image1": "<img src=\"https://picsum.photos/200/150\">",
"image2": "<img src=\"https://picsum.photos/300/300\" width=\"75px\" height=\"75px\">"
}
]
}
]
The region :p172_htmlcontent in the sql contains the following HTML.
<p>This is text coming from the database / session in HTML format.<br />
It supports:</p>
Lists with numbers:
<ol>
<li><strong>Bold</strong></li>
<li><em>Italic</em></li>
<li><u>Underline</u></li>
<li><s>Strikethrough</s></li>
<li>Sub<sub>script</sub></li>
<li><sup>Super</sup>script</li>
<li><span style="color:#FF0000">Text Color</span></li>
<li><span style="background-color:#FFFF00">Background Text Color</span></li>
</ol>
Lists without numbers:
<ul>
<li>item 1</li>
<li>item 2</li>
</ul>
<h1>Heading 1</h1>
<h2>Heading 2</h2>
<h3>Heading 3</h3>
<h4>Heading 4</h4>
<p>Normalt text with<span style="font-family:comic sans ms,cursive"> Font Change</span></p>
<p><span style="font-family:courier new,courier,monospace">Code font</span></p>
<table border="1" cellpadding="1" cellspacing="1" style="width:500px">
<thead>
<tr>
<th scope="col">THeader 1</th>
<th scope="col">THeader 2</th>
</tr>
</thead>
<tbody>
<tr>
<td>some text</td>
<td> </td>
</tr>
<tr>
<td> </td>
<td>some other text</td>
</tr>
</tbody>
</table>
<p>Other table with style:</p>
<table border="1" cellpadding="1" cellspacing="1" style="border:1px solid green; width:700px">
<thead>
<tr>
<th scope="col">THeader 1</th>
<th scope="col">THeader 2</th>
</tr>
</thead>
<tbody>
<tr>
<td>some text</td>
<td> </td>
</tr>
<tr>
<td> </td>
<td>some other text</td>
</tr>
</tbody>
</table>
<p> </p>
Use Tag Style
While processing HTML contents, AOP uses the default paragraph format/styling of Word. To apply the paragraph styling from the template, you should specify a new column with _use_tag_style as a suffix for an HTML content tag and set true as its value.
A simple example for its usage :
    "htmlcontent": "<p>Hello World</p><ol>\n    <li> Level 1.1 \n        <ol type=\"A\">\n            <li>Level 2.1</li>\n            <li> Level 2.2 \n                <ol start=\"50\" style=\"list-style-type:lower-alpha\">\n                    <li>Level 3.1</li>\n                    <li>Level 3.2</li>\n                </ol>\n            </li>\n        </ol>\n    </li>\n    <li>Level 1.2</li>\n    <li>Level 1.3</li>\n</ol> ",
    "htmlcontent_use_tag_style": false
By default, use_tag_style is set to false, and the default paragraph styling will be used while processing. In cases where _use_tag_style is true, any changes in the below options (Paragraph setting in Word), made in the template file will be used for the processing. Despite the changes made in below options, if htmlKey_use_tag_style is set to false, the paragraph styling will always be set to default regardless of any modifications made.

Template
The templates consists the usage of html tag in different ways like large html content, ordered and unorderedd lists with detault and custom list style, table with default style and custom table style.
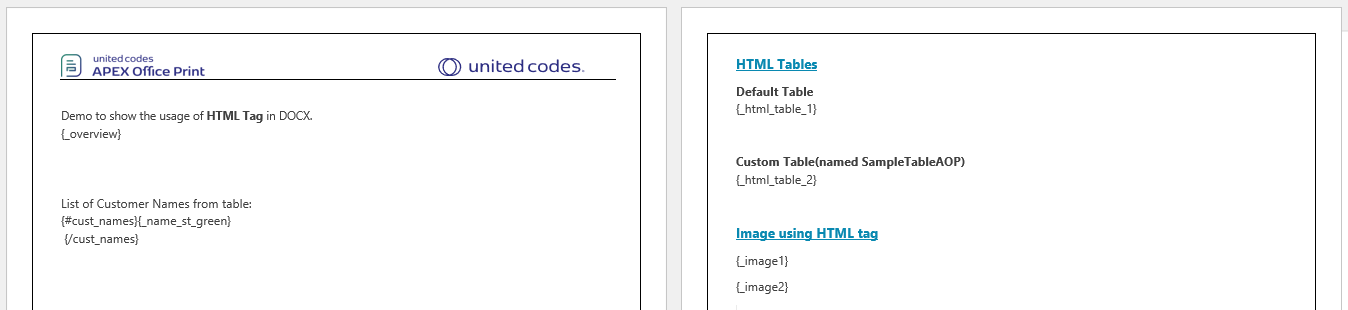

Output
Upon processing the provided template and data using AOP, the resulting output is as follows.
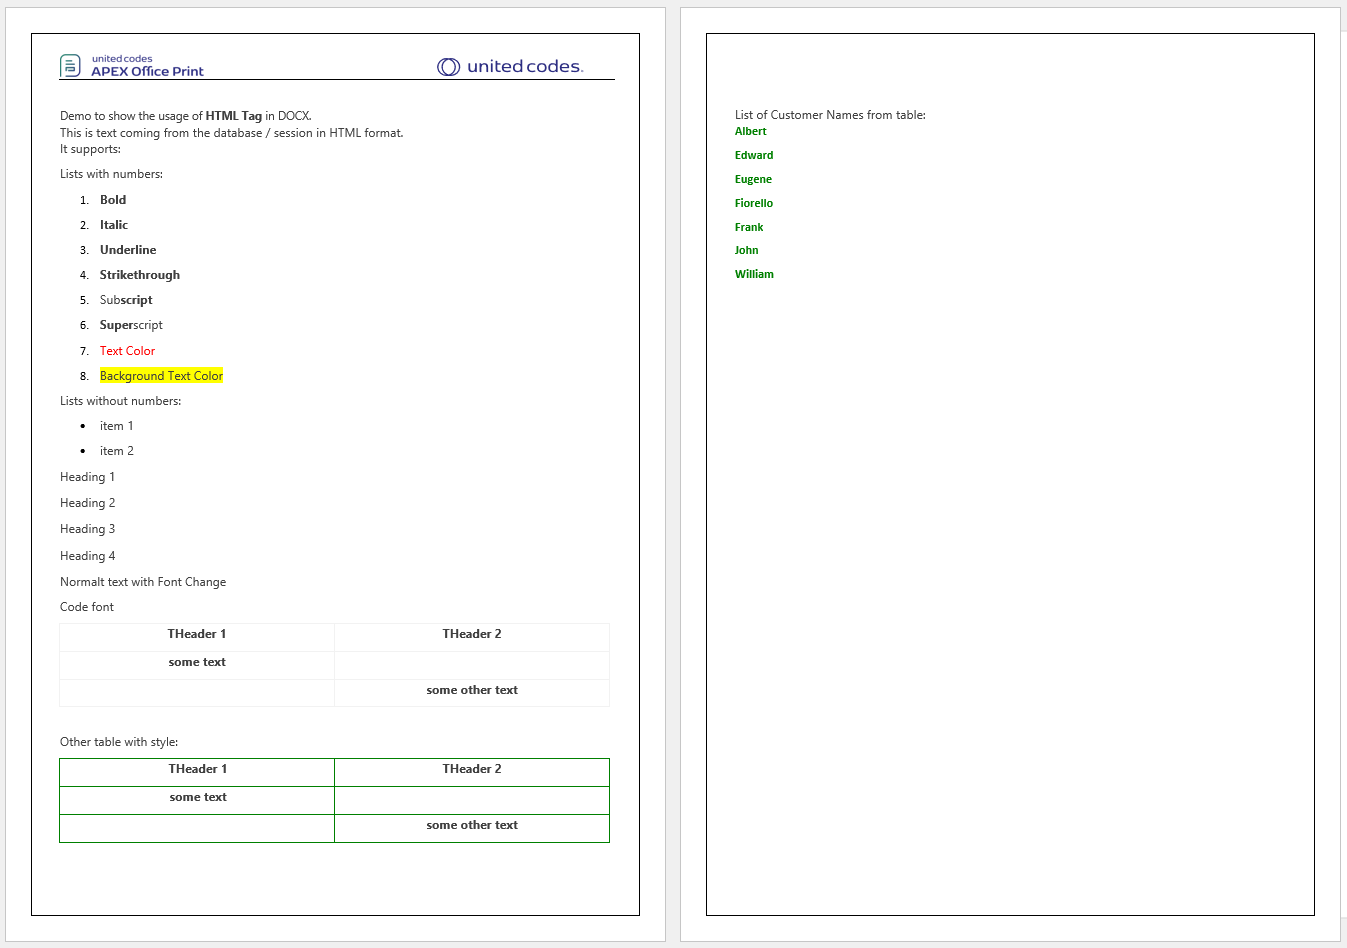

Barcodes and QR Codes
Available From: v3.1Barcode and QR code tags allows the user to insert barcode or QR code in the document. The barcode and QR code start with a pipeline sign. For example {|barcode}. The data must also contain the information for the type of barcode or QR code.
- You might sometimes get the following error (might occur when the tag is inside loop):
The tag "qrcode" is not inside a paragraphIn this case, just change the style of the tag (the whole {|qrcode}), for example change the text color to red, and the error should be resolved.
When the AOP identifies one of these tags in a template, it replaces it with the corresponding barcode or QR code.
Please visit Barcode and QR code of general tags documentation for detailed information.
QR Code Image Replacing
Available From: v18.1AOP allows you to replace a QRcode image with another image. The QR code can contain the image tags and barcode tags, i.e {%key} or {|key}. This method can be used if you are inserting a floating image, or need to have certain border styles on the image. The tag replacing will work as look as there are no artistic effects used for the image themselves.
Please visit QR Code Image Replacing in general tags documentation for detailed information.
Chart
Available From: v2.0It is possible to insert charts in Word using $ tag followed by cursor name inside delimiters. Ex {$chart}.
Please refer to Chart Tags in General Tags for detailed information and implementation.
Chart Templating
Available From: v20.3It is possible to create a chart by providing the chart style in template itself. You can provide a chart in the template and mark it with a preceding {aopchart chartData} where aopchart is the tag identifier and chartData is the cursor in the data which contains information about the chart.
Using this method, the chart in the template can be styled through MS Office or LibreOffice as an alternative to passing the style options as a part of the input data. This allows the use of style options we do not support, but moves the chart styling from the data to the template (e.g. loops containing a chart with different style on each iteration would not be possible using this tag).
Please visit Chart Templating of general tags documentation.
D3 Images
Available From: v18.1You can insert a d3 image in your report using the d3 tag, which follows the syntax $d3 followed by the column with the javascript d3 code within delimiters (for ex {$d3 test} considering test has javascript d3 code). When AOP runs the code for the d3 image, it will replace the tag with the resulting image.
Please visit D3 Images of general tags documentation.
Page Breaks
Within AOP, there are two methods for inserting page breaks: using the page break tag {?...} and implementing conditional page breaks. Let's explore each method with examples below.
Page Break Tag
Available From: v21.1Using AOP, you can utilize the pagebreak tag {?...} (a tag that starts with "?") to dynamically insert page or column breaks. For example, if you want to insert a page break using {?pageBreak}, the corresponding value in the pageBreak column should be set to true or 1. If no break should be inserted, the value should be 0 or false.
Basically, the ? appended with condition that is either true or false enclosed by delimiters are used for a dynamic page break. After processing, a page break is inserted by AOP where the tag is located.
This tag can be used together with expressions that AOP supports. Please click here for more info about the expressions and conditions.
The given expression when resolves to a truthy value, AOP will insert a page break.
For example, the following expression will insert a page break only when it's not the last record.
{?(customers.length - 1 !== current_child_index)}
Example
Data Source
Hereby examples of data source for different options.
- SQL
- PL/SQL returning SQL
- PL/SQL returning JSON
- JSON
select 'file1' as "filename",
       cursor (
         select cursor (
           select c.cust_first_name as "cust_first_name",
                  c.cust_last_name  as "cust_last_name",
                  case
                    when c.customer_id = 3 then
                      'false'
                    else
                      'true'
                  end               as "pageBreak"
           from aop_sample_customers c
           where c.customer_id < 4
         ) as "customers"
         from dual
       )       as "data"
from dual
declare
  l_return clob;
begin
  l_return := q'[
    select 'file1' as "filename",
           cursor (
             select cursor (
               select c.cust_first_name as "cust_first_name",
                      c.cust_last_name  as "cust_last_name",
                      case
                        when c.customer_id = 3 then
                          'false'
                        else
                          'true'
                      end               as "pageBreak"
               from aop_sample_customers c
               where c.customer_id < 4
             ) as "customers"
             from dual
           )       as "data"
    from dual
    ]';
  return l_return;
end;
declare
  l_cursor sys_refcursor;
  l_return clob; -- can also be varchar2, make sure it corresponds to the structure in the JSON
begin
  apex_json.initialize_clob_output(dbms_lob.call, true, 2);
  open l_cursor for
    select 'file1' as "filename",
           cursor (
             select cursor (
               select c.cust_first_name as "cust_first_name",
                      c.cust_last_name  as "cust_last_name",
                      case
                        when c.customer_id = 3 then
                          'false'
                        else
                          'true'
                      end               as "pageBreak"
               from aop_sample_customers c
               where c.customer_id < 4
             ) as "customers"
             from dual
           )       as "data"
    from dual

  apex_json.write(l_cursor);
  l_return := apex_json.get_clob_output;
  return l_return;
end;
[
  {
    "filename": "file1",
    "data": [
      {
        "customers": [
          {
            "cust_first_name": "John",
            "cust_last_name": "Dulles",
            "pageBreak": true
          },
          {
            "cust_first_name": "William",
            "cust_last_name": "Hartsfield",
            "pageBreak": true
          },
          {
            "cust_first_name": "Edward",
            "cust_last_name": "Logan",
            "pageBreak": false
          }
        ]
      }
    ]
  }
]
Template
The template below show the usage of page break tag {?...}.

Output
Upon processing the data and output, following output is obtained.

Conditional Page Break
This is more of a trick, in which you can manually insert a page break in the template and enclose it within a condition. The page break will be included only if the condition evaluates to true; otherwise, it will be omitted.
Example
Data Source
Hereby examples of data source for different options.
- SQL
- PL/SQL returning SQL
- PL/SQL returning JSON
- JSON
select
  'file1' as "filename",
  cursor(
    select
      cursor(
          select
          c.cust_first_name as "cust_first_name",
          c.cust_last_name as "cust_last_name"
          from aop_sample_customers c where c.customer_id < 4
      ) as "customers"
      from dual
) as "data"
from dual
declare
  l_return clob;
begin
  l_return := q'[
    select
      'file1' as "filename",
      cursor(
        select
          cursor(
              select
              c.cust_first_name as "cust_first_name",
              c.cust_last_name as "cust_last_name"
              from aop_sample_customers c where c.customer_id < 4
          ) as "customers"
          from dual
    ) as "data"
    from dual
    ]';
  return l_return;
end;
declare
  l_cursor sys_refcursor;
  l_return clob; -- can also be varchar2, make sure it corresponds to the structure in the JSON
begin
  apex_json.initialize_clob_output(dbms_lob.call, true, 2);
  open l_cursor for
    select
      'file1' as "filename",
      cursor(
        select
          cursor(
              select
              c.cust_first_name as "cust_first_name",
              c.cust_last_name as "cust_last_name"
              from aop_sample_customers c where c.customer_id < 4
          ) as "customers"
          from dual
    ) as "data"
    from dual

  apex_json.write(l_cursor);
  l_return := apex_json.get_clob_output;
  return l_return;
end;
[
  {
    "filename": "file1",
    "data": [
      {
        "customers": [
          {
            "cust_first_name": "John",
            "cust_last_name": "Dulles"
          },
          {
            "cust_first_name": "William",
            "cust_last_name": "Hartsfield"
          },
          {
            "cust_first_name": "Edward",
            "cust_last_name": "Logan"
          }
        ]
      }
    ]
  }
]
Template
The provided template demonstrates the implementation of a conditional page break, where a page break is inserted for each customer. The page break is placed within a condition that specifies it should be inserted until reaching the last index of the customer's cursor. In other words, the page break will not be inserted on the last page.
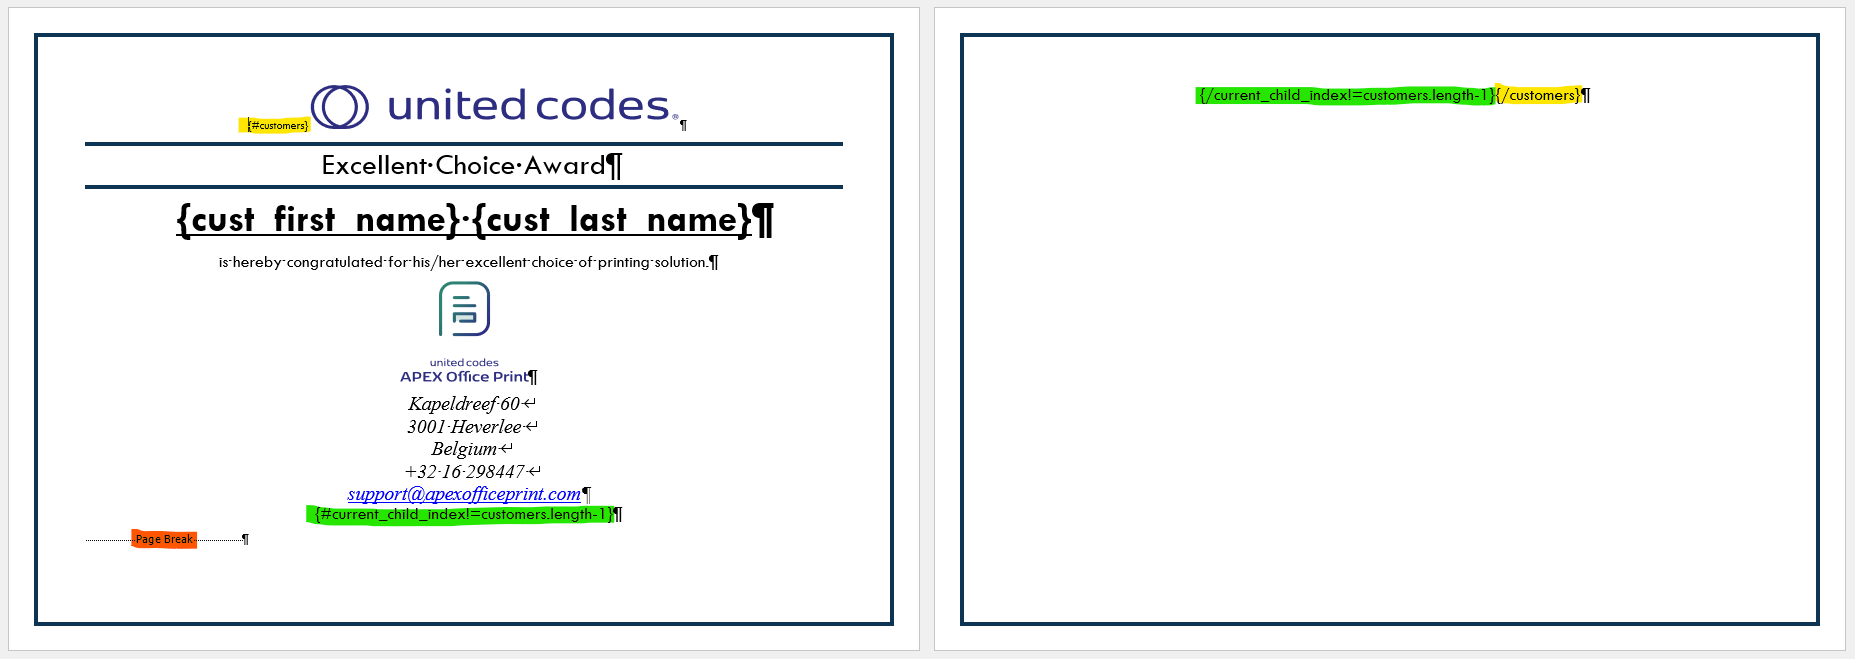
page-break-conditional-template.docx
Output
Upon processing the data and template using AOP, the ouput obtained as follows:
The complete output is available here:
page-break-conditional-output.docx
Column Break Tag
This tag can be used to introduce a column break in the template if there are multiple columns available. This tag starts with a question mark sign and the name of the column that holds the value 'columnbreak'.
If you want to make this tag conditional, you can use expressions for example: {?(customers.length - 1 !== current_child_index) && "columnbreak"}. Here the first part is the condition and the second part will return "columnbreak". This means the retruning value or tag value will be "columnbreak" when the condition succeeds and false otherwise.
Example
Data Source
Hereby examples of data source for different options.
- SQL
- PL/SQL returning SQL
- PL/SQL returning JSON
- JSON
select 'file1' as "filename",
       cursor (
         select cursor (
           select product_id                                      as "p_id",
                  product_name                                    as "prod_name",
                  product_description                             as "prod_desc",
                  category                                        as "category",
                  product_avail                                   as "prod_avai",
                  list_price                                      as "price",
                  apex_web_service.blob2clobbase64(product_image) as "product_image",
                  20                                              as "PRODUCT_IMAGE_max_width",
                  20                                              as "PRODUCT_IMAGE_max_height"
           from aop_sample_product_info
           where product_id < 7
         ) as "products"
       )       as "data"
from dual
declare
  l_return clob;
begin
  l_return := q'[
    select 'file1' as "filename",
           cursor (
             select cursor (
               select product_id                                      as "p_id",
                      product_name                                    as "prod_name",
                      product_description                             as "prod_desc",
                      category                                        as "category",
                      product_avail                                   as "prod_avai",
                      list_price                                      as "price",
                      apex_web_service.blob2clobbase64(product_image) as "product_image",
                      20                                              as "PRODUCT_IMAGE_max_width",
                      20                                              as "PRODUCT_IMAGE_max_height"
               from aop_sample_product_info
               where product_id < 7
             ) as "products"
           )       as "data"
    from dual
    ]';
  return l_return;
end;
declare
  l_cursor sys_refcursor;
  l_return clob; -- can also be varchar2, make sure it corresponds to the structure in the JSON
begin
  apex_json.initialize_clob_output(dbms_lob.call, true, 2);
  open l_cursor for
    select 'file1' as "filename",
           cursor (
             select cursor (
               select product_id                                      as "p_id",
                      product_name                                    as "prod_name",
                      product_description                             as "prod_desc",
                      category                                        as "category",
                      product_avail                                   as "prod_avai",
                      list_price                                      as "price",
                      apex_web_service.blob2clobbase64(product_image) as "product_image",
                      20                                              as "PRODUCT_IMAGE_max_width",
                      20                                              as "PRODUCT_IMAGE_max_height"
               from aop_sample_product_info
               where product_id < 7
             ) as "products"
           )       as "data"
    from dual

  apex_json.write(l_cursor);
  l_return := apex_json.get_clob_output;
  return l_return;
end;
[
    {
      "filename": "file1",
      "data": [
        {
          "products": [
            {
              "p_id": 1,
              "prod_name": "Business Shirt",
              "prod_desc": "Wrinkle-free cotton business shirt",
              "category": "Mens",
              "prod_avai": "Y",
              "price": 50,
              "product_image": " ... base64ecoded of image ... ",
              "PRODUCT_IMAGE_max_width": 20,
              "PRODUCT_IMAGE_max_height": 20
            },
            {
              "p_id": 2,
              "prod_name": "Trousers",
              "prod_desc": "Black trousers suitable for every business man",
              "category": "Mens",
              "prod_avai": "Y",
              "price": 80,
              "product_image": " ... base64ecoded of image ... ",
              "PRODUCT_IMAGE_max_width": 20,
              "PRODUCT_IMAGE_max_height": 20
            },
            {
              "p_id": 3,
              "prod_name": "Jacket",
              "prod_desc": "Fully lined jacket which is both professional and extremely comfortable to wear",
              "category": "Mens",
              "prod_avai": "Y",
              "price": 150,
              "product_image": " ... base64ecoded of image ... ",
              "PRODUCT_IMAGE_max_width": 20,
              "PRODUCT_IMAGE_max_height": 20
            },
            {
              "p_id": 4,
              "prod_name": "Blouse",
              "prod_desc": "Silk blouse ideal for all business women",
              "category": "Womens",
              "prod_avai": "Y",
              "price": 60,
              "product_image": " ... base64ecoded of image ... ",
              "PRODUCT_IMAGE_max_width": 20,
              "PRODUCT_IMAGE_max_height": 20
            },
            {
              "p_id": 5,
              "prod_name": "Skirt",
              "prod_desc": "Wrinkle free skirt",
              "category": "Womens",
              "prod_avai": "Y",
              "price": 80,
              "product_image": " ... base64ecoded of image ... ",
              "PRODUCT_IMAGE_max_width": 20,
              "PRODUCT_IMAGE_max_height": 20
            },
            {
              "p_id": 6,
              "prod_name": "Ladies Shoes",
              "prod_desc": "Low heel and cushioned interior for comfort and style in simple yet elegant shoes",
              "category": "Womens",
              "prod_avai": "Y",
              "price": 120,
              "product_image": " ... base64ecoded of image ... ",
              "PRODUCT_IMAGE_max_width": 20,
              "PRODUCT_IMAGE_max_height": 20
            }
          ]
        }
      ]
    }
  ]
Template
The template consist of three column, in which the info of products are to be shown in each column. Here {?"columnbreak"} is used to break the column for each product.
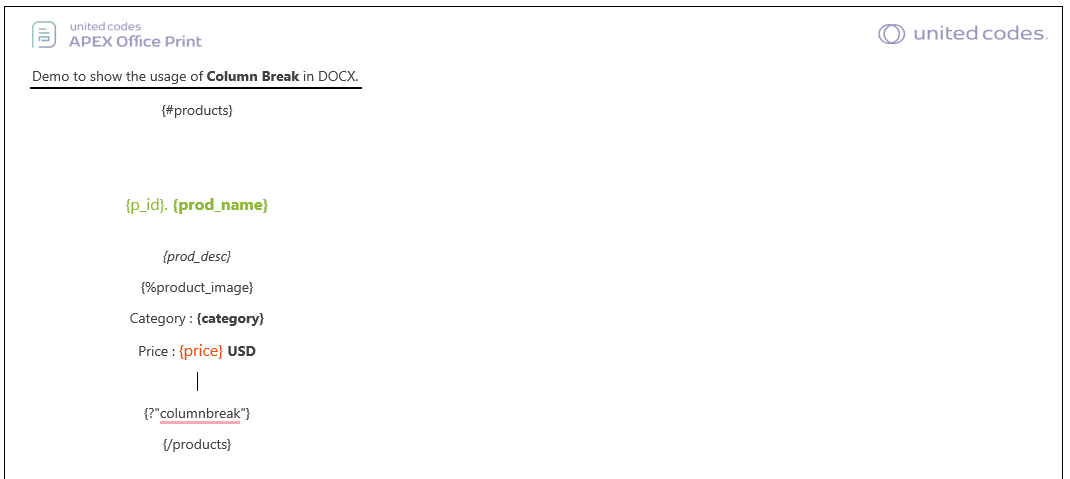
Output
Upon processing the template and data, the following output is obtained.
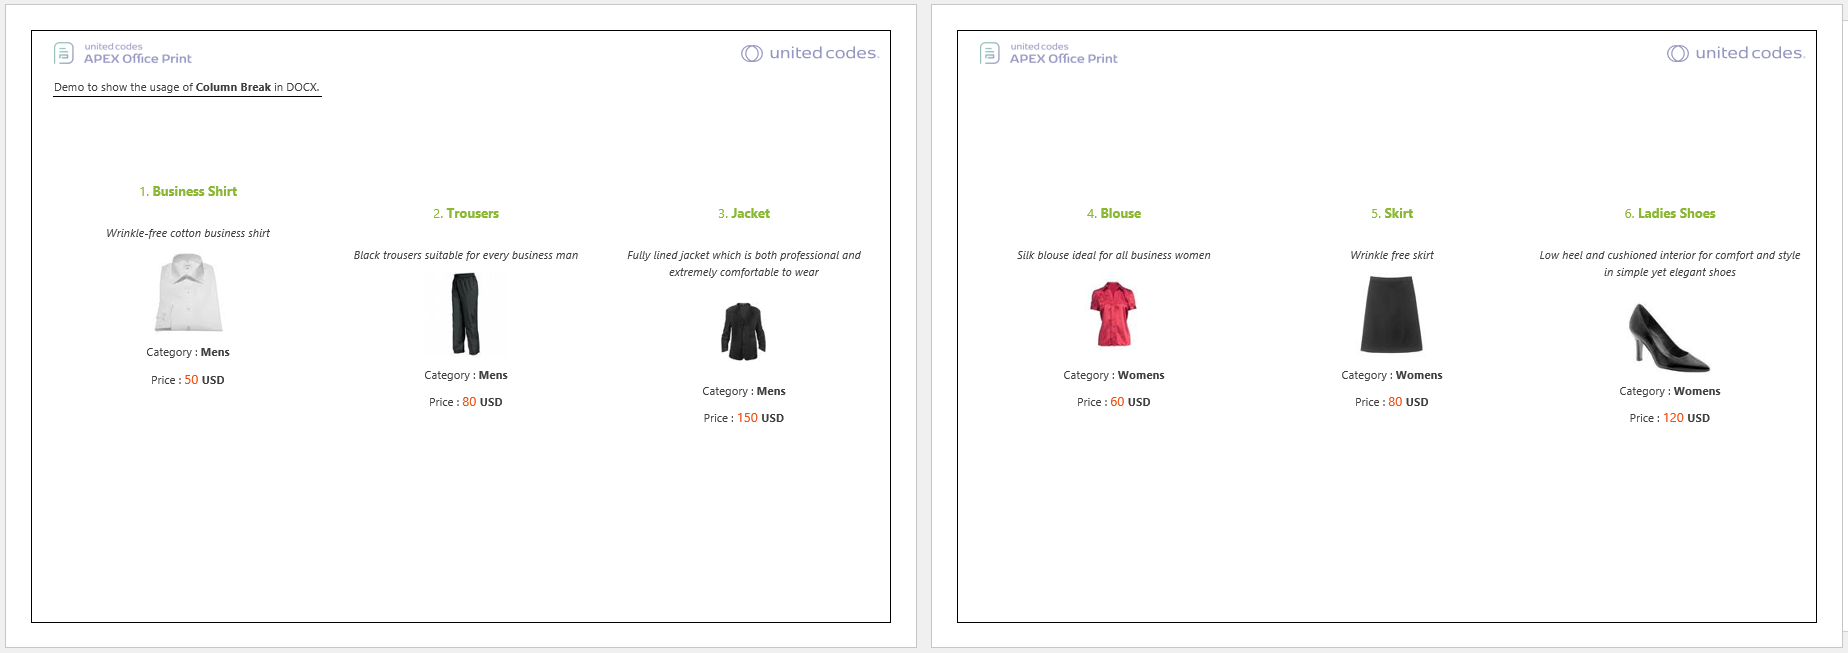
Watermark Tag
Available From: v21.2.1AOP allows insertion of native text watermarks by using the {watermark data} tag in the header of the document, where the data field determines the watermark text.
Using section breaks to produce different headers allows the specification of watermarks on a per-page basis.
An angular expression can be used instead of a data reference, e.g. {watermark "my watermark"} will produce a watermark with text my watermark, but this does not allow for the specification of options. Options can be specified by appending _optionName to the data field containing the watermark text. The supported options are:
| Option | Description | Allowed | Default |
|---|---|---|---|
| _color | watermark text color | CSS notation | "silver" |
| _font | watermark text font | font name | Calibri |
| _height | height to scale watermark text to | size in px, pt, in, cm or em | automatically determined by AOP |
| _opacity | opacity of the watermark text | decimal number between 0 and 1 | 1 |
| _rotation | rotation of the watermark text | an integer, interpreted in degrees | calculated to lie along the bottom-left to top-right diagonal |
| _width | width to scale watermark text to | size in px, pt, in, cm or em | automatically determined by AOP |
The rotation angle is oriented counterclockwise from the horizontal axis:

Example
Data Source
Hearby the example data sources for different options.
- SQL
- PL/SQL returning SQL
- PL/SQL returning JSON
- JSON
select 'file1' as "filename",
       cursor (
         select 'sample watermark' as "w_text",
                'green'            as "w_text_color",
                0.2                as "w_text_opacity",
                '-60'              as "w_text_rotation",
                'Comic Sans MS'    as "w_text_font",
                '17cm'             as "w_text_width",
                '3cm'              as "w_text_height"
         from dual
       )       as "data"
from dual
declare
  l_return clob;
begin
  l_return := q'[
    select 'file1' as "filename",
           cursor (
             select 'sample watermark' as "w_text",
                    'green'            as "w_text_color",
                    0.2                as "w_text_opacity",
                    '-60'              as "w_text_rotation",
                    'Comic Sans MS'    as "w_text_font",
                    '17cm'             as "w_text_width",
                    '3cm'              as "w_text_height"
             from dual
           )       as "data"
    from dual
    ]';
  return l_return;
end;
declare
  l_cursor sys_refcursor;
  l_return clob; -- can also be varchar2, make sure it corresponds to the structure in the JSON
begin
  apex_json.initialize_clob_output(dbms_lob.call, true, 2);
  open l_cursor for
    select 'file1' as "filename",
           cursor (
             select 'sample watermark' as "w_text",
                    'green'            as "w_text_color",
                    0.2                as "w_text_opacity",
                    '-60'              as "w_text_rotation",
                    'Comic Sans MS'    as "w_text_font",
                    '17cm'             as "w_text_width",
                    '3cm'              as "w_text_height"
             from dual
           )       as "data"
    from dual

  apex_json.write(l_cursor);
  l_return := apex_json.get_clob_output;
  return l_return;
end;
[
  {
    "filename": "file1",
    "data": [
      {
        "w_text": "sample watermark",
        "w_text_color": "green",
        "w_text_opacity": 0.2,
        "w_text_rotation": -60,
        "w_text_font": "Comic Sans MS",
        "w_text_width": "17cm",
        "w_text_height": "3cm"
      }
    ]
  }
]
Template
The template contains the watermark tag {watermark w_text} in the header as shown in below:

Output
With the data source and template provided above, AOP gives the output as shown below.
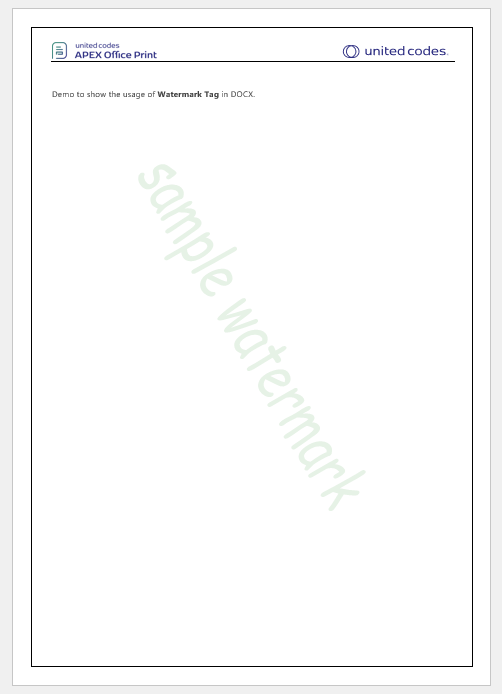
Markdown Tag
Available From: v3.0Markdown styled text can be converted to docx file format. The syntax for this tag is {_key_}. The "key" tag holds the Markdown content in the JSON file. To get a better idea about the basics of Markdown styling syntax, this documentation will be helpful. For extended Markdown styling syntax this documentation will be helpful.
From the basic syntax documentation, we are supporting:
- Headings and Alternative Headings Syntax
- Paragraphs and Line Breaks
- Bold and Italic emphasized text
- Ordered Lists and Unordered Lists
- Code Blocks
- Images and Images with a Link
- Horizantal Rules
- Links
From the extended syntax documentation, we are supporting:
- Tables
- Fenced Code Blocks
- Strikethrough is supported but as a HTML tag. (i.e. with
<strike>...</strike>or with<s></s>)
Example
Data Source
Hearby the example data sources for different options.
- SQL
- PL/SQL returning SQL
- PL/SQL returning JSON
- JSON
select 'file1' as "filename",
       cursor (
         select nvl(:p172_markdown, 'no apex session') as "markdowncontent",
                cursor (
                  select cust_first_name as "first",
                         '**'
                         || cust_first_name
                         || '**'         as "cust_name_bold"
                  from aop_sample_customers
                )                                      as "cust_names"
         from dual
       )       as "data"
from dual
declare
  l_return clob;
begin
  l_return := q'[
    select 'file1' as "filename",
           cursor (
             select nvl(:p172_markdown, 'no apex session') as "markdowncontent",
                    cursor (
                      select cust_first_name as "first",
                             '**'
                             || cust_first_name
                             || '**'         as "cust_name_bold"
                      from aop_sample_customers
                    )                                      as "cust_names"
             from dual
           )       as "data"
    from dual
    ]';
  return l_return;
end;
declare
  l_cursor sys_refcursor;
  l_return clob; -- can also be varchar2, make sure it corresponds to the structure in the JSON
begin
  apex_json.initialize_clob_output(dbms_lob.call, true, 2);
  open l_cursor for
    select 'file1' as "filename",
           cursor (
             select nvl(:p172_markdown, 'no apex session') as "markdowncontent",
                    cursor (
                      select cust_first_name as "first",
                             '**'
                             || cust_first_name
                             || '**'         as "cust_name_bold"
                      from aop_sample_customers
                    )                                      as "cust_names"
             from dual
           )       as "data"
    from dual

  apex_json.write(l_cursor);
  l_return := apex_json.get_clob_output;
  return l_return;
end;
[
  {
    "filename": "file1",
    "data": [
      {
        "markdowncontent": "# Heading level 1\n\n## Heading level 2\n\n===============\n\nI just love **bold text**.  \n\nItalicized text is the *cat's meow*.\n\n1. First item\n2. Second item\n3. Third item\n4. Fourth item\n\n---\n\n* First item\n* Second item\n* Third item\n* Fourth item\n\n| Syntax    | Description |\n| --------- | ----------- |\n| Header    | Title       |\n| Paragraph | Text        |\n\n<strike>The world is flat.</strike> We now know that the world is round.",
        "cust_names": [
          {
            "first": "Albert",
            "cust_name_bold": "**Albert**"
          },
          {
            "first": "Edward",
            "cust_name_bold": "**Edward**"
          },
          {
            "first": "Eugene",
            "cust_name_bold": "**Eugene**"
          },
          {
            "first": "Fiorello",
            "cust_name_bold": "**Fiorello**"
          },
          {
            "first": "Frank",
            "cust_name_bold": "**Frank**"
          },
          {
            "first": "John",
            "cust_name_bold": "**John**"
          },
          {
            "first": "William",
            "cust_name_bold": "**William**"
          }
        ]
      }
    ]
  }
]
The :p172_markdown region used in the sql contains the following markdown contains:
# Heading level 1

## Heading level 2

===============

I just love **bold text**.

Italicized text is the *cat's meow*.

1. First item
2. Second item
3. Third item
4. Fourth item

---

* First item
* Second item
* Third item
* Fourth item

| Syntax    | Description |
| --------- | ----------- |
| Header    | Title       |
| Paragraph | Text        |

<strike>The world is flat.</strike> We now know that the world is round.
Template
The template contains {_markdowncontent_} for the markdown from the region and {_cust_name_bold_} for the customer name returned as markdown from table.

Output
The given template and data when process by AOP gives the following output.

Raw Tag
The raw tag is a special tag that allows you to insert raw xml that specifies the openxml content of docx format. This tag starts with @ sign followed by the column name that holds the value. For example {@raw}. This can be used for wide variety of purposes. This can for example be used to introduce a page break, different styling and so on.
Please be careful using this tag as the xml value that is inserted into the document is not validated. The place where this xml is inserted is inside the text element of the word run eleemnt of the document. Be sure to close this before applying any other tags and reopen it once done. See: http://officeopenxml.com/WPtext.php
Example
Data Source
Hereby examples of data source for different available options.
- SQL
- PL/SQL returning SQL
- PL/SQL returning JSON
- JSON
select 'file1' as "filename",
       cursor (
         select '<w:p>'
                || '<w:pPr>'
                || '<w:pStyle w:val="NormalWeb"/>'
                || '<w:spacing w:before="120" w:after="120"/>'
                || '</w:pPr>'
                || '<w:r><w:rPr><w:b/><w:i/></w:rPr>'
                || '<w:t>'
                || cust_first_name
                || '</w:t>'
                || '</w:r>'
                || '</w:p>' as "bold"
         from aop_sample_customers
         where customer_id = 1
       )       as "data"
from dual
declare
  l_return clob;
begin
  l_return := q'[
    select 'file1' as "filename",
           cursor (
             select '<w:p>'
                    || '<w:pPr>'
                    || '<w:pStyle w:val="NormalWeb"/>'
                    || '<w:spacing w:before="120" w:after="120"/>'
                    || '</w:pPr>'
                    || '<w:r><w:rPr><w:b/><w:i/></w:rPr>'
                    || '<w:t>'
                    || cust_first_name
                    || '</w:t>'
                    || '</w:r>'
                    || '</w:p>' as "bold"
             from aop_sample_customers
             where customer_id = 1
           )       as "data"
    from dual
    ]';
  return l_return;
end;
declare
  l_cursor sys_refcursor;
  l_return clob; -- can also be varchar2, make sure it corresponds to the structure in the JSON
begin
  apex_json.initialize_clob_output(dbms_lob.call, true, 2);
  open l_cursor for
    select 'file1' as "filename",
           cursor (
             select '<w:p>'
                    || '<w:pPr>'
                    || '<w:pStyle w:val="NormalWeb"/>'
                    || '<w:spacing w:before="120" w:after="120"/>'
                    || '</w:pPr>'
                    || '<w:r><w:rPr><w:b/><w:i/></w:rPr>'
                    || '<w:t>'
                    || cust_first_name
                    || '</w:t>'
                    || '</w:r>'
                    || '</w:p>' as "bold"
             from aop_sample_customers
             where customer_id = 1
           )       as "data"
    from dual;

  apex_json.write(l_cursor);
  l_return := apex_json.get_clob_output;
  return l_return;
end;
[
  {
    "filename": "file1",
    "data": [
      {
        "bold": "<w:p><w:pPr><w:pStyle w:val=\"NormalWeb\"/><w:spacing w:before=\"120\" w:after=\"120\"/></w:pPr><w:r><w:rPr><w:b/><w:i/></w:rPr><w:t>John</w:t></w:r></w:p>"
      }
    ]
  }
]
Template
In the above code, the xml is inside the bold column. The template becomes: {@bold}
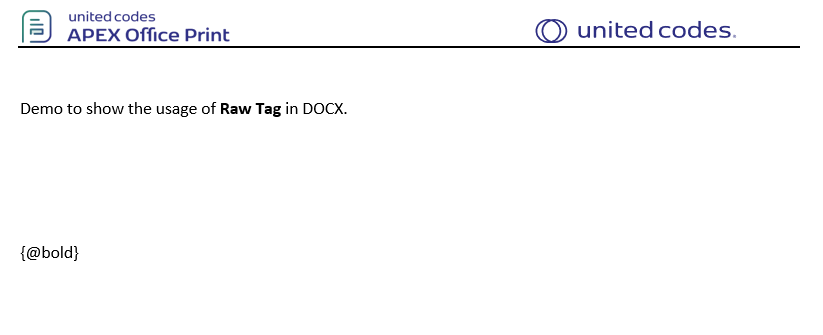
Output
The given data source and template gives the following output.

Hyperlink tag
Available From: v3.3The hyperlink tag is a special tag that allows you to insert a hyperlink into the document. This tag starts with a * (asterisk) sign followed by the column name that holds the value. For example {*link} where link is the column name. You can also specify the text that should be displayed for the hyperlink. If none specified, the URL itself will be shown. AOP auto detects the URL and also supports mail hyperlinks.
Available options:
- preserve_tag_style : The hyperlink will take the styling of hyperlink text defined in the template (blue and underlined by default). Enabling this option will take the styling of the tag instead of default styling of hyperlink. Values(true or false). It is false by default.
Example
Data Source
Hereby examples of data source for different options.
- SQL
- PL/SQL returning SQL
- PL/SQL returning JSON
- JSON
select 'file1' as "filename",
       cursor (
         select cust_first_name as "cust_first_name",
                'https://www.apexofficeprint.com' as "website",
                'United Codes'                    as "website_text",
                'support@apexofficeprint.com'     as "mail"
         from aop_sample_customers where customer_id = 2
       )       as "data"
from dual
declare
  l_return clob;
begin
  l_return := q'[
    select 'file1' as "filename",
           cursor (
             select cust_first_name as "cust_first_name",
                    'https://www.apexofficeprint.com' as "website",
                    'United Codes'                    as "website_text",
                    'support@apexofficeprint.com'     as "mail"
             from aop_sample_customers where customer_id = 2
           )       as "data"
    from dual
    ]';
  return l_return;
end;
declare
  l_cursor sys_refcursor;
  l_return clob; -- can also be varchar2, make sure it corresponds to the structure in the JSON
begin
  apex_json.initialize_clob_output(dbms_lob.call, true, 2);
  open l_cursor for
    select 'file1' as "filename",
           cursor (
             select cust_first_name as "cust_first_name",
                    'https://www.apexofficeprint.com' as "website",
                    'United Codes'                    as "website_text",
                    'support@apexofficeprint.com'     as "mail"
             from aop_sample_customers where customer_id = 2
           )       as "data"
    from dual;

  apex_json.write(l_cursor);
  l_return := apex_json.get_clob_output;
  return l_return;
end;
[
  {
    "filename": "file1",
    "data": [
      {
        "cust_first_name": "William",
        "website": "https://www.apexofficeprint.com",
        "website_text": "United Codes",
        "mail": "support@apexofficeprint.com"
      }
    ]
  }
]
Template
In the above data source, the links are inside website and mail column name. The tags to use become: {*website} and {*mail}
Our template looks like:
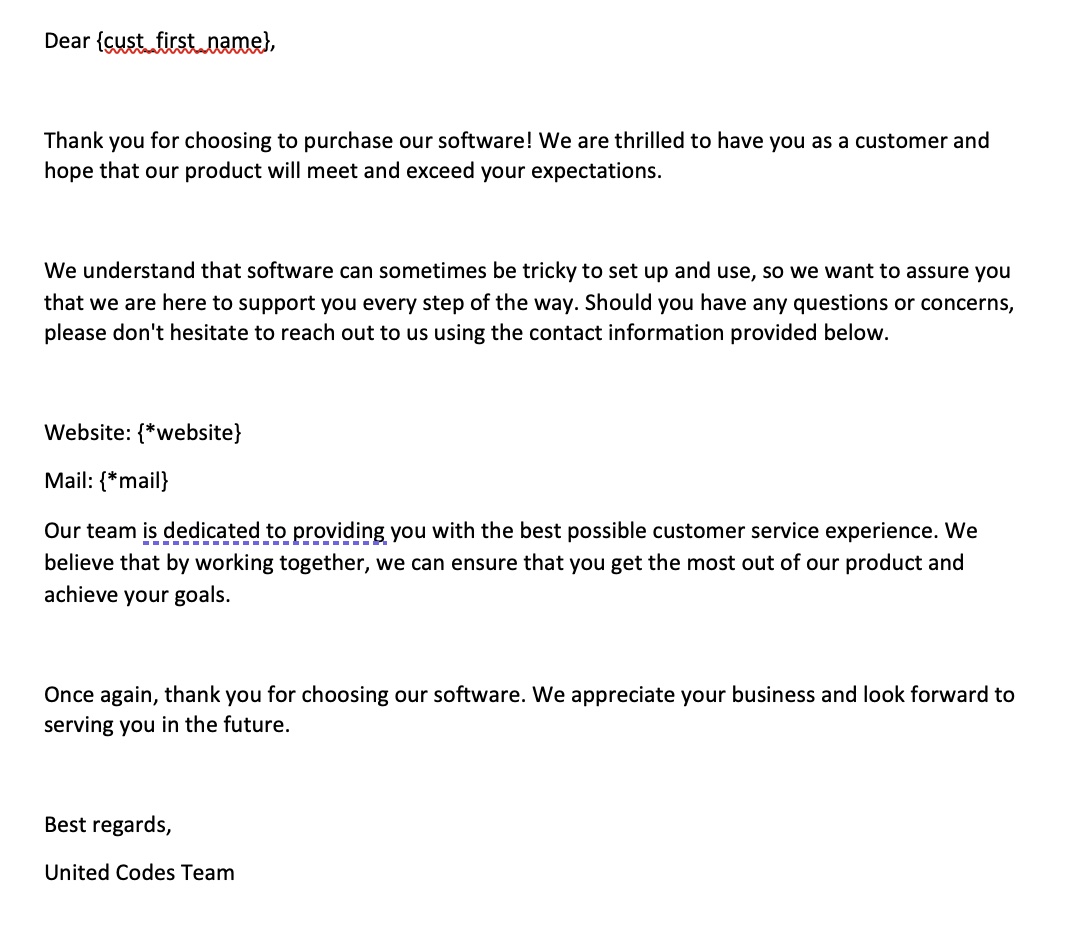
Please download the template below to have a look at the template:
template.docx
Output
The output is as follows:
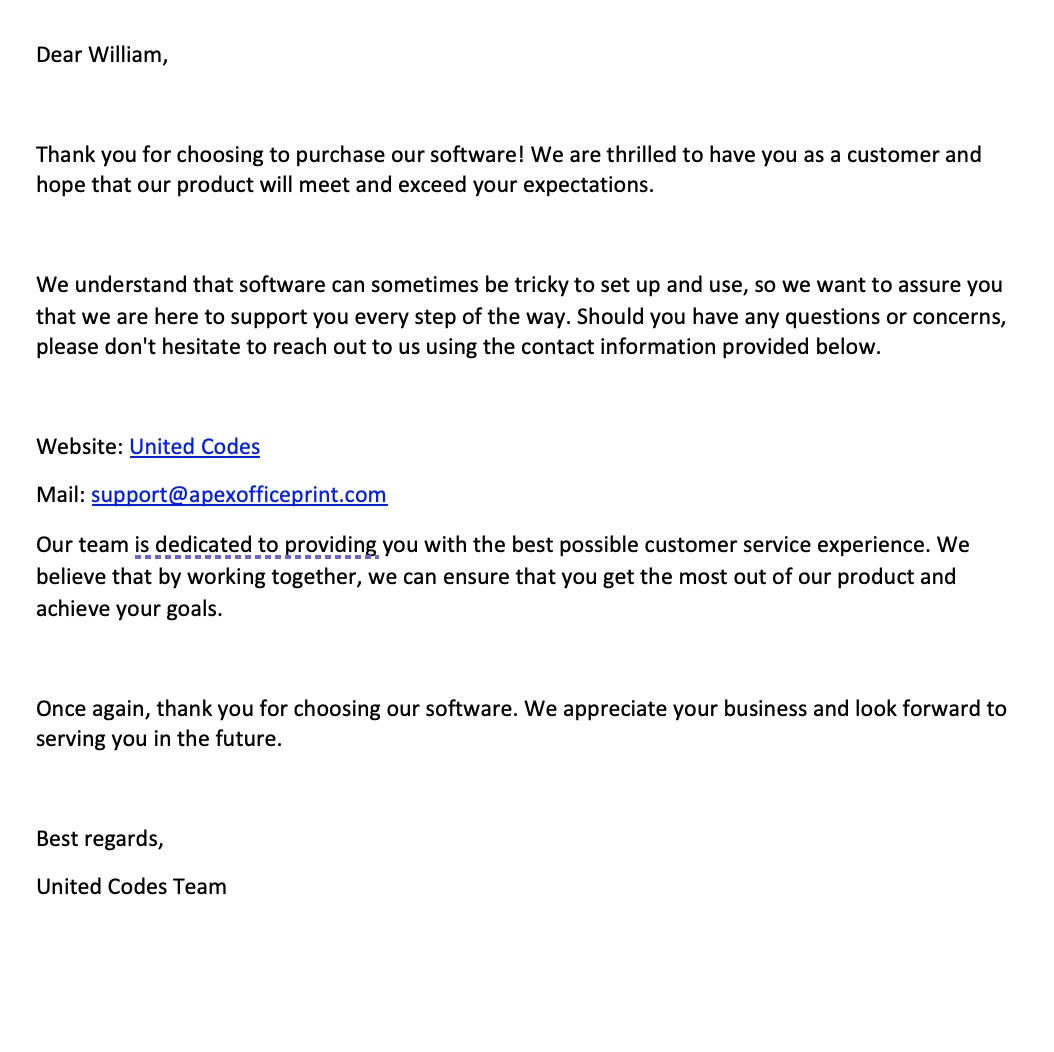
You can also download the output to check it out: output.docx
Auto Hyperlink Tag
The hyperlink tag expects single hyperlink content to be provided in the data source. The auto hyperlink tag will automatically detect URLs and mail addresses and convert them to hyperlinks from one single value. The auto tag starts with *auto followed by space and the column name that holds the value. eg {*auto textWithLink}.
Available options:
- preserve_tag_style :The hyperlinks in the text will take the styling of hyperlink text defined in the template (blue and underlined by default). Enabling this option will take the styling of the tag instead of default styling of hyperlink. Values(true or false). It is false by default. Ex. (
textWithLink_preserve_tag_style).
Example
Data Source
Hereby examples of data source for different options.
- SQL
- PL/SQL returning SQL
- PL/SQL returning JSON
- JSON
select 'file1' as "filename",
       cursor (
         select 'You can visit us at https://www.apexofficeprint.com or mail us at support@apexofficeprint.com' as "contact"
         from dual
       )       as "data"
from dual;
declare
  l_return clob;
begin
  l_return := q'[
    select 'file1' as "filename",
           cursor (
             select 'You can visit us at https://www.apexofficeprint.com or mail us at support@apexofficeprint.com' as "contact"
             from dual
           )       as "data"
    from dual;
    ]';
  return l_return;
end;
declare
  l_cursor sys_refcursor;
  l_return clob; -- can also be varchar2, make sure it corresponds to the structure in the JSON
begin
  apex_json.initialize_clob_output(dbms_lob.call, true, 2);
  open l_cursor for
    select 'file1' as "filename",
           cursor (
             select 'You can visit us at https://www.apexofficeprint.com or mail us at support@apexofficeprint.com' as "contact"
             from dual
           )       as "data"
    from dual;

  apex_json.write(l_cursor);
  l_return := apex_json.get_clob_output;
  return l_return;
end;
[
  {
    "filename": "file1",
    "data": [
      {
        "contact": "You can visit us at https://www.apexofficeprint.com or mail us at support@apexofficeprint.com"
      }
    ]
  }
]
Template
In the above data source, the link containing text is inside contact column. The tag to use becomes: {*auto contact}
The template looks as follows:
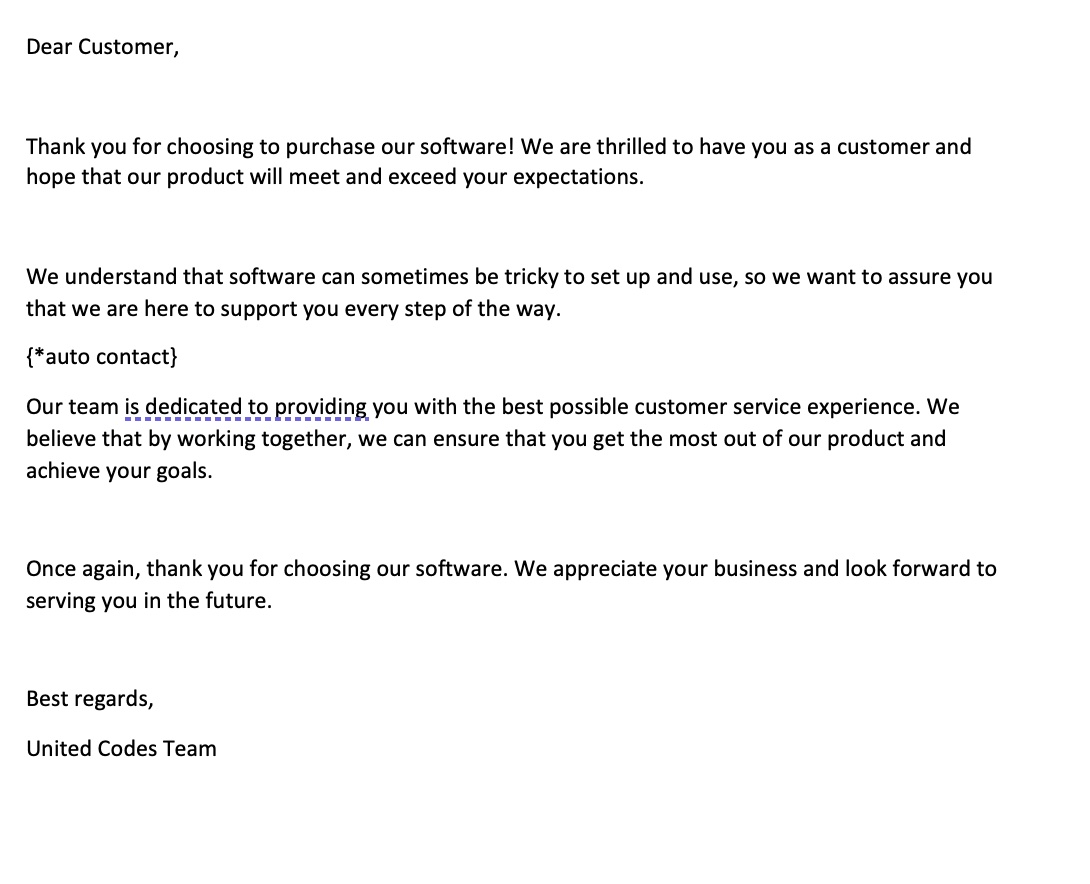
Please download the template below to have a look at the template:
template.docx
Output
The output is as follows:
You can also download the output to check it out:
output.docx
Internal Link Tag
Available From: v21.2This tag allows you to place a link to a target inside the same document. To point a link tag to its target both of these tags should have same unique id (uid). If the uid is not provided, a new uid will be generated uniquely for every different link and target pair having the same value after the space in the tag.{link name:uid} is a tag where a link will be placed. The tag itself will be replaced by the value of key after the space, in this case the value of name. This can also be for example: {link "Click here":1}. This will link or redirect to the section where a target tag is placed with the same uid. Multiple link tag may target one target tag. But one link tag cannot target multiple target tags.
{target name:uid} is a tag where a bookmark will be placed and is thus the target of link tag having same unique id. The replacing value will be determined by the key after space, in this case, name. This is a variable and can be for example: {target "To go here":1}.
Example
Data Source
Hearby the example data sources for different options.
- SQL
- PL/SQL returning SQL
- PL/SQL returning JSON
- JSON
select 'file1' as "filename",
       cursor (
         select cursor (
           select c.customer_id         as "id",
                  c.customer_id * 91509 as "invoicenumber",
                  c.cust_first_name     as "cust_first_name",
                  c.cust_last_name      as "cust_last_name",
                  c.cust_city           as "cust_city",
                  cursor (
                    select o.order_total      as "order_total",
                           'Order ' || rownum as "order_name"
                    from aop_sample_orders o
                    where c.customer_id = o.customer_id
                  )                     "orders"
           from aop_sample_customers c
           where c.customer_id < 4
         ) as "invoice"
         from dual
       )       as "data"
from dual
declare
  l_return clob;
begin
  l_return := q'[
    select 'file1' as "filename",
           cursor (
             select cursor (
               select c.customer_id         as "id",
                      c.customer_id * 91509 as "invoicenumber",
                      c.cust_first_name     as "cust_first_name",
                      c.cust_last_name      as "cust_last_name",
                      c.cust_city           as "cust_city",
                      cursor (
                        select o.order_total      as "order_total",
                               'Order ' || rownum as "order_name"
                        from aop_sample_orders o
                        where c.customer_id = o.customer_id
                      )                     "orders"
               from aop_sample_customers c
               where c.customer_id < 4
             ) as "invoice"
             from dual
           )       as "data"
    from dual
    ]';
  return l_return;
end;
declare
  l_cursor sys_refcursor;
  l_return clob; -- can also be varchar2, make sure it corresponds to the structure in the JSON
begin
  apex_json.initialize_clob_output(dbms_lob.call, true, 2);
  open l_cursor for
    select 'file1' as "filename",
           cursor (
             select cursor (
               select c.customer_id         as "id",
                      c.customer_id * 91509 as "invoicenumber",
                      c.cust_first_name     as "cust_first_name",
                      c.cust_last_name      as "cust_last_name",
                      c.cust_city           as "cust_city",
                      cursor (
                        select o.order_total      as "order_total",
                               'Order ' || rownum as "order_name"
                        from aop_sample_orders o
                        where c.customer_id = o.customer_id
                      )                     "orders"
               from aop_sample_customers c
               where c.customer_id < 4
             ) as "invoice"
             from dual
           )       as "data"
    from dual

  apex_json.write(l_cursor);
  l_return := apex_json.get_clob_output;
  return l_return;
end;
[
  {
    "filename": "file1",
    "data": [
      {
        "invoice": [
          {
            "id": 1,
            "invoicenumber": 91509,
            "cust_first_name": "John",
            "cust_last_name": "Dulles",
            "cust_city": "Sterling",
            "orders": [
              {
                "order_total": 2380,
                "order_name": "Order 1"
              }
            ]
          },
          {
            "id": 2,
            "invoicenumber": 183018,
            "cust_first_name": "William",
            "cust_last_name": "Hartsfield",
            "cust_city": "Atlanta",
            "orders": [
              {
                "order_total": 1640,
                "order_name": "Order 1"
              },
              {
                "order_total": 730,
                "order_name": "Order 2"
              }
            ]
          },
          {
            "id": 3,
            "invoicenumber": 274527,
            "cust_first_name": "Edward",
            "cust_last_name": "Logan",
            "cust_city": "East Boston",
            "orders": [
              {
                "order_total": 1515,
                "order_name": "Order 1"
              },
              {
                "order_total": 905,
                "order_name": "Order 2"
              }
            ]
          }
        ]
      }
    ]
  }
]
Template
The template shows the link of invoices from first page of the document to the targeted invoice page.
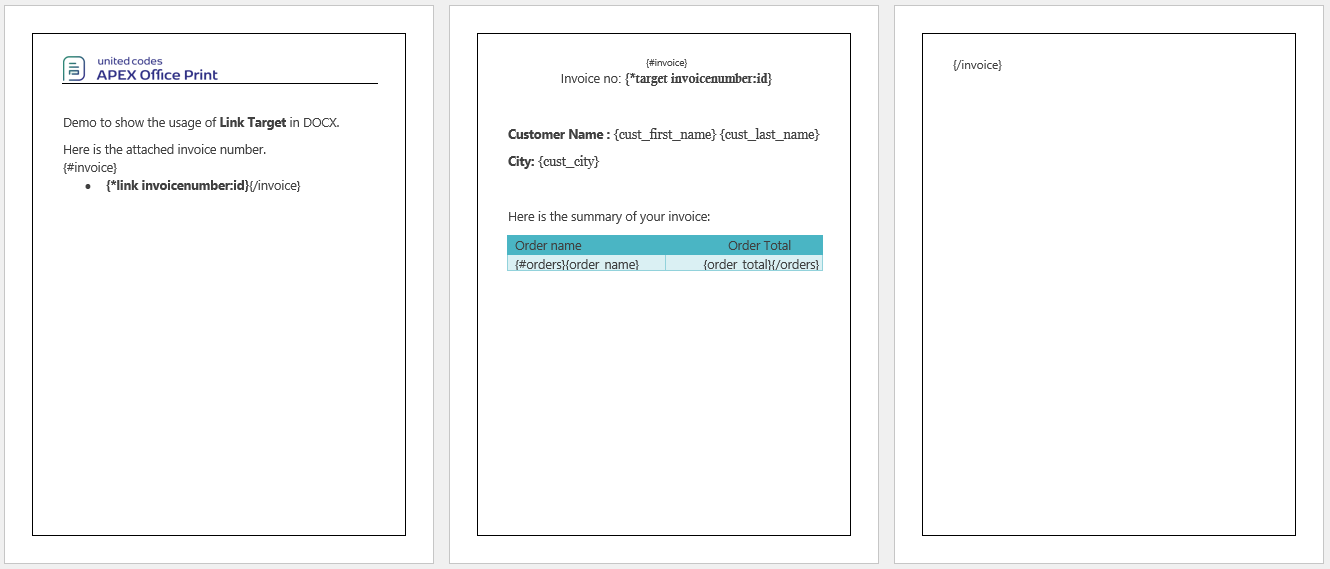
Here the uid number is not really necessary as the our replacing value is already unique. So our pairs could have been {link invoicenumber} and {target invoicenumber}.
Output
Upon processing the provided data and template, the resulting outcome is as follows. By clicking on the invoice number located on the first page, it redirects to the corresponding invoice page.

Table Of Content Tag
This tag is going to be deprecated in the future. Please insert the table of content in the template itself. With the use of macros, you can update the page numbers using pre conversion commands. Please see server preconversion command configuration.
To create a table of contents, a tag starting with a ~ character followed by the name of the column that holds the options is used. By placing the {~tockey} tag, a table of contents will be generated at the location where the tag is inserted.
Furthermore, since AOP version 18.2.3, users are now able to customize the table of content, which provides greater flexibility and control when creating documents.The following options are available:
- title : The title to show at the top of table of content. Deafult "Contents".
- show_level: The level of heading to show in the table of content. Default 3
- tab_leader: the character to use after providing the headings. default '.', can be either ".", "_", "-".
Please note that AOP itself does not render the content, thus the page numbers will not be updated. If your output type docx, you can update the page number after opening.
If your output type is PD and are using MS Office as PDF converter, the table of content will be automatically updated with page number. Please ntoe that this is only available after AOP 22.2. Alternatively, if you are using a prior version, you will need to configure a custom converter. See server section for more information.
If your output type is PDF and are using Libreoffice as PDF converter, the table of content might not be updated with the page number. You can use 'soffice-macro' pdf converter to convert the document to PDF. You can specify the converter for this specific request in the init PLSQL section of the dymaic action or providing it to the AOP PLSQL API.
aop_api_pkg.g_output_converter := 'soffice-macro';
Alternatively, you can also use the inbuilt table of content in Word.
Example
Data Source
Hearby the example data sources for different options. The templates contains toc_demo as the table of content key thus toc_demo_title, toc_demo_show_level and toc_demo_tab_leader for table of contents title, show level and tab leader in the sql.
- SQL
- PL/SQL returning SQL
- PL/SQL returning JSON
- JSON
select 'file1' as "filename",
       cursor (
         select cursor (
           select c.cust_first_name                    as "cust_f_name",
                  c.cust_last_name                     as "cust_l_name",
                  c.cust_city                          as "city",
                  c.cust_street_address1               as "addr_1",
                  c.cust_street_address2               as "addr_2",
                  c.cust_state                         as "state",
                  c.cust_email                         as "email",
                  c.phone_number1                      as "phone_number_1",
                  c.phone_number2                      as "phone_number_2",
                  c.url                                as "url"
           from aop_sample_customers c
         )                                             as "cust_list",
                  '<h1>Heading 1 from html</h1><h2>Heading 2 from html</h2><h3>Heading 3 from html</h3> AOP also handles the headings from html' as "sample_html",
                  'Table of Contents - Generated by AOP'as "toc_demo_title",
                  2                                    as "toc_demo_show_level",
                  '-'                                  as "toc_demo_tab_leader"
         from dual
       )       as "data"
from dual
declare
  l_return clob;
begin
  l_return := q'[
    select 'file1' as "filename",
           cursor (
             select cursor (
               select c.cust_first_name                    as "cust_f_name",
                      c.cust_last_name                     as "cust_l_name",
                      c.cust_city                          as "city",
                      c.cust_street_address1               as "addr_1",
                      c.cust_street_address2               as "addr_2",
                      c.cust_state                         as "state",
                      c.cust_email                         as "email",
                      c.phone_number1                      as "phone_number_1",
                      c.phone_number2                      as "phone_number_2",
                      c.url                                as "url"
               from aop_sample_customers c
             )                                             as "cust_list",
                      '<h1>Heading 1 from html</h1><h2>Heading 2 from html</h2><h3>Heading 3 from html</h3> AOP also handles the headings from html' as "sample_html",
                      'Table of Contents - Generated by AOP'as "toc_demo_title",
                      2                                    as "toc_demo_show_level",
                      '-'                                  as "toc_demo_tab_leader"
             from dual
           )       as "data"
    from dual
    ]';
  return l_return;
end;
declare
  l_cursor sys_refcursor;
  l_return clob; -- can also be varchar2, make sure it corresponds to the structure in the JSON
begin
  apex_json.initialize_clob_output(dbms_lob.call, true, 2);
  open l_cursor for
    select 'file1' as "filename",
           cursor (
             select cursor (
               select c.cust_first_name                    as "cust_f_name",
                      c.cust_last_name                     as "cust_l_name",
                      c.cust_city                          as "city",
                      c.cust_street_address1               as "addr_1",
                      c.cust_street_address2               as "addr_2",
                      c.cust_state                         as "state",
                      c.cust_email                         as "email",
                      c.phone_number1                      as "phone_number_1",
                      c.phone_number2                      as "phone_number_2",
                      c.url                                as "url"
               from aop_sample_customers c
             )                                             as "cust_list",
                      '<h1>Heading 1 from html</h1><h2>Heading 2 from html</h2><h3>Heading 3 from html</h3> AOP also handles the headings from html' as "sample_html",
                      'Table of Contents - Generated by AOP'as "toc_demo_title",
                      2                                    as "toc_demo_show_level",
                      '-'                                  as "toc_demo_tab_leader"
             from dual
           )       as "data"
    from dual

  apex_json.write(l_cursor);
  l_return := apex_json.get_clob_output;
  return l_return;
end;
[
  {
    "filename": "file1",
    "data": [
      {
        "cust_list": [
          {
            "cust_f_name": "John",
            "cust_l_name": "Dulles",
            "city": "Sterling",
            "addr_1": "45020 Aviation Drive",
            "state": "VA",
            "email": "john.dulles@email.com",
            "phone_number_1": "703-555-2143",
            "phone_number_2": "703-555-8967",
            "url": "http://www.johndulles.com"
          },
          {
            "cust_f_name": "William",
            "cust_l_name": "Hartsfield",
            "city": "Atlanta",
            "addr_1": "6000 North Terminal Parkway",
            "state": "GA",
            "phone_number_1": "404-555-3285"
          },
          {
            "cust_f_name": "Edward",
            "cust_l_name": "Logan",
            "city": "East Boston",
            "addr_1": "1 Harborside Drive",
            "state": "MA",
            "phone_number_1": "617-555-3295"
          },
          {
            "cust_f_name": "Frank",
            "cust_l_name": "OHare",
            "city": "Chicago",
            "addr_1": "10000 West OHare",
            "state": "IL",
            "phone_number_1": "773-555-7693"
          },
          {
            "cust_f_name": "Fiorello",
            "cust_l_name": "LaGuardia",
            "city": "Flushing",
            "addr_1": "Hangar Center",
            "addr_2": "Third Floor",
            "state": "NY",
            "phone_number_1": "212-555-3923"
          },
          {
            "cust_f_name": "Albert",
            "cust_l_name": "Lambert",
            "city": "St. Louis",
            "addr_1": "10701 Lambert International Blvd.",
            "state": "MO",
            "phone_number_1": "314-555-4022"
          },
          {
            "cust_f_name": "Eugene",
            "cust_l_name": "Bradley",
            "city": "Windsor Locks",
            "addr_1": "Schoephoester Road",
            "state": "CT",
            "phone_number_1": "860-555-1835"
          }
        ],
        "sample_html": "<h1>Heading 1 from html</h1><h2>Heading 2 from html</h2><h3>Heading 3 from html</h3> AOP also handles the headings from html",
        "toc_demo_title": "Table of Contents - Generated by AOP",
        "toc_demo_show_level": 2,
        "toc_demo_tab_leader": "-"
      }
    ]
  }
]
Template
In the above data source, the options are inside the key toc_demo. Thus the tag to use becomes:
{~toc_demo}

Example template can be downloaded from:
table-of-contents.docx
Output
The output will look like the following:
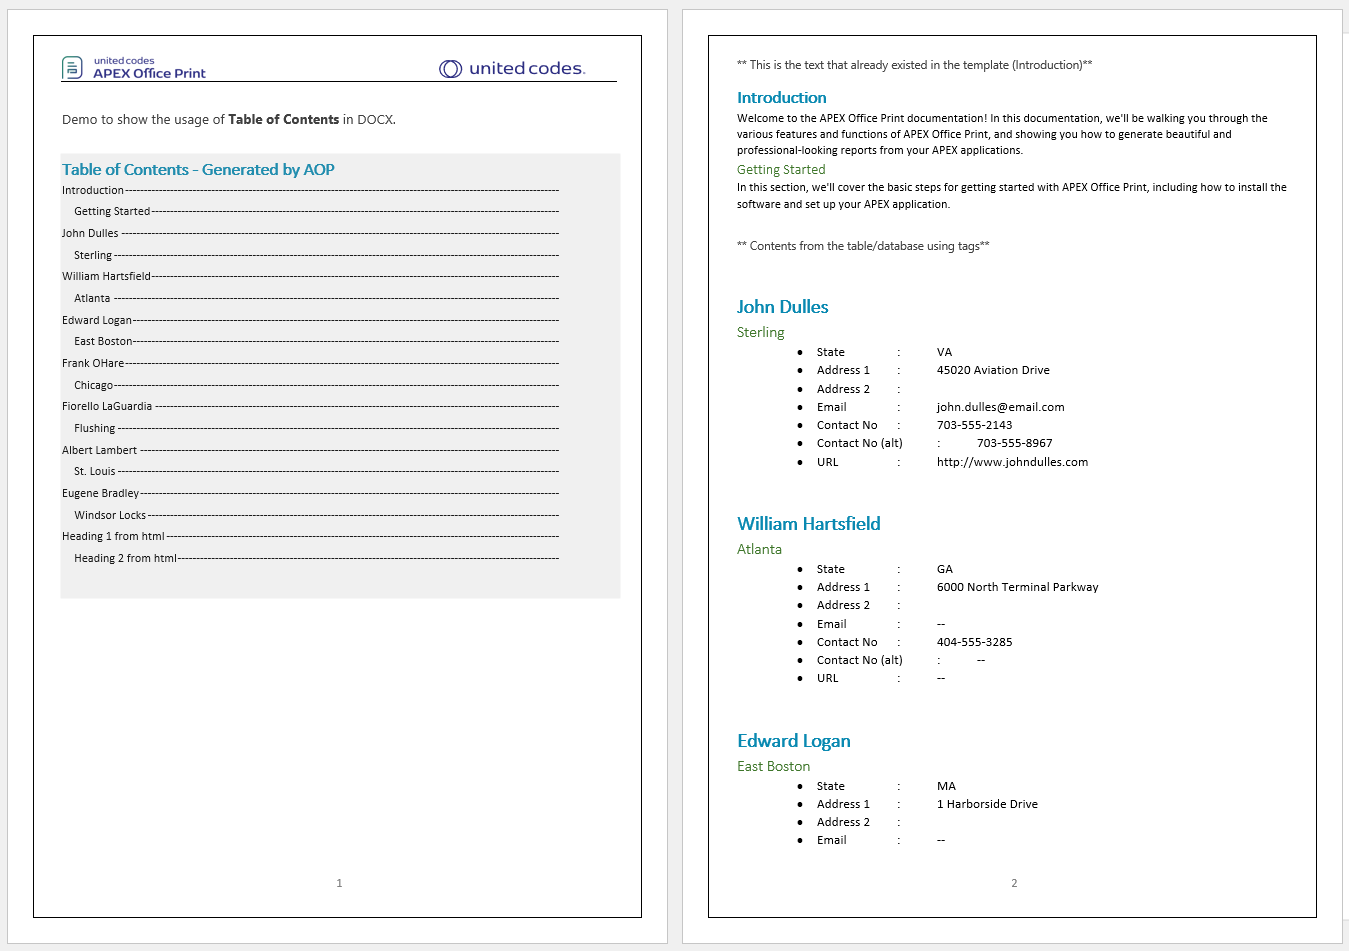
The complete output is available here :
table-of-contents.docx
Footnote Tag
Footnote tags are a way to add footnotes to your report. Footnotes are added to the bottom of the page and are numbered sequentially. The footnote tag starts with a + sign, followed by the column name that holds the value. For example {+footnote}
Example
Data Source
Hereby examples of data source for different available options.
- SQL
- PL/SQL returning SQL
- PL/SQL returning JSON
- JSON
select 'file1' as "filename",
       cursor (
         select 'Only I can change my life. No one can do it for me.' as "quote",
                'Carol Burnett'                                       as "person"
         from dual
       )       as "data"
from dual;
declare
  l_return clob;
begin
  l_return := q'[
    select 'file1' as "filename",
           cursor (
             select 'Only I can change my life. No one can do it for me.' as "quote",
                    'Carol Burnett'                                       as "person"
             from dual
           )       as "data"
    from dual;
    ]';
  return l_return;
end;
declare
  l_cursor sys_refcursor;
  l_return clob; -- can also be varchar2, make sure it corresponds to the structure in the JSON
begin
  apex_json.initialize_clob_output(dbms_lob.call, true, 2);
  open l_cursor for
    select 'file1' as "filename",
           cursor (
             select 'Only I can change my life. No one can do it for me.' as "quote",
                    'Carol Burnett'                                       as "person"
             from dual
           )       as "data"
    from dual;

  apex_json.write(l_cursor);
  l_return := apex_json.get_clob_output;
  return l_return;
end;
[
  {
    "filename": "file1",
    "data": [
      {
        "quote": "Only I can change my life. No one can do it for me.",
        "person": "Carol Burnett"
      }
    ]
  }
]
Template
In the above data source we want the person to be the footnote and the quote should be the part of document. We use normal substitution tag for quote and footnote tag for person. The template becomes:

Output
The expected output is as follows:

Labels
The label tag allows you to do mail merging with the Word template. The labels tag starts with a minus sign followed by the name of the cursor that holds the records. In order to perform mail merging, create a document with labels by going to Mailings options and then to Labels. Fill in the tags in the address field and choose the type of label in the Label option. A document can then be generated by clicking New document. Currently however if labels are getting printed then we expect the document only containing labels and no other information, and that the tag keys are not used more than once.
Note that in the first cell you need to add the {-labels} tag.
This mail merge option is very simple. If you want to include conditions, images, barcodes or qrcodes, please make a custom table with the right margin and use loop tags.
Example
Data Source
Hereby examples of data source for different options.
- SQL
- PL/SQL returning SQL
- PL/SQL returning JSON
- JSON
select 'file1' as "filename",
       cursor (
         select cursor (
           select 'Mr'                      as "Title",
                  cust_first_name           as "FirstName",
                  cust_last_name            as "LastName",
                  'Developer'               as "JobTitle",
                  'APEX RnD'                as "Company",
                  cust_street_address1      as "Address1",
                  cust_street_address2      as "Address2",
                  cust_city                 as "City",
                  cust_state                as "State",
                  to_char(cust_postal_code) as "PostalCode",
                  'US'                      as "Country",
                  phone_number1             as "HomePhone",
                  phone_number2             as "WorkPhone"
           from aop_sample_customers
           order by 1,
                    2
         ) as "labels"
         from dual
       )       as "data"
from dual
declare
  l_return clob;
begin
  l_return := q'[
    select 'file1' as "filename",
           cursor (
             select cursor (
               select 'Mr'                      as "Title",
                      cust_first_name           as "FirstName",
                      cust_last_name            as "LastName",
                      'Developer'               as "JobTitle",
                      'APEX RnD'                as "Company",
                      cust_street_address1      as "Address1",
                      cust_street_address2      as "Address2",
                      cust_city                 as "City",
                      cust_state                as "State",
                      to_char(cust_postal_code) as "PostalCode",
                      'US'                      as "Country",
                      phone_number1             as "HomePhone",
                      phone_number2             as "WorkPhone"
               from aop_sample_customers
               order by 1,
                        2
             ) as "labels"
             from dual
           )       as "data"
    from dual
    ]';
  return l_return;
end;
declare
  l_cursor sys_refcursor;
  l_return clob; -- can also be varchar2, make sure it corresponds to the structure in the JSON
begin
  apex_json.initialize_clob_output(dbms_lob.call, true, 2);
  open l_cursor for
    select 'file1' as "filename",
           cursor (
             select cursor (
               select 'Mr'                      as "Title",
                      cust_first_name           as "FirstName",
                      cust_last_name            as "LastName",
                      'Developer'               as "JobTitle",
                      'APEX RnD'                as "Company",
                      cust_street_address1      as "Address1",
                      cust_street_address2      as "Address2",
                      cust_city                 as "City",
                      cust_state                as "State",
                      to_char(cust_postal_code) as "PostalCode",
                      'US'                      as "Country",
                      phone_number1             as "HomePhone",
                      phone_number2             as "WorkPhone"
               from aop_sample_customers
               order by 1,
                        2
             ) as "labels"
             from dual
           )       as "data"
    from dual

  apex_json.write(l_cursor);
  l_return := apex_json.get_clob_output;
  return l_return;
end;
[
  {
    "filename": "file1",
    "data": [
      {
        "labels": [
          {
            "Title": "Mr",
            "FirstName": "Albert",
            "LastName": "Lambert",
            "JobTitle": "Developer",
            "Company": "APEX RnD",
            "Address1": "10701 Lambert International Blvd.",
            "City": "St. Louis",
            "State": "MO",
            "PostalCode": 63145,
            "Country": "US",
            "HomePhone": "314-555-4022"
          },
          {
            "Title": "Mr",
            "FirstName": "Edward",
            "LastName": "Logan",
            "JobTitle": "Developer",
            "Company": "APEX RnD",
            "Address1": "1 Harborside Drive",
            "City": "East Boston",
            "State": "MA",
            "PostalCode": "02128",
            "Country": "US",
            "HomePhone": "617-555-3295"
          },
          {
            "Title": "Mr",
            "FirstName": "Eugene",
            "LastName": "Bradley",
            "JobTitle": "Developer",
            "Company": "APEX RnD",
            "Address1": "Schoephoester Road",
            "City": "Windsor Locks",
            "State": "CT",
            "PostalCode": "06096",
            "Country": "US",
            "HomePhone": "860-555-1835"
          },
          {
            "Title": "Mr",
            "FirstName": "Fiorello",
            "LastName": "LaGuardia",
            "JobTitle": "Developer",
            "Company": "APEX RnD",
            "Address1": "Hangar Center",
            "Address2": "Third Floor",
            "City": "Flushing",
            "State": "NY",
            "PostalCode": 11371,
            "Country": "US",
            "HomePhone": "212-555-3923"
          },
          {
            "Title": "Mr",
            "FirstName": "Frank",
            "LastName": "OHare",
            "JobTitle": "Developer",
            "Company": "APEX RnD",
            "Address1": "10000 West OHare",
            "City": "Chicago",
            "State": "IL",
            "PostalCode": 60666,
            "Country": "US",
            "HomePhone": "773-555-7693"
          },
          {
            "Title": "Mr",
            "FirstName": "John",
            "LastName": "Dulles",
            "JobTitle": "Developer",
            "Company": "APEX RnD",
            "Address1": "45020 Aviation Drive",
            "City": "Sterling",
            "State": "VA",
            "PostalCode": 20166,
            "Country": "US",
            "HomePhone": "703-555-2143",
            "WorkPhone": "703-555-8967"
          },
          {
            "Title": "Mr",
            "FirstName": "William",
            "LastName": "Hartsfield",
            "JobTitle": "Developer",
            "Company": "APEX RnD",
            "Address1": "6000 North Terminal Parkway",
            "City": "Atlanta",
            "State": "GA",
            "PostalCode": 30320,
            "Country": "US",
            "HomePhone": "404-555-3285"
          }
        ]
      }
    ]
  }
]
Template
Please have a look at the template below, you can follow the procedure here: https://www.youtube.com/watch?v=_gGNXhPNfdk
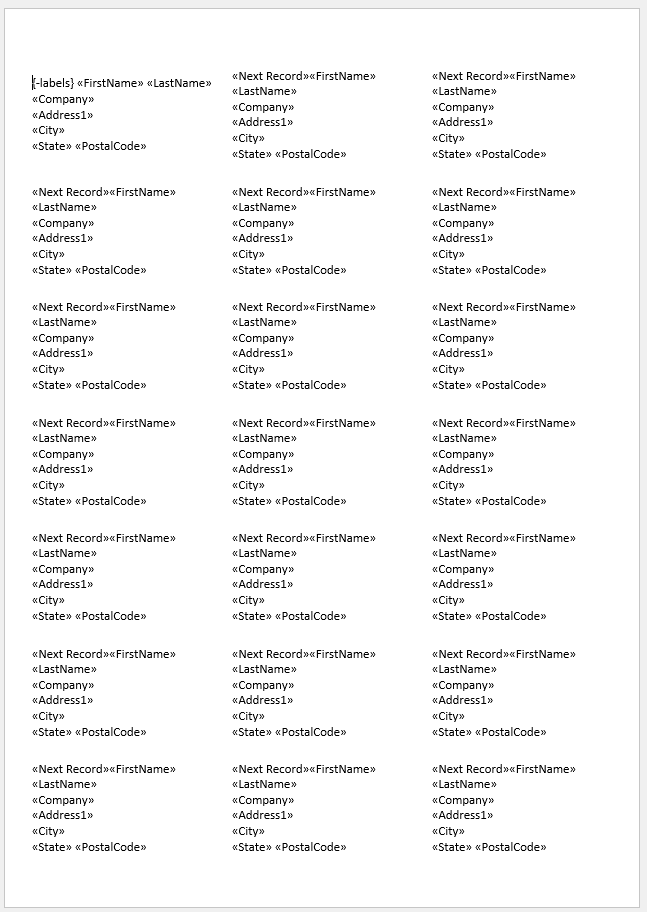
Output
The output will look as follows:

Example using Loop Tag
For the insertion of images, barcodes, qrcodes and for custom styling, you can use loop tag for the labels. This examples shows the application of loop tag inside table to generate the Lables lookalike output including images.
Data Source
Hereby examples of data source for different options.
- SQL
- PL/SQL returning SQL
- PL/SQL returning JSON
- JSON
select 'file1' as "filename",
       cursor (
         select cursor (
           select 'Mr'                      as "Title",
                  cust_first_name           as "FirstName",
                  cust_last_name            as "LastName",
                  'Developer'               as "JobTitle",
                  'APEX RnD'                as "Company",
                  cust_street_address1      as "Address1",
                  cust_street_address2      as "Address2",
                  cust_city                 as "City",
                  cust_state                as "State",
                  to_char(cust_postal_code) as "PostalCode",
                  'US'                      as "Country",
                  phone_number1             as "HomePhone",
                  phone_number2             as "WorkPhone",
                  'https://api.apexofficeprint.com/logo-aop.png' as "img",
                  '100px'                   as "img_height",
                  'true'                    as "img_maintain_aspect_ratio",
                  "square"                  as "img_text_wrap
           from aop_sample_customers
           order by 1,
                    2
         ) as "labels"
         from dual
       )       as "data"
from dual
declare
  l_return clob;
begin
  l_return := q'[
    select 'file1' as "filename",
           cursor (
             select cursor (
               select 'Mr'                      as "Title",
                      cust_first_name           as "FirstName",
                      cust_last_name            as "LastName",
                      'Developer'               as "JobTitle",
                      'APEX RnD'                as "Company",
                      cust_street_address1      as "Address1",
                      cust_street_address2      as "Address2",
                      cust_city                 as "City",
                      cust_state                as "State",
                      to_char(cust_postal_code) as "PostalCode",
                      'US'                      as "Country",
                      phone_number1             as "HomePhone",
                      phone_number2             as "WorkPhone",
                      'https://api.apexofficeprint.com/logo-aop.png' as "img",
                      '100px'                   as "img_height",
                      'true'                    as "img_maintain_aspect_ratio",
                      "square"                  as "img_text_wrap
               from aop_sample_customers
               order by 1,
                        2
             ) as "labels"
             from dual
           )       as "data"
    from dual
    ]';
  return l_return;
end;
declare
  l_cursor sys_refcursor;
  l_return clob; -- can also be varchar2, make sure it corresponds to the structure in the JSON
begin
  apex_json.initialize_clob_output(dbms_lob.call, true, 2);
  open l_cursor for
    select 'file1' as "filename",
           cursor (
             select cursor (
               select 'Mr'                      as "Title",
                      cust_first_name           as "FirstName",
                      cust_last_name            as "LastName",
                      'Developer'               as "JobTitle",
                      'APEX RnD'                as "Company",
                      cust_street_address1      as "Address1",
                      cust_street_address2      as "Address2",
                      cust_city                 as "City",
                      cust_state                as "State",
                      to_char(cust_postal_code) as "PostalCode",
                      'US'                      as "Country",
                      phone_number1             as "HomePhone",
                      phone_number2             as "WorkPhone",
                      'https://api.apexofficeprint.com/logo-aop.png' as "img",
                      '100px'                   as "img_height",
                      'true'                    as "img_maintain_aspect_ratio",
                      "square"                  as "img_text_wrap
               from aop_sample_customers
               order by 1,
                        2
             ) as "labels"
             from dual
           )       as "data"
    from dual

  apex_json.write(l_cursor);
  l_return := apex_json.get_clob_output;
  return l_return;
end;
[
  {
    "filename": "file1",
    "data": [
      {
        "labels": [
          {
            "Title": "Mr",
            "FirstName": "Albert",
            "LastName": "Lambert",
            "JobTitle": "Developer",
            "Company": "APEX RnD",
            "Address1": "10701 Lambert International Blvd.",
            "City": "St. Louis",
            "State": "MO",
            "PostalCode": 63145,
            "Country": "US",
            "HomePhone": "314-555-4022",
            "img": "https://api.apexofficeprint.com/logo-aop.png",
            "img_height": "100px",
            "img_maintain_aspect_ratio": true,
            "img_wrap_text": "square"
          },
          {
            "Title": "Mr",
            "FirstName": "Edward",
            "LastName": "Logan",
            "JobTitle": "Developer",
            "Company": "APEX RnD",
            "Address1": "1 Harborside Drive",
            "City": "East Boston",
            "State": "MA",
            "PostalCode": "02128",
            "Country": "US",
            "HomePhone": "617-555-3295",
            "img": "https://api.apexofficeprint.com/logo-aop.png",
            "img_height": "100px",
            "img_maintain_aspect_ratio": true,
            "img_wrap_text": "square"
          },
          {
            "Title": "Mr",
            "FirstName": "Eugene",
            "LastName": "Bradley",
            "JobTitle": "Developer",
            "Company": "APEX RnD",
            "Address1": "Schoephoester Road",
            "City": "Windsor Locks",
            "State": "CT",
            "PostalCode": "06096",
            "Country": "US",
            "HomePhone": "860-555-1835",
            "img": "https://api.apexofficeprint.com/logo-aop.png",
            "img_height": "100px",
            "img_maintain_aspect_ratio": true,
            "img_wrap_text": "square"
          },
          {
            "Title": "Mr",
            "FirstName": "Fiorello",
            "LastName": "LaGuardia",
            "JobTitle": "Developer",
            "Company": "APEX RnD",
            "Address1": "Hangar Center",
            "Address2": "Third Floor",
            "City": "Flushing",
            "State": "NY",
            "PostalCode": 11371,
            "Country": "US",
            "HomePhone": "212-555-3923",
            "img": "https://api.apexofficeprint.com/logo-aop.png",
            "img_height": "100px",
            "img_maintain_aspect_ratio": true,
            "img_wrap_text": "square"
          },
          {
            "Title": "Mr",
            "FirstName": "Frank",
            "LastName": "OHare",
            "JobTitle": "Developer",
            "Company": "APEX RnD",
            "Address1": "10000 West OHare",
            "City": "Chicago",
            "State": "IL",
            "PostalCode": 60666,
            "Country": "US",
            "HomePhone": "773-555-7693",
            "img": "https://api.apexofficeprint.com/logo-aop.png",
            "img_height": "100px",
            "img_maintain_aspect_ratio": true,
            "img_wrap_text": "square"
          },
          {
            "Title": "Mr",
            "FirstName": "John",
            "LastName": "Dulles",
            "JobTitle": "Developer",
            "Company": "APEX RnD",
            "Address1": "45020 Aviation Drive",
            "City": "Sterling",
            "State": "VA",
            "PostalCode": 20166,
            "Country": "US",
            "HomePhone": "703-555-2143",
            "WorkPhone": "703-555-8967",
            "img": "https://api.apexofficeprint.com/logo-aop.png",
            "img_height": "100px",
            "img_maintain_aspect_ratio": true,
            "img_wrap_text": "square"
          },
          {
            "Title": "Mr",
            "FirstName": "William",
            "LastName": "Hartsfield",
            "JobTitle": "Developer",
            "Company": "APEX RnD",
            "Address1": "6000 North Terminal Parkway",
            "City": "Atlanta",
            "State": "GA",
            "PostalCode": 30320,
            "Country": "US",
            "HomePhone": "404-555-3285",
            "img": "https://api.apexofficeprint.com/logo-aop.png",
            "img_height": "100px",
            "img_maintain_aspect_ratio": true,
            "img_wrap_text": "square"
          }
        ]
      }
    ]
  }
]
Template
In the provided template, a table is first created using the labels in Microsoft Word's Label Options. This allows for the incorporation of table properties from the chosen Product Number in Label Options. Following this, data tags are inserted within the table, formatted as needed.
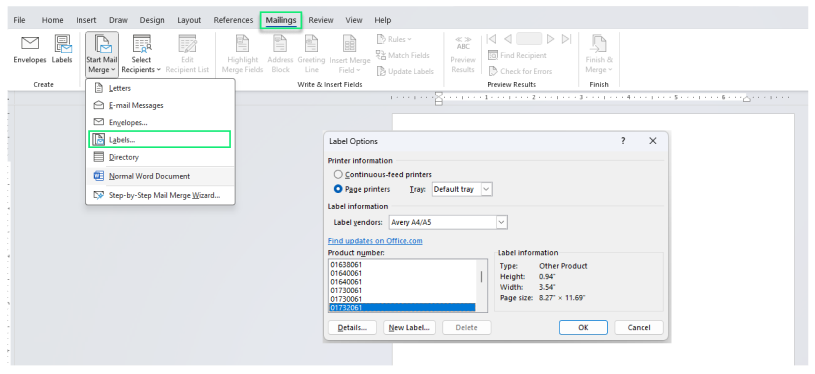
Additional columns can be added based on the requirement. Depending on the number of columns, corresponding tags and conditions should be included, as demonstrated in the template below.

labels-using-loop-template.docx
Output
The output will look as follows:
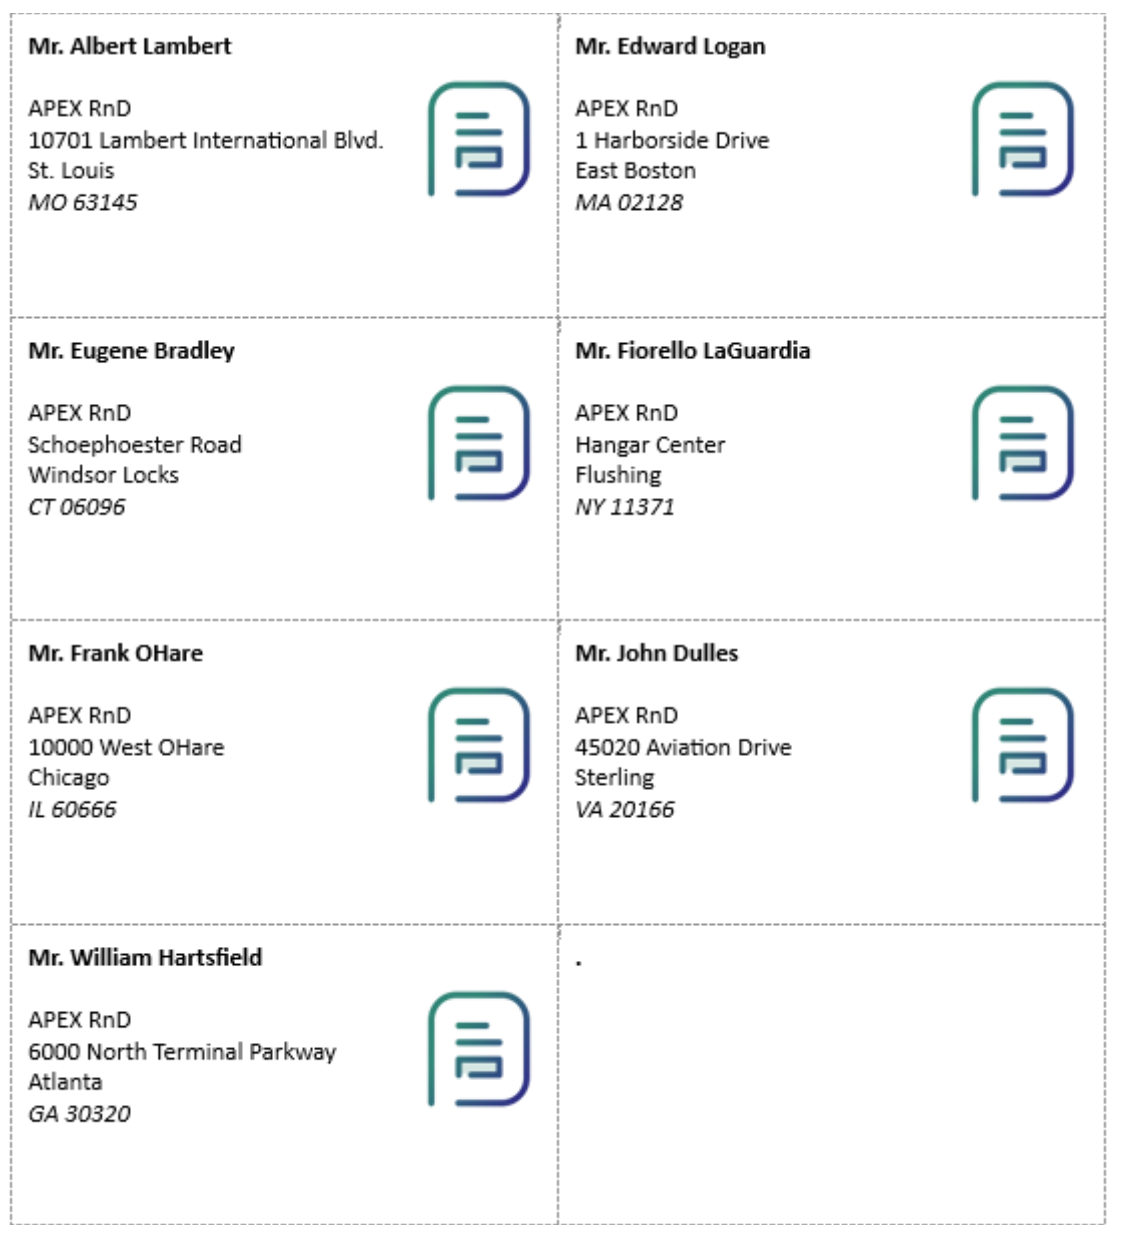
Form Tag
Available From: v20.3The form tag allows users to create froms in PDF documents.
The form tag starts with ?form string, followed by the name of the column that holds the value and options.
AOP currently allows generation of three types of form elements:
- textboxes
- radio buttons
- check boxes.
If you are looking to generate a signature field, please have a look here. TODO: Link
The output should be PDF when form tag is used, otherwise an error will be thrown.
Form tag options
All three types of form elements have common fields that must be provided in order to create them.
- type (required): Indicates which type of form element to be created. Options are text, radio, and checkbox.
- name (required): Unique ID of a form element.
- height (optional): User defined height of a form element. If not specified automatically assigned.
- width (optional): User defined width of a form element. If not specified automatically assigned.
- value (optional): The default value a certain form element will have.
- text (optional): A label for certain form elements.
- selected (optional): Boolean value (true/false) that checks or unchecks radio button elements.
Only form elements fields indicated with required, height and width are common for every element. The remaining elements are discussed in each form elements section below.
Textboxes
To create a textbox form element in a PDF Form, the following fields must be included in the data :
- type (required)
- name (required)
- value (optional)
- height (optional)
- width (optional)
Data Source
- SQL
- PL/SQL returning SQL
- PL/SQL returning JSON
- JSON
SELECT
    'file1' AS "filename",
    CURSOR (
        SELECT
            CURSOR (
                SELECT
                    'text'       AS "type",
                    ''           AS "value",
                    'first_name' AS "name"
                FROM
                    dual
            ) AS "first_name",
            CURSOR (
                SELECT
                    'text'      AS "type",
                    'Apex R&D'  AS "value",
                    'last_name' AS "name",
                    '20'        AS "height",
                    '200'       AS "width"
                FROM
                    dual
            ) AS "last_name"
        FROM
            dual
    )       AS "data"
FROM
    dual;
DECLARE
    l_return CLOB;
BEGIN
    l_return := q'[
    SELECT
    'file1' AS "filename",
    CURSOR (
        SELECT
            CURSOR (
                SELECT
                    'text'       AS "type",
                    ''           AS "value",
                    'first_name' AS "name"
                FROM
                    dual
            ) AS "first_name",
            CURSOR (
                SELECT
                    'text'      AS "type",
                    'Apex R&D'  AS "value",
                    'last_name' AS "name",
                    '20'        AS "height",
                    '200'       AS "width"
                FROM
                    dual
            ) AS "last_name"
        FROM
            dual
    )       AS "data"
FROM
    dual;
    ]';
    RETURN l_return;
END;
DECLARE
    l_cursor SYS_REFCURSOR;
    l_return CLOB; -- can also be varchar2, make sure it corresponds to the structure in the JSON
BEGIN
    apex_json.initialize_clob_output(dbms_lob.call, TRUE, 2);
    OPEN l_cursor FOR SELECT
                          'file1' AS "filename",
                          CURSOR (
                              SELECT
                                  CURSOR (
                                      SELECT
                                          'text'       AS "type",
                                          ''           AS "value",
                                          'first_name' AS "name"
                                      FROM
                                          dual
                                  ) AS "first_name",
                                  CURSOR (
                                      SELECT
                                          'text'      AS "type",
                                          'Apex R&D'  AS "value",
                                          'last_name' AS "name",
                                          '20'        AS "height",
                                          '200'       AS "width"
                                      FROM
                                          dual
                                  ) AS "last_name"
                              FROM
                                  dual
                          )       AS "data"
                      FROM
                          dual;

    apex_json.write(l_cursor);
    l_return := apex_json.get_clob_output;
    RETURN l_return;
END;
[
  {
    "filename": "file1",
    "data": [
      {
        "first_name": [{ "type": "text", "name": "first_name" }],
        "last_name": [
          {
            "type": "text",
            "value": "Apex R&D",
            "name": "last_name",
            "height": 20,
            "width": 200
          }
        ]
      }
    ]
  }
]
Template
The template consists of a textbox element with the name first_name and a textbox element with the name last_name, with the form tag represented by
Name: {?form first_name} Surname: {?form last_name}
Output
It will result in two textbox elements in the PDF Form, one with the name first_name and one with the name last_name. The textbox element with the name first_name will be empty with default size, while the textbox element with the name last_name will have the value Apex R&D and will have a height of 20 and a width of 200.

 output.pdf
 Radio Buttons
To create a radio button element, radio type can be used. Extra options for radio type are as follows:
- type (required)
- name (required)
- heigth (optional)
- width (optional)
- value (optional)
- text (optional)
- selected (optional)
There are two ways to create a radio button element. The first way is to create a single radio button element by Referencing. The second way is to create multiple radio button elements by Looping. Multiple radio buttons or Radiolists are grouped together as a single unit, and only one radio button can be selected at a time.
Looping
This technique is used to create a group of radio buttons that are interconnected to each other. A list of items are expected with options for radio type.
- SQL
- PL/SQL returning SQL
- PL/SQL returning JSON
- JSON
SELECT
    'file1' AS "filename",
    CURSOR (
        SELECT
            CURSOR (
                SELECT
                    'radio'         AS "type",
                    'List A'        AS "value",
                    'Radiolist'     AS "name",
                    'List Option A' AS "text",
                    1               AS "selected"
                FROM
                    dual
                UNION ALL
                SELECT
                    'radio'         AS "type",
                    'List B'        AS "value",
                    'Radiolist'     AS "name",
                    'List Option B' AS "text",
                    1               AS "selected"
                FROM
                    dual
            ) AS "radiolist"
        FROM
            dual
    )       AS "data"
FROM
    dual;
DECLARE
    l_return CLOB;
BEGIN
    l_return := q'[
    SELECT
    'file1' AS "filename",
    CURSOR (
        SELECT
            CURSOR (
                SELECT
                    'radio'         AS "type",
                    'List A'        AS "value",
                    'Radiolist'     AS "name",
                    'List Option A' AS "text",
                    1               AS "selected"
                FROM
                    dual
                UNION ALL
                SELECT
                    'radio'         AS "type",
                    'List B'        AS "value",
                    'Radiolist'     AS "name",
                    'List Option B' AS "text",
                    1               AS "selected"
                FROM
                    dual
            ) AS "radiolist"
        FROM
            dual
    )       AS "data"
FROM
    dual;
    ]';
    RETURN l_return;
END;
DECLARE
    l_cursor SYS_REFCURSOR;
    l_return CLOB; -- can also be varchar2, make sure it corresponds to the structure in the JSON
BEGIN
    apex_json.initialize_clob_output(dbms_lob.call, TRUE, 2);
    OPEN l_cursor FOR SELECT
                          'file1' AS "filename",
                          CURSOR (
                              SELECT
                                  CURSOR (
                                      SELECT
                                          'radio'         AS "type",
                                          'List A'        AS "value",
                                          'Radiolist'     AS "name",
                                          'List Option A' AS "text",
                                          1               AS "selected"
                                      FROM
                                          dual
                                      UNION ALL
                                      SELECT
                                          'radio'         AS "type",
                                          'List B'        AS "value",
                                          'Radiolist'     AS "name",
                                          'List Option B' AS "text",
                                          1               AS "selected"
                                      FROM
                                          dual
                                  ) AS "radiolist"
                              FROM
                                  dual
                          )       AS "data"
                      FROM
                          dual;

    apex_json.write(l_cursor);
    l_return := apex_json.get_clob_output;
    RETURN l_return;
END;
[
  {
    "filename": "file1",
    "data": [
      {
        "radiolist": [
          {
            "type": "radio",
            "value": "List A",
            "name": "Radiolist",
            "text": "List Option A",
            "selected": 1
          },
          {
            "type": "radio",
            "value": "List B",
            "name": "Radiolist",
            "text": "List Option B",
            "selected": 1
          }
        ]
      }
    ]
  }
]
and the template as following picture:

Result will look like this:

Referencing
This technique is used to create a single radio button element. The radio button element is referenced by the name of the radio button element. If multiple radio element are defined, they are not interconnected and will behave as an independent element.
- SQL
- PL/SQL returning SQL
- PL/SQL returning JSON
- JSON
SELECT
'pdf_form' AS "filename",
CURSOR ( SELECT
    CURSOR (
        SELECT
            CURSOR (
                SELECT
                    'radio'    AS "type",
                    'Radio'    AS "name",
                    'A'        AS "value",
                    'Option A' AS "text",
                    15         AS "height",
                    100        AS "width"
                FROM
                    dual
            ) AS "a",
            CURSOR (
                SELECT
                    'radio'    AS "type",
                    'Radio'    AS "name",
                    'B'        AS "value",
                    'Option B' AS "text",
                    15         AS "height",
                    100        AS "width"
                FROM
                    dual
            ) AS "b"
        FROM
            dual
    ) AS "radio",
FROM
dual
) AS "data" FROM dual;
declare
  l_return clob;
begin
  l_return := q'[
    SELECT
    'pdf_form' AS "filename",
    CURSOR ( SELECT
        CURSOR (
            SELECT
                CURSOR (
                    SELECT
                        'radio'    AS "type",
                        'Radio'    AS "name",
                        'A'        AS "value",
                        'Option A' AS "text",
                        15         AS "height",
                        100        AS "width"
                    FROM
                        dual
                ) AS "a",
                CURSOR (
                    SELECT
                        'radio'    AS "type",
                        'Radio'    AS "name",
                        'B'        AS "value",
                        'Option B' AS "text",
                        15         AS "height",
                        100        AS "width"
                    FROM
                        dual
                ) AS "b"
            FROM
                dual
        ) AS "radio",
    FROM
    dual
    ) AS "data" FROM dual;
    ]';
  return l_return;
end;
declare
  l_cursor sys_refcursor;
  l_return clob; -- can also be varchar2, make sure it corresponds to the structure in the JSON
begin
  apex_json.initialize_clob_output(dbms_lob.call, true, 2);
  open l_cursor for
    SELECT
    'pdf_form' AS "filename",
    CURSOR ( SELECT
        CURSOR (
            SELECT
                CURSOR (
                    SELECT
                        'radio'    AS "type",
                        'Radio'    AS "name",
                        'A'        AS "value",
                        'Option A' AS "text",
                        15         AS "height",
                        100        AS "width"
                    FROM
                        dual
                ) AS "a",
                CURSOR (
                    SELECT
                        'radio'    AS "type",
                        'Radio'    AS "name",
                        'B'        AS "value",
                        'Option B' AS "text",
                        15         AS "height",
                        100        AS "width"
                    FROM
                        dual
                ) AS "b"
            FROM
                dual
        ) AS "radio",
    FROM
    dual
    ) AS "data" FROM dual;

  apex_json.write(l_cursor);
  l_return := apex_json.get_clob_output;
  return l_return;
end;
[
  {
    "filename": "pdf_form",
    "data": [
      {
        "radio":
          [{
            "a": [
              {
                "type": "radio",
                "name": "Radio",
                "value": "A",
                "text": "Option A",
                "height": 15,
                "width": 100
              }
            ],
            "b": [
              {
                "type": "radio",
                "name": "Radio",
                "value": "B",
                "text": "Option B",
                "height": 15,
                "width": 100
              }
            ]
          }]

      }
    ]
  }
]
and template :
    {?form radio[0].a}
    {?form radio[0].b}
Result will look like this:

Checkboxes
The checkbox format generates a from woth checkboxes. It has several other options such as :
- type (required)
- name (required)
- heigth (optional)
- width (optional)
- value (optional)
- text (optional)
In this case, the value field can only accept a boolean value, which sets the default state of the checkbox as either checked or unchecked.
Given the data below:
- SQL
- PL/SQL returning SQL
- PL/SQL returning JSON
- JSON
SELECT
    'file1' AS "filename",
    CURSOR (
        SELECT
            CURSOR (
                SELECT
                    'checkbox'  AS "type",
                    1           AS "value",
                    'Checkbox'  AS "name",
                    'IsChecked' AS "text",
                    20          AS "height",
                    200         AS "width"
                FROM
                    dual
            ) AS "checkbox"
        FROM
            dual
    )       AS "data"
FROM
    dual;
DECLARE
    l_return CLOB;
BEGIN
    l_return := q'[
    SELECT
    'file1' AS "filename",
    CURSOR (
        SELECT
            CURSOR (
                SELECT
                    'checkbox'  AS "type",
                    1           AS "value",
                    'Checkbox'  AS "name",
                    'IsChecked' AS "text",
                    20          AS "height",
                    200         AS "width"
                FROM
                    dual
            ) AS "checkbox"
        FROM
            dual
    )       AS "data"
FROM
    dual;
    ]';
    RETURN l_return;
END;
DECLARE
    l_cursor SYS_REFCURSOR;
    l_return CLOB; -- can also be varchar2, make sure it corresponds to the structure in the JSON
BEGIN
    apex_json.initialize_clob_output(dbms_lob.call, TRUE, 2);
    OPEN l_cursor FOR SELECT
                          'file1' AS "filename",
                          CURSOR (
                              SELECT
                                  CURSOR (
                                      SELECT
                                          'checkbox'  AS "type",
                                          1           AS "value",
                                          'Checkbox'  AS "name",
                                          'IsChecked' AS "text",
                                          20          AS "height",
                                          200         AS "width"
                                      FROM
                                          dual
                                  ) AS "checkbox"
                              FROM
                                  dual
                          )       AS "data"
                      FROM
                          dual;

    apex_json.write(l_cursor);
    l_return := apex_json.get_clob_output;
    RETURN l_return;
END;
[
  {
    "filename": "file1",
    "data": [
      {
        "checkbox": [
          {
            "type": "checkbox",
            "value": 1,
            "name": "Checkbox",
            "text": "IsChecked",
            "height": 20,
            "width": 200
          }
        ]
      }
    ]
  }
]
Template
{?form checkbox}
Output

Attach Tag
Available From: v22.2AOP offers a feature that allows the attachment of Word, Excel, PowerPoint, and PDF files within a Word document. To utilize the attach tag, you must include "?insert" followed by the column name and enclose them with delimiters like {?insert fileToInsert}. The column_name (in this case, fileToInsert) should return a base64 encoded string.
PDF and PowerPoint embedding will not work when the output file is opened in macOS. This is due to the limitation of Microsoft Office/ Libreoffice itself.
Example
Data Source
Here are the different options for example data sources, where templates in DOCX, PPTX, and XLSX formats are selected from the static application files.
- SQL
- PL/SQL returning SQL
- PL/SQL returning JSON
- JSON
select 'file1' as "filename",
      cursor (
        select (
          select apex_web_service.blob2clobbase64(file_content)
          from apex_application_static_files
          where application_id = :app_id
                and file_name = 'angular_expressions.docx'
          ) as "fileToInsert1",
          (
            select apex_web_service.blob2clobbase64(file_content)
            from apex_application_static_files
            where application_id = :app_id
                  and file_name = 'aop_classic_template.xlsx'
          ) as "fileToInsert2",
          (
            select apex_web_service.blob2clobbase64(file_content)
            from apex_application_static_files
            where application_id = :app_id
                  and file_name = 'aop_d3_template.pptx'
          ) as "fileToInsert3"
      )       as "data"
from dual
declare
  l_return clob;
begin
  l_return := q'[
    select 'file1' as "filename",
          cursor (
            select (
              select apex_web_service.blob2clobbase64(file_content)
              from apex_application_static_files
              where application_id = :app_id
                    and file_name = 'angular_expressions.docx'
              ) as "fileToInsert1",
              (
                select apex_web_service.blob2clobbase64(file_content)
                from apex_application_static_files
                where application_id = :app_id
                      and file_name = 'aop_classic_template.xlsx'
              ) as "fileToInsert2",
              (
                select apex_web_service.blob2clobbase64(file_content)
                from apex_application_static_files
                where application_id = :app_id
                      and file_name = 'aop_d3_template.pptx'
              ) as "fileToInsert3"
          )       as "data"
    from dual
    ]';
  return l_return;
end;
declare
  l_cursor sys_refcursor;
  l_return clob; -- can also be varchar2, make sure it corresponds to the structure in the JSON
begin
  apex_json.initialize_clob_output(dbms_lob.call, true, 2);
  open l_cursor for
    select 'file1' as "filename",
          cursor (
            select (
              select apex_web_service.blob2clobbase64(file_content)
              from apex_application_static_files
              where application_id = :app_id
                    and file_name = 'angular_expressions.docx'
              ) as "fileToInsert1",
              (
                select apex_web_service.blob2clobbase64(file_content)
                from apex_application_static_files
                where application_id = :app_id
                      and file_name = 'aop_classic_template.xlsx'
              ) as "fileToInsert2",
              (
                select apex_web_service.blob2clobbase64(file_content)
                from apex_application_static_files
                where application_id = :app_id
                      and file_name = 'aop_d3_template.pptx'
              ) as "fileToInsert3"
          )       as "data"
    from dual

  apex_json.write(l_cursor);
  l_return := apex_json.get_clob_output;
  return l_return;
end;
[
    {
      "filename": "file1",
      "data": [
        {
          "fileToInsert1": " ... base64 encoded string of selected file ... ",
          "fileToInsert2": " ... base64 encoded string of selected file ... ",
          "fileToInsert3": " ... base64 encoded string of selected file ... "
        }
      ]
    }
  ]
Template
The templates contain three {?insert fileToInsert} tags, which will be replaced by their respective files returned by the data source.

Output
Upon processing the provided template and data source, the following output is obtained.
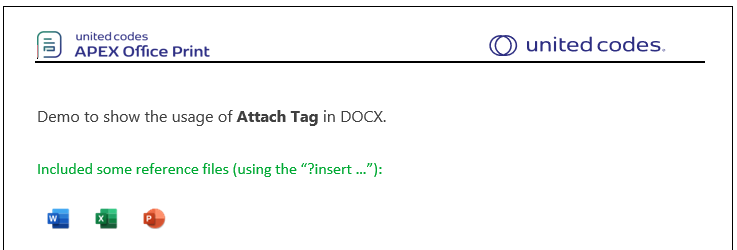
Embed Tag
Available From: v22.2AOP provides the ability to include the contents of another Word file using the Embed tag. To accomplish this, you need to include "?embed" followed by the column name, enclosed within delimiters like "{?embed fileToInsert}". The fileToInsert should contain either the Base64 encoded representation of the file or the path to the document (FTP, SFTP, or URL). Please note that only Word files can be embedded using this feature.
Example
Data Source
Here are the different options for example data sources, where base64encoded string of sample DOCX template is returned from the table aop_template table from Sample Application.
- SQL
- PL/SQL returning SQL
- PL/SQL returning JSON
- JSON
select 'file1' as "filename",
       cursor (
         select (
           select apex_web_service.blob2clobbase64(template_blob)
           from aop_template
           where id = 1
         ) as "fileToEmbed"
       )       as "data"
from dual
declare
  l_return clob;
begin
  l_return := q'[
    select 'file1' as "filename",
           cursor (
             select (
               select apex_web_service.blob2clobbase64(template_blob)
               from aop_template
               where id = 1
             ) as "fileToEmbed"
           )       as "data"
    from dual
    ]';
  return l_return;
end;
declare
  l_cursor sys_refcursor;
  l_return clob; -- can also be varchar2, make sure it corresponds to the structure in the JSON
begin
  apex_json.initialize_clob_output(dbms_lob.call, true, 2);
  open l_cursor for
    select 'file1' as "filename",
           cursor (
             select (
               select apex_web_service.blob2clobbase64(template_blob)
               from aop_template
               where id = 1
             ) as "fileToEmbed"
           )       as "data"
    from dual

  apex_json.write(l_cursor);
  l_return := apex_json.get_clob_output;
  return l_return;
end;
[
  {
    "filename": "file1",
    "data": [
      {
        "fileToEmbed": " ... base64encoded file ..."
      }
    ]
  }
]
Template
The templates contains the {?embed fieToInsert} which will be replaced by the contents of the file returned from the column fileToEmbed.
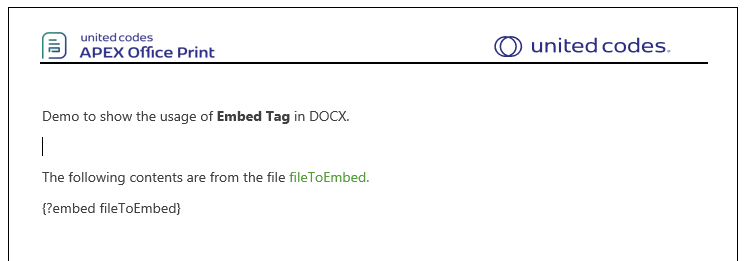
Output
Upon processing the provided template and data source, the following output is obtained.

Word Subtemplating
Available From: v18.1AOP allows the reference of other templates within the Word template. The referenced templates is known as a sub-template. The goal of sub-templates is to make it easier for you to reuse common templates in different files. To reference a sub-template in the Word template, you use the syntax ?include followed by the filename, like {?include Subtemplate}.
To include the sub-template(s), you need to set the g_sub_templates_sql variable. In the Init PL/SQL section add for example:
aop_api_pkg.g_sub_templates_sql := q'[select filename, mime_type, template_blob as file_blob from aop_template where filename like 'SUB-TEMPLATE' order by filename]';
This tag can be used inside loops, and tags inside the subtemplate will also be replaced.
For example:
{#products}
Product {name}
    {?include Subtemplate1}

{/products}
Should the subtemplate just consist of the content Amount: {amount}, then this could be an example result:
Product Product1
    Amount: 5

Product Product2
    Amount: 36
From AOPv22.1.4, It is possible to include a subtemplate from another subtemplate.
For example: If there are two subtemplates with the name Subtemplate1 and Subtemplate2, then tag {?include Subtemplate2} can be used in the template Subtemplate1 to include the content of Subtemplate2 or vice versa.
Note: Maximum circular references is limited to 10.
This tag is currently only available inside Word templates, and the subtemplates can currently only be Word documents (templates) too.
Example
Data Source
Hereby examples of data source for different options.
- SQL
- PL/SQL returning SQL
- PL/SQL returning JSON
- JSON
select
    'file1' as "filename",
    cursor
    (select
         'John' as "firstname",
         'Doe' as "lastname",
          'https://d2x5ku95bkycr3.cloudfront.net/App_Themes/Common/images/profile/0_200.png' as "image",
          200 as "image_height",
          200 as "image_width",
          "yes" as "includeConditionalTemplate"
         from dual
    ) as "data"
from dual
declare
  l_return clob;
begin
  l_return := q'[
    select
        'file1' as "filename",
        cursor
        (select
             'John' as "firstname",
             'Doe' as "lastname",
              'https://d2x5ku95bkycr3.cloudfront.net/App_Themes/Common/images/profile/0_200.png' as "image",
              200 as "image_height",
              200 as "image_width",
              "yes" as "includeConditionalTemplate"
             from dual
        ) as "data"
    from dual
    ]';
  return l_return;
end;
declare
  l_cursor sys_refcursor;
  l_return clob; -- can also be varchar2, make sure it corresponds to the structure in the JSON
begin
  apex_json.initialize_clob_output(dbms_lob.call, true, 2);
  open l_cursor for
    select
        'file1' as "filename",
        cursor
        (select
             'John' as "firstname",
             'Doe' as "lastname",
              'https://d2x5ku95bkycr3.cloudfront.net/App_Themes/Common/images/profile/0_200.png' as "image",
              200 as "image_height",
              200 as "image_width",
              "yes" as "includeConditionalTemplate"
             from dual
        ) as "data"
    from dual

  apex_json.write(l_cursor);
  l_return := apex_json.get_clob_output;
  return l_return;
end;
[
    {
        "filename": "file1",
        "data": [
            {
                "firstname": "John",
                "lastname": "Doe",
                "image": "https://d2x5ku95bkycr3.cloudfront.net/App_Themes/Common/images/profile/0_200.png",
                "image_height": 200,
                "image_width": 200,
                "includeConditionalTemplate": "yes"
            }
        ]
    }
]
Init PL/SQL for the subtemplate files.
- Init PL/SQL
- JSON
aop_api_pkg.g_sub_templates_sql := q'[select filename, mime_type, blob_content as file_blob from apex_application_files where filename in ('subtemplate1.docx','subtemplate_conditional.docx') order by filename]';
"templates": [
  {
      "name": "subtemplate_conditional.docx",
      "mime_type": "application/vnd.openxmlformats-officedocument.wordprocessingml.document",
      "file_content": "...base64encoded for the subtemplate_conditional.docx ...",
      "file_source": "base64"
  },
  {
      "name": "subtemplate1.docx",
      "mime_type": "application/vnd.openxmlformats-officedocument.wordprocessingml.document",
      "file_content": "... base64encoded for the subtemplate1.docx ...",
      "file_source": "base64"
  }
]
Template
The template and the subtemplate files are as shown below:
Template
It contains the tags to include the subtemplate1{?include subtemplate1}and the conditional subtemplate{?include subtemplate_conditional}.
The subtemplate1 is always rendered in the output whereas the contents of subtemplate_conditional is only rendered if the condition {#includeConditionalTemplate=='yes'} is true.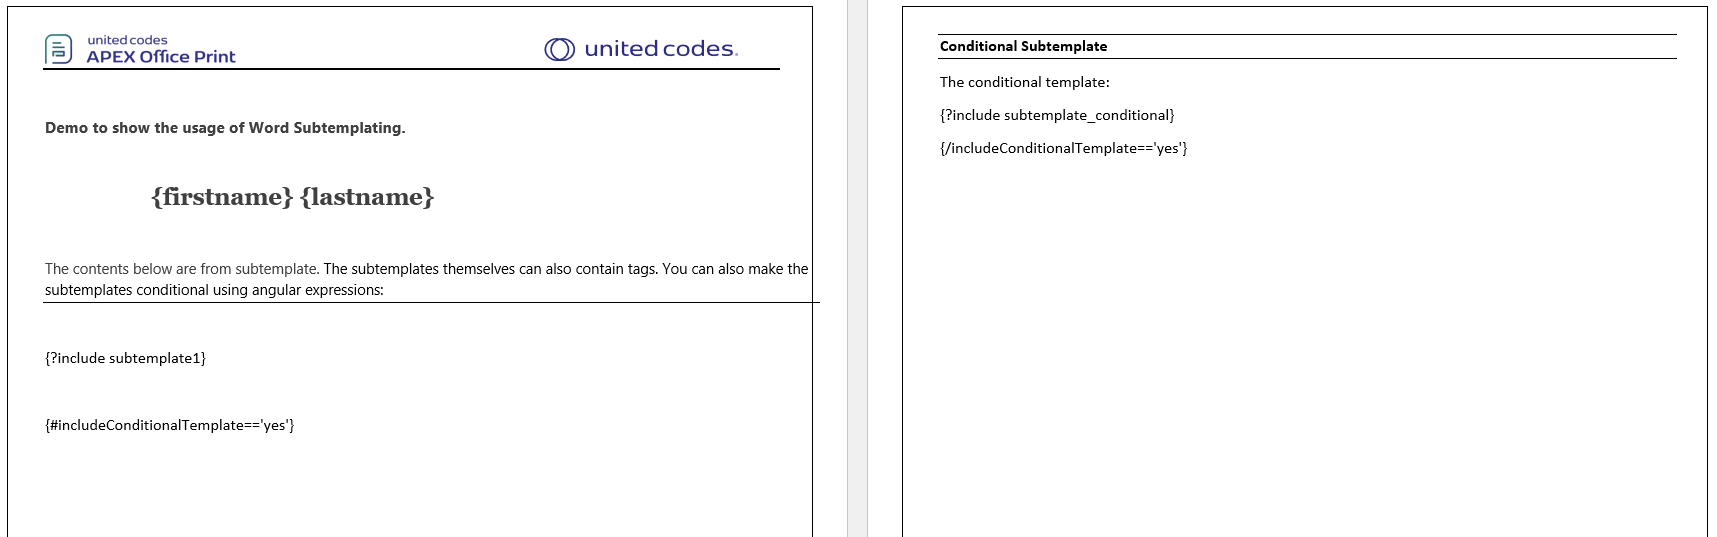 template.docx
 Subtemplate1
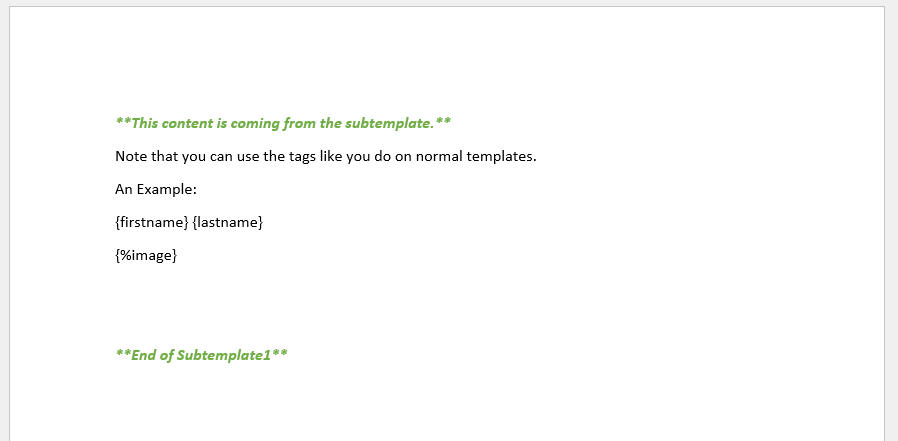 subtemplate1.docx
 subtemplate_conditional
 subtemplate_conditional.docx
Output
Upon processing the given data source, template and subtemplate files, Following output is obtained. For conditional subtemplate, the conditional statement includeConditionalTemplate=='yes' is true. Thus, the output also contains the contents of subtemplate_conditional.docx .
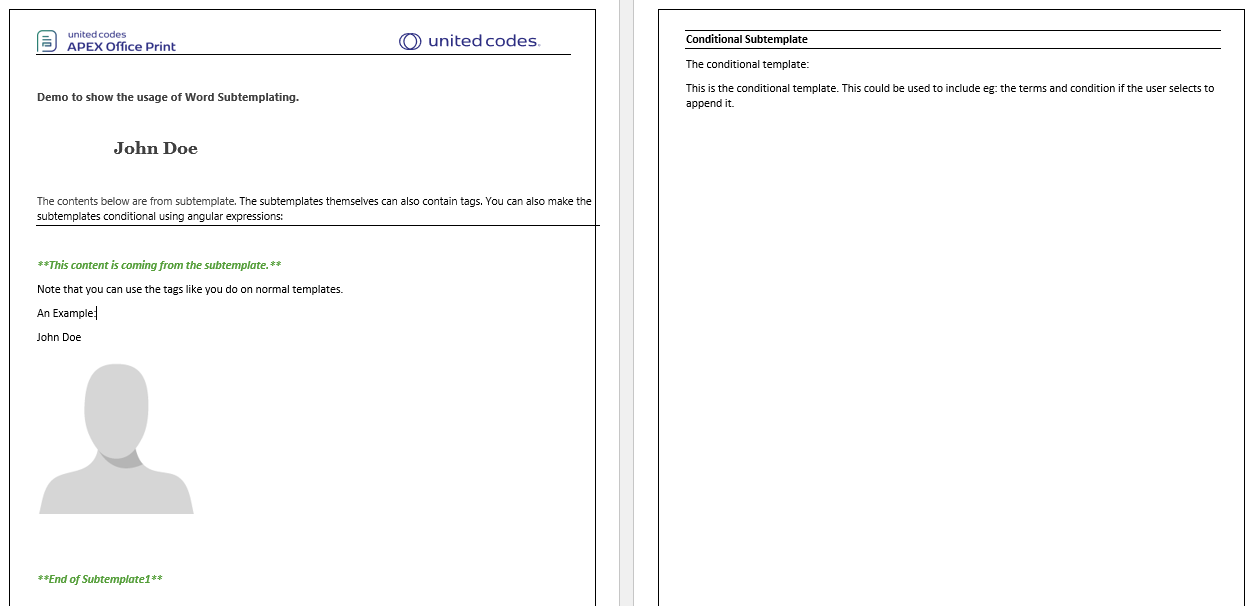
Interactive Report
AOP is capable of handling exported data from interactive reports, and users can obtain an interactive report by using the {&interactive} tag within a specific template. This tag will be replaced with the chosen interactive report in APEX.
Please visit Interactive Report of apex feature for detailed information.
Interactive Grid
Using the interactive grid tag {&...&}, user can get the exported IG in the designated template. The tag consist of interactive grid static id, with & on both sides enclosed by the delimiters.
Like the Interactive reports, it also supports Highlights, Filters, Aggregates, Break, Charts and many more. For more detail on its uses, please refer to AOP Sample Application > APEX Features > Interactive Grid.
Please visit Interactive Grid of apex feature for detailed information.
Classic Report
AOP also supports the data exported of classic reports. The tag is similar to interactive grid tag where static id, with & on both sides enclosed by the delimiters like {&crStaticID&}. Upon processing, the tag is replaced by the data from the classic report.
Please visit Classic Grid of apex feature for detailed information.